How to start Exness Trading in 2026: A Step-by-Step Guide for Beginners
This guide provides a comprehensive step-by-step approach to help new traders get started with Exness, covering everything from account setup to executing your first trade. Follow these steps to build a solid foundation for your trading activities and embark on your path to success.
How to Sign up for Exness
How to Sign up Exness Account on the Web app
How to Sign up for an account
1. Visit the Exness homepage and click "Open account".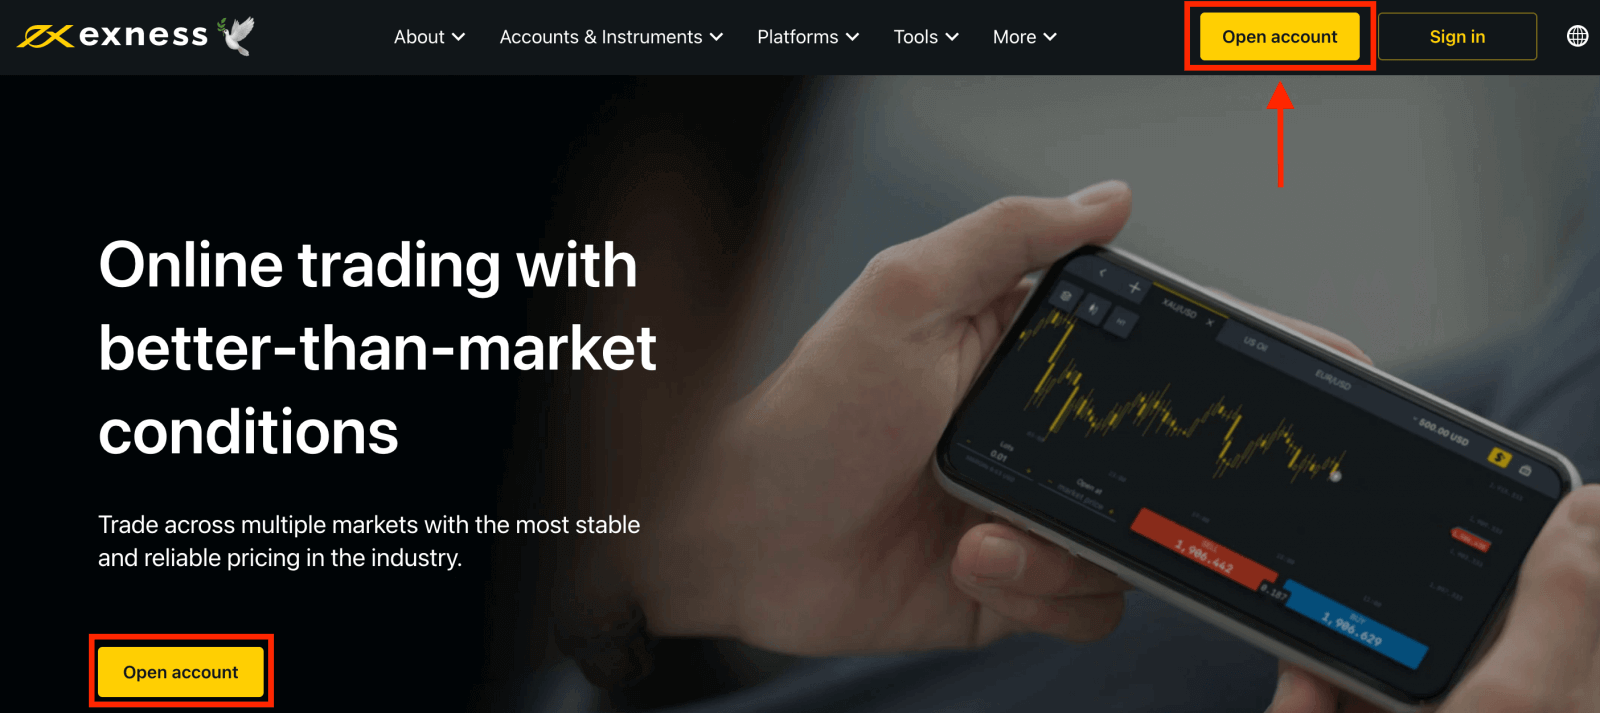
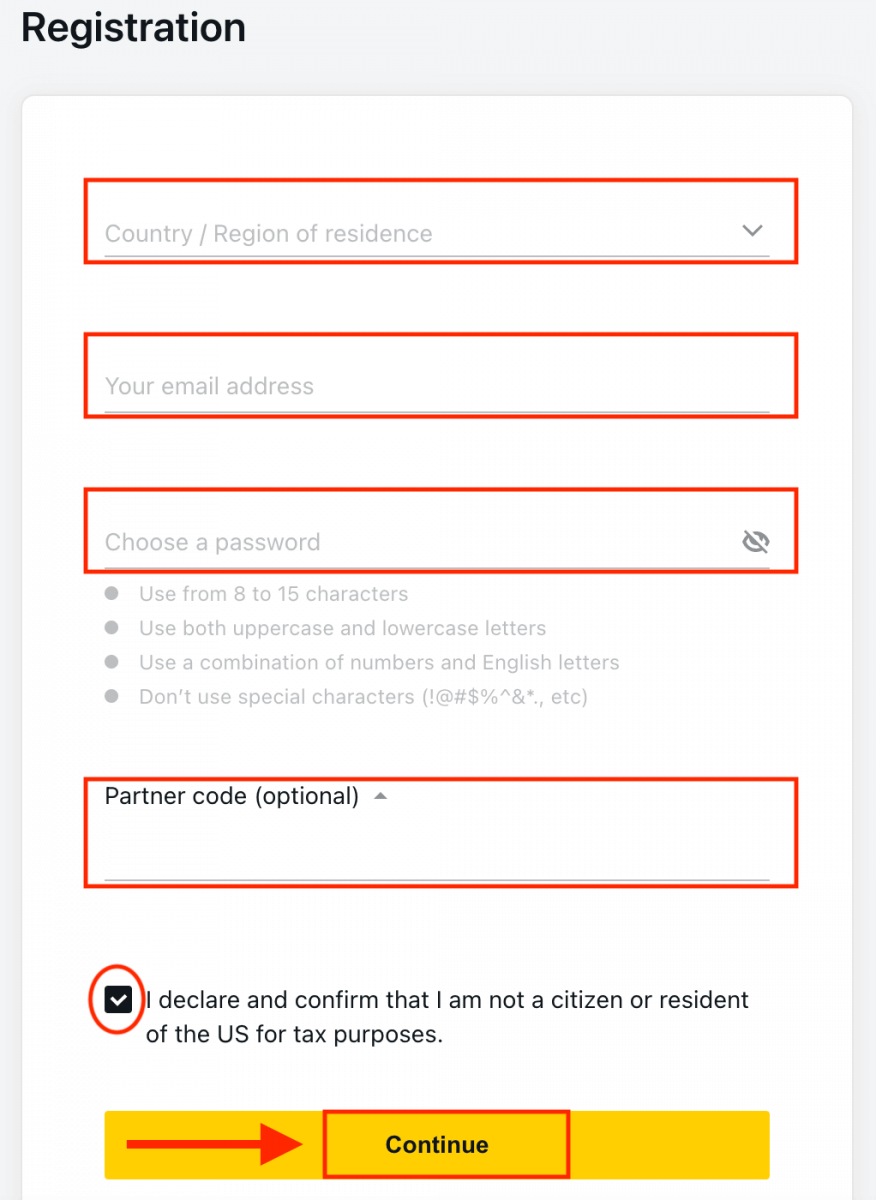
2. At the registration page:
- Select your country of residence; this cannot be changed and will dictate which payment services are available to you.
- Enter your email address.
- Create a password for your Exness account following the guidelines shown.
- Enter a partner code (optional), which will link your Exness account to a partner in the Exness Partnership program.
- Note: in the case of an invalid partner code, this entry field will be cleared so that you can try again.
- Tick the box declaring you are not a citizen or resident of the US if this applies to you.
- Click Continue once you have provided all the required information.
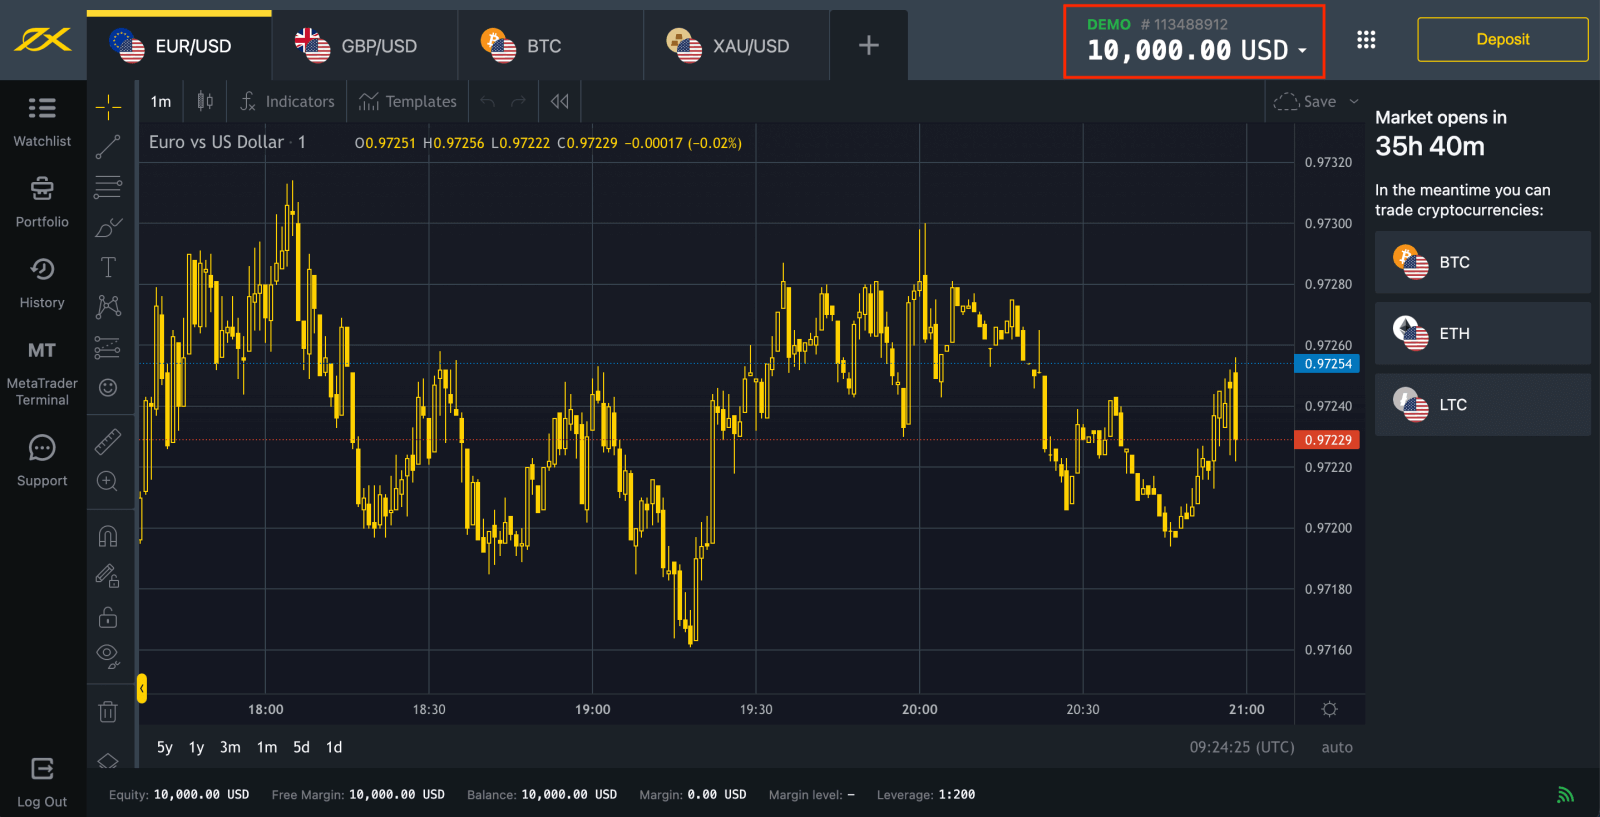
3. Congratulations, you have successfully registered a new Exness Account and will be taken to Exness Terminal. Click "Demo Account" button to trade with the Demo account.
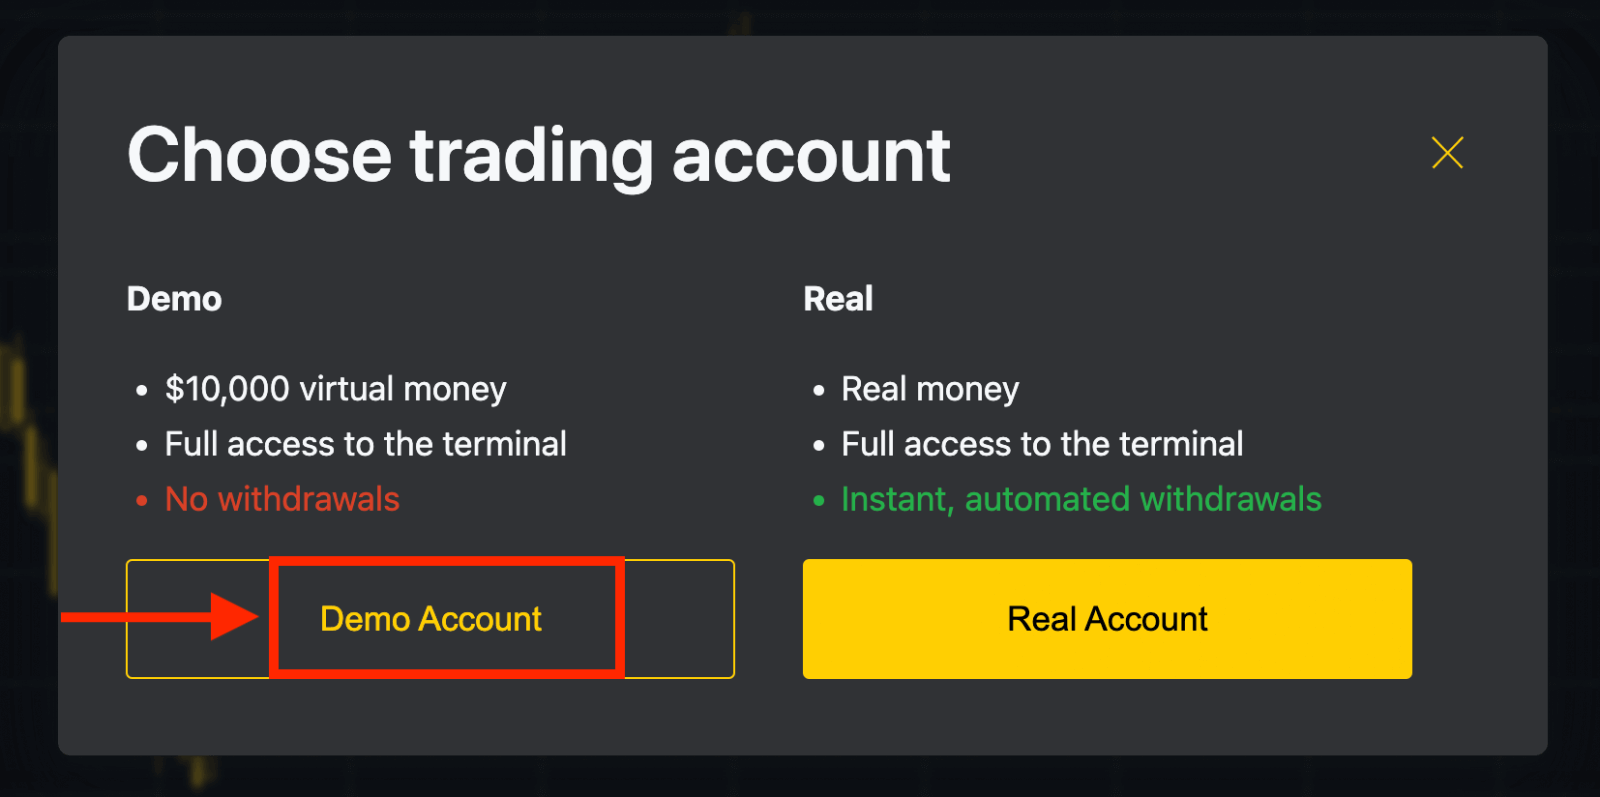
Now you don’t need any registration to open a demo account. $10,000 in a Demo account allows you to practice as much as you need for free.
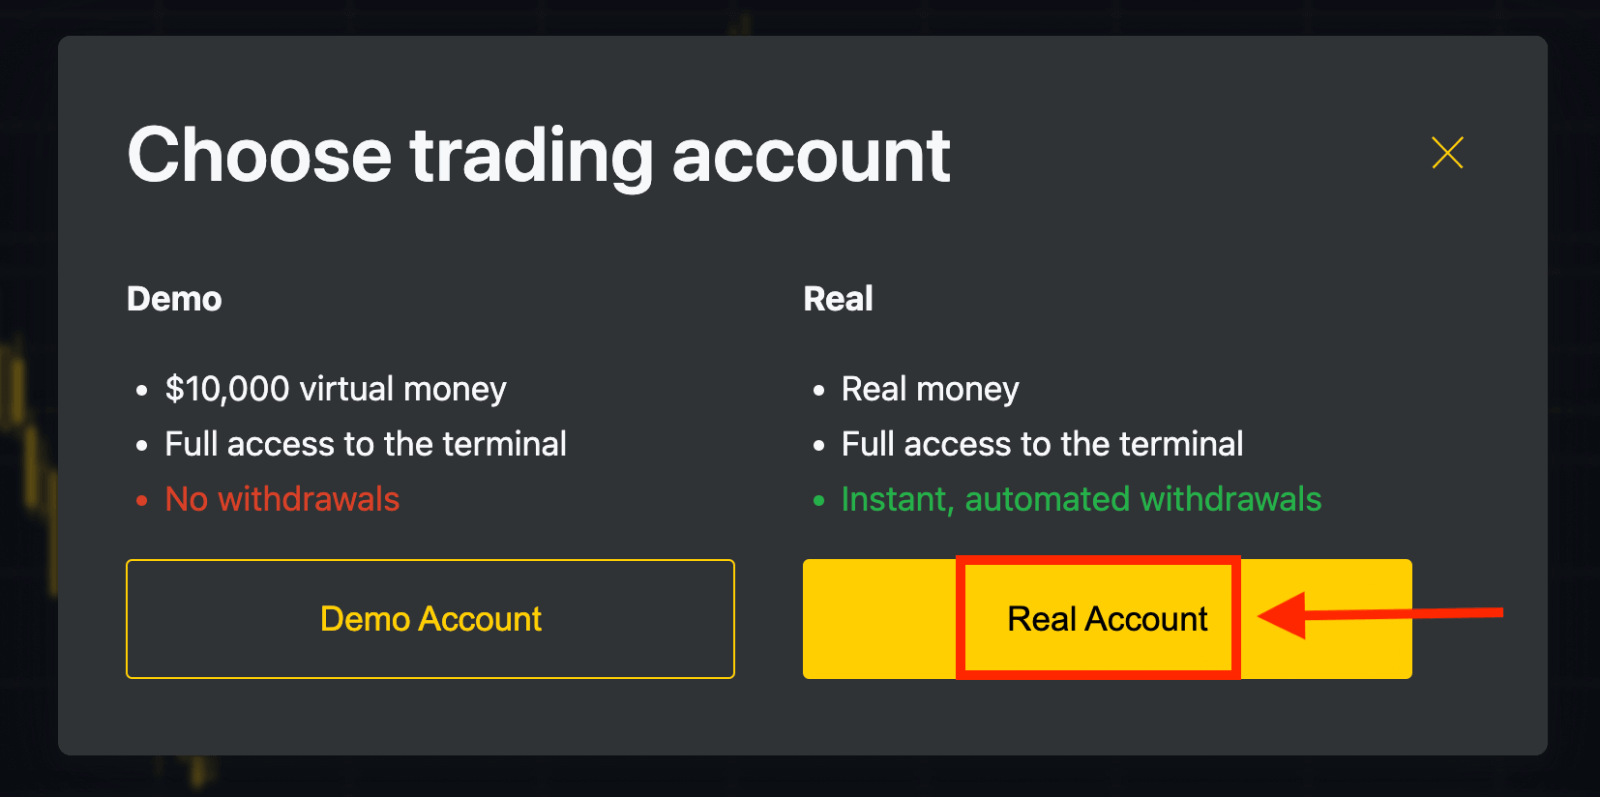
You can also trade on a Real account after depositing. Click the "Real Account" yellow button to trade with a real account.
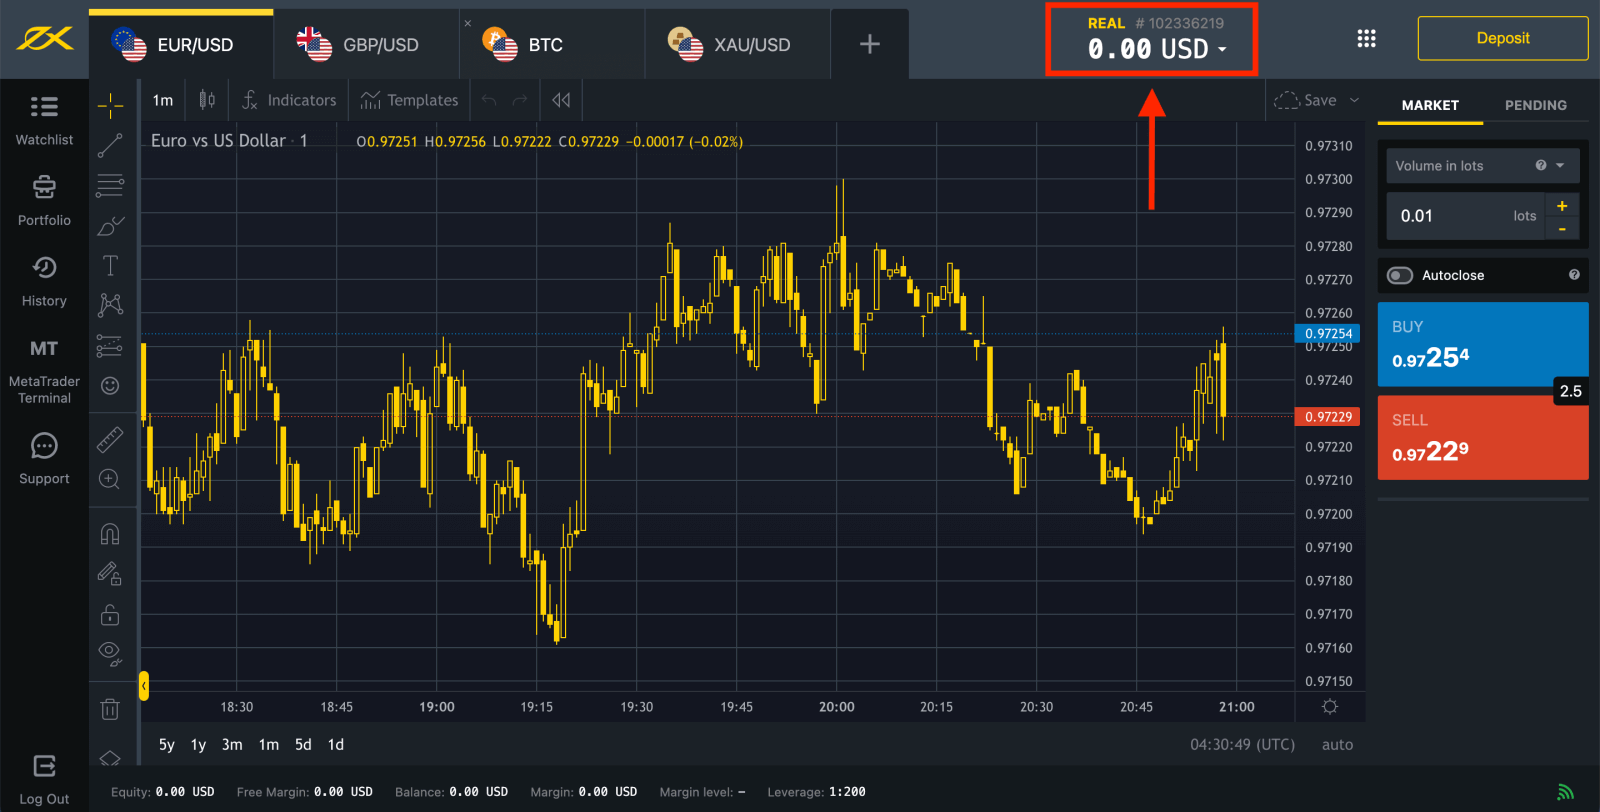
Go to Personal Area to open more trading accounts.
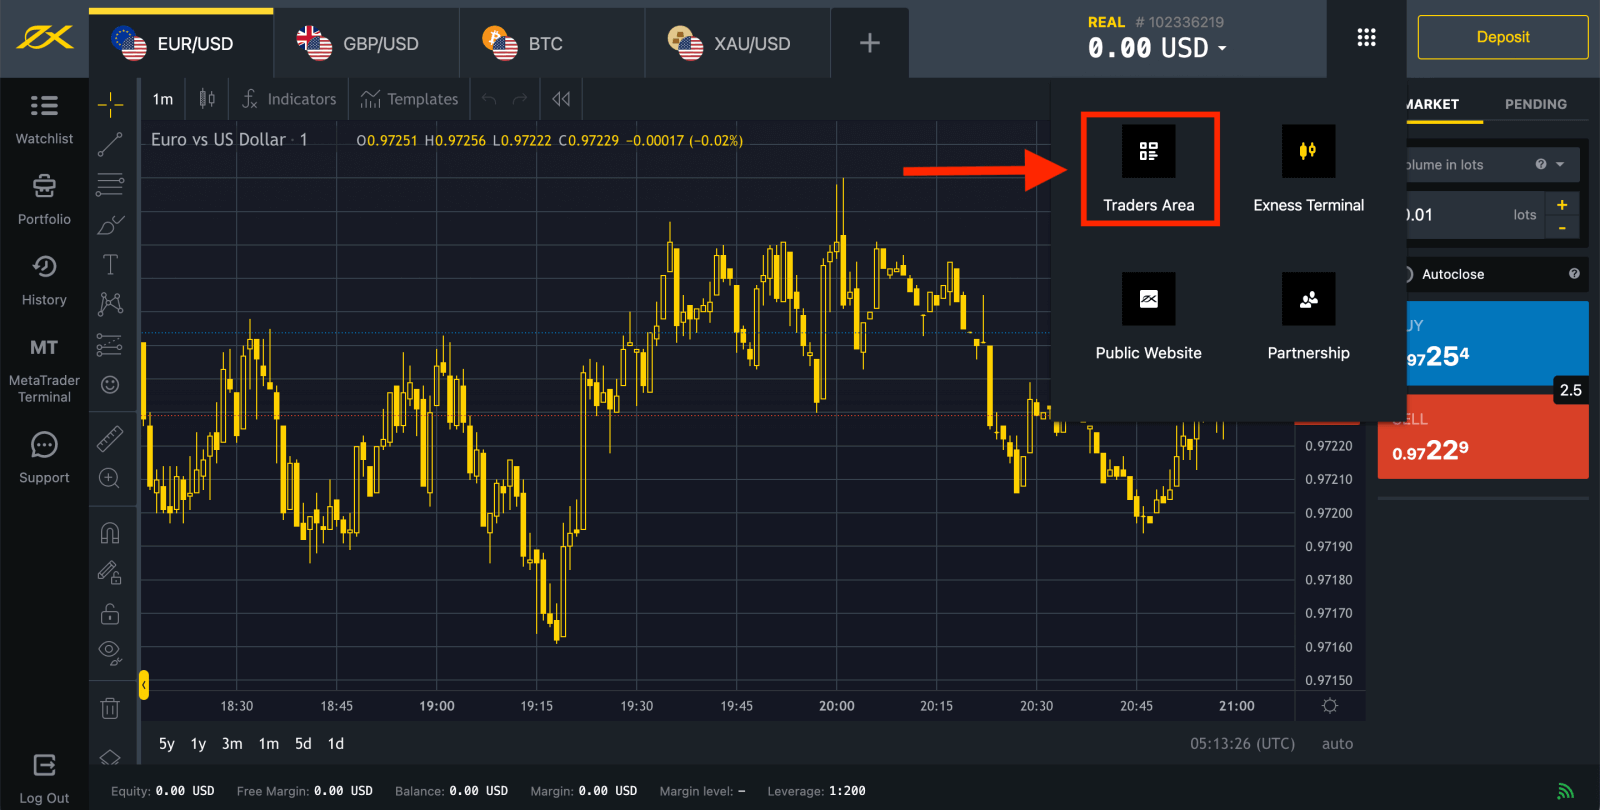
By default, a real trading account and a demo trading account (both for MT5) are created in your new Personal Area; but it is possible to open new trading accounts.
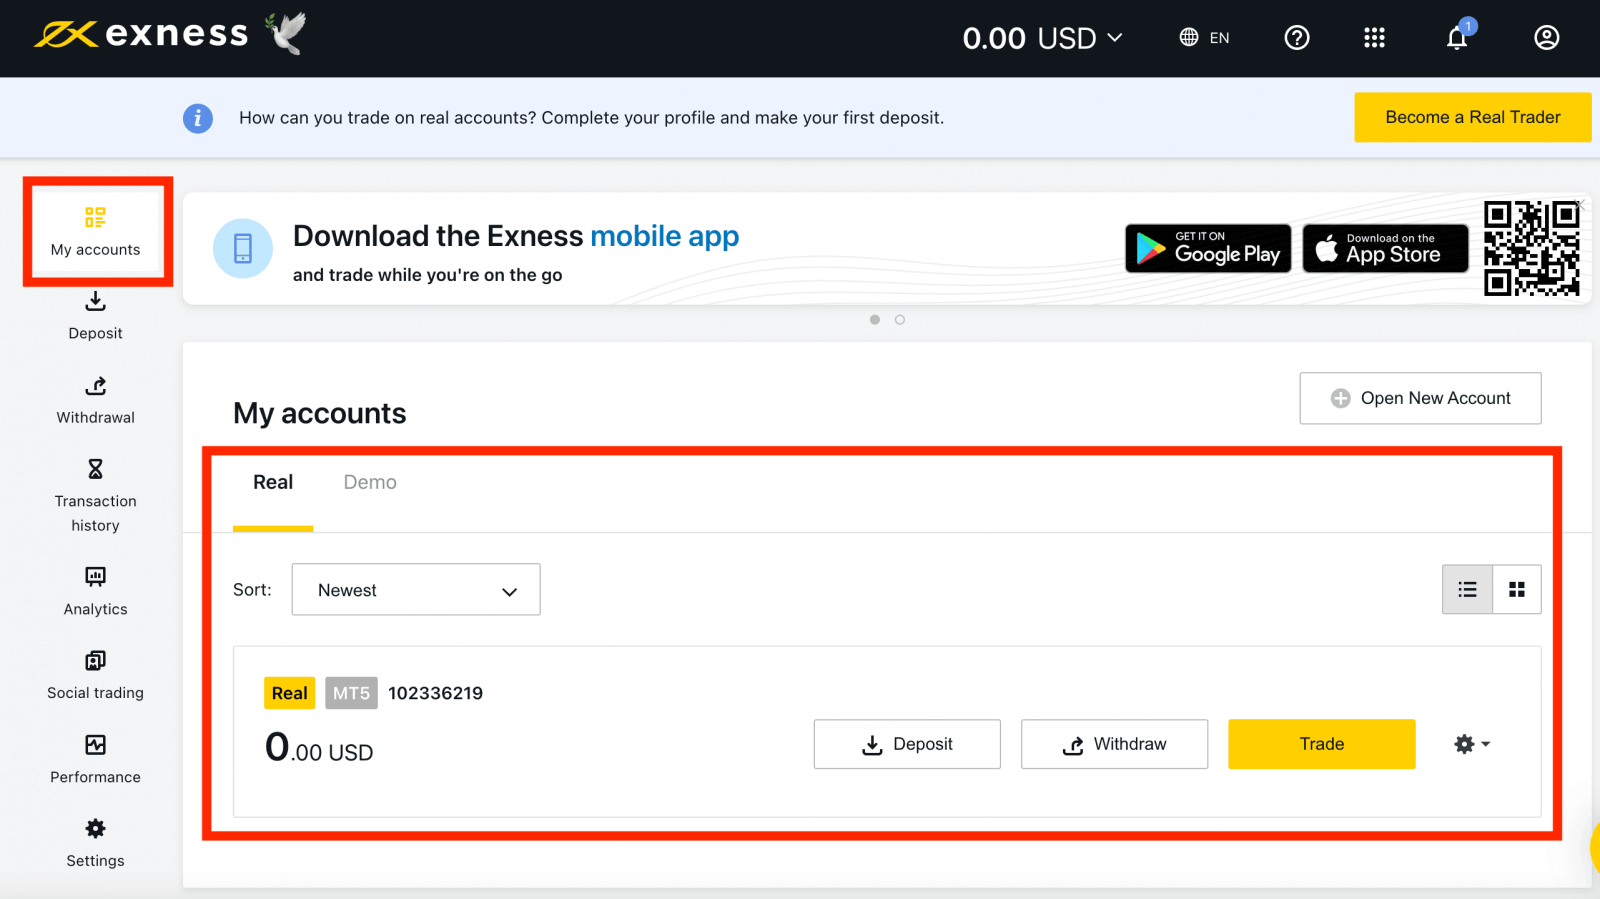
Registering with Exness can be done at any time, even right now!
Once you have registered, it is advised that you fully verify your Exness account to gain access to every feature available only to fully verified Personal Areas.
How to create a new trading account
Here’s how:
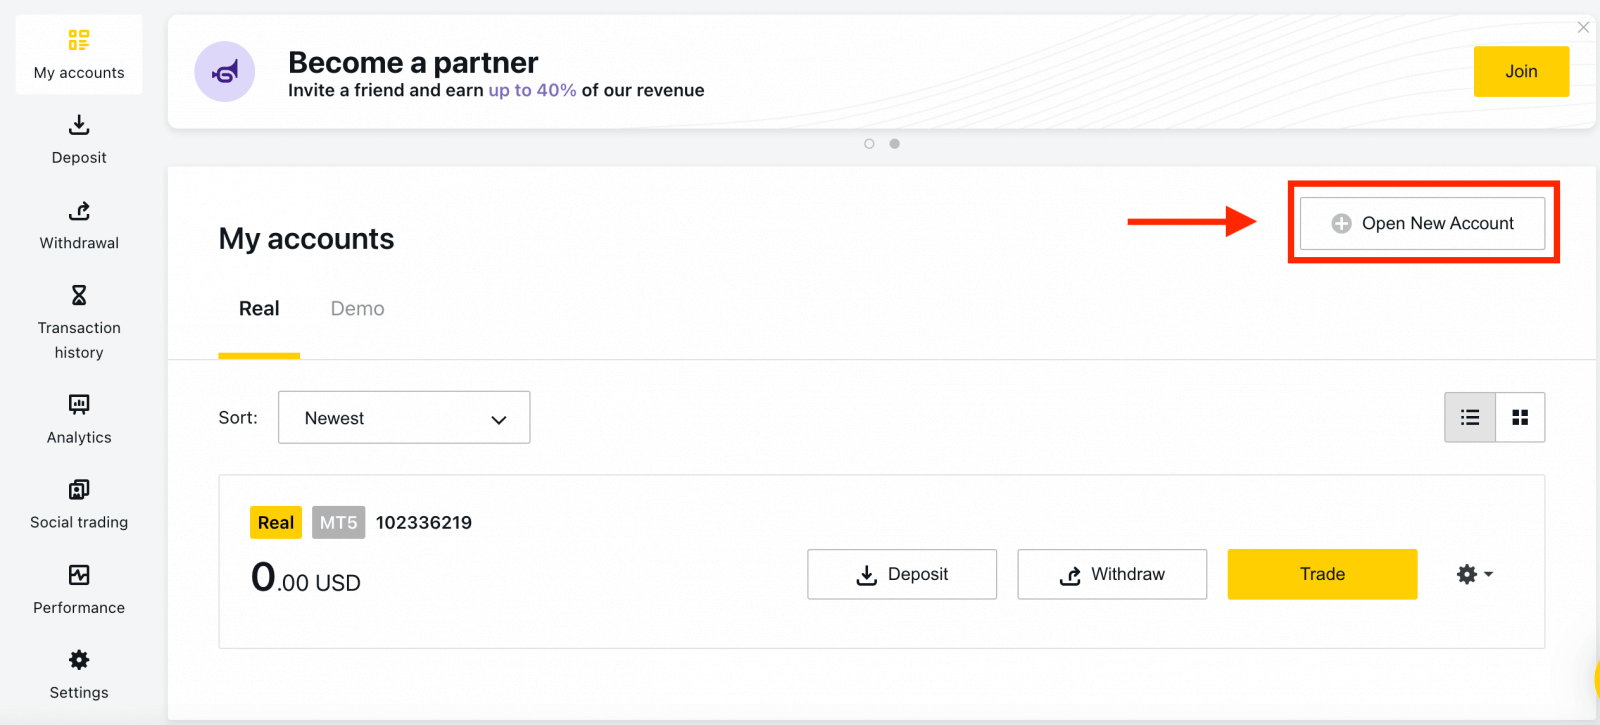
1. From your new Personal Area, click Open New Account in the ‘My Accounts’ area.
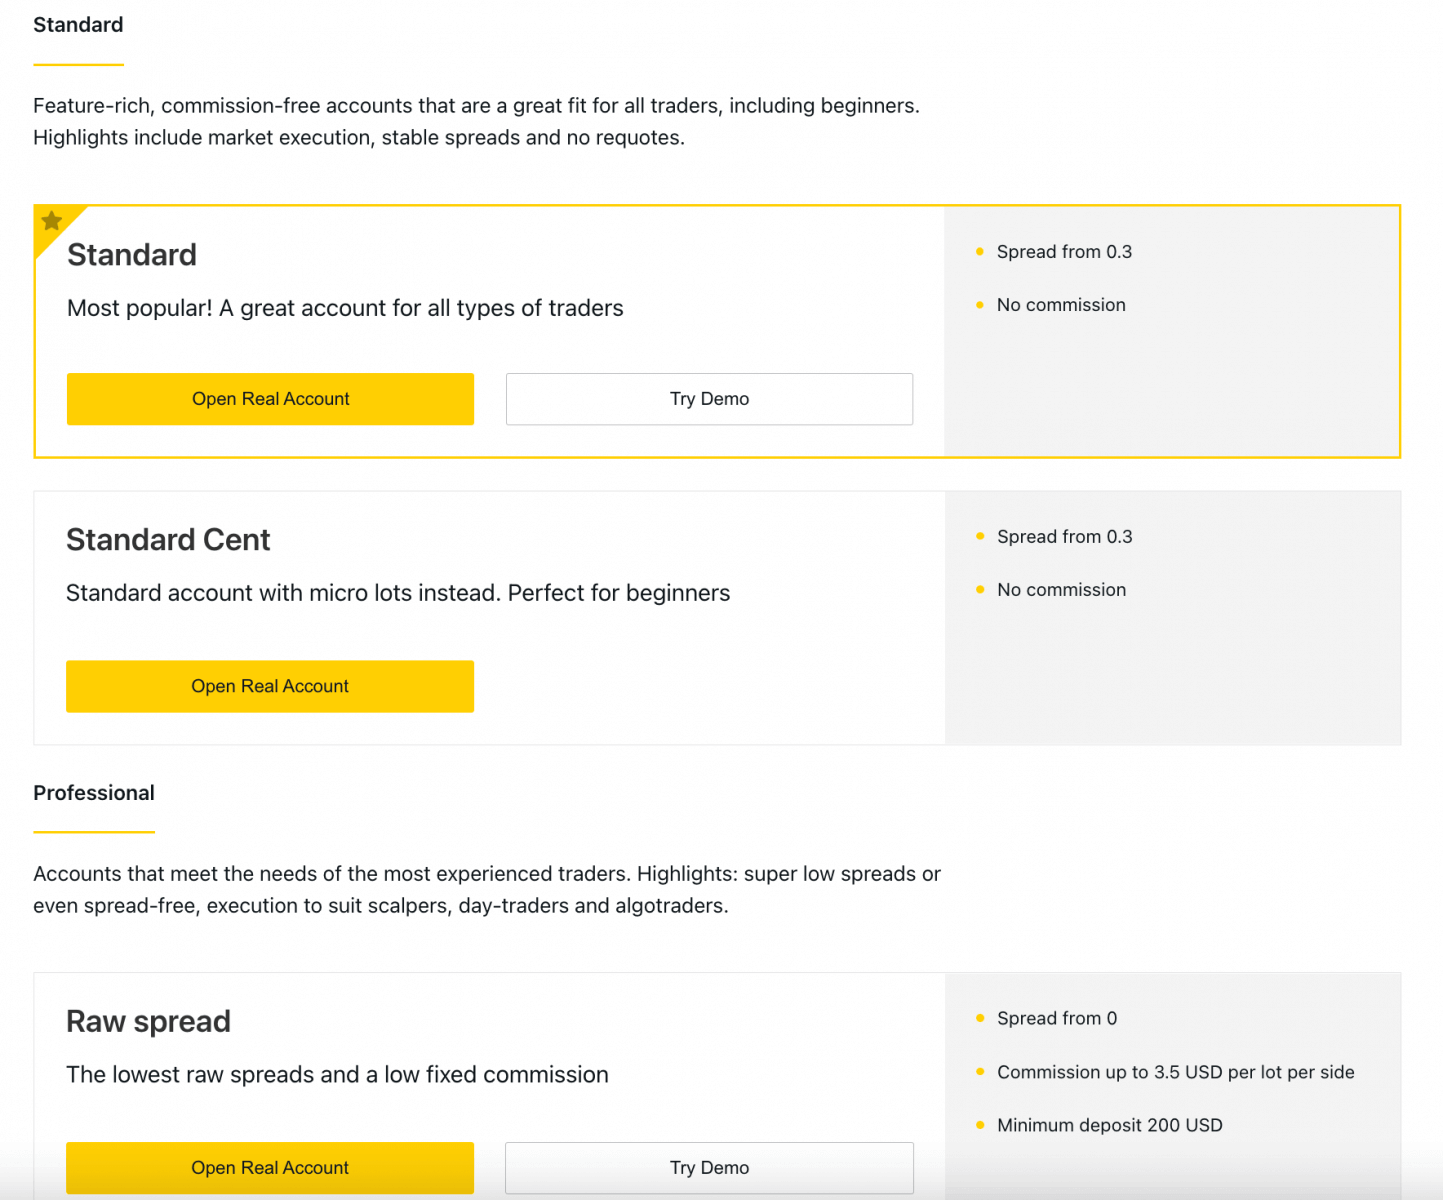
2. Choose from the available trading account types, and whether you prefer a real or demo account.
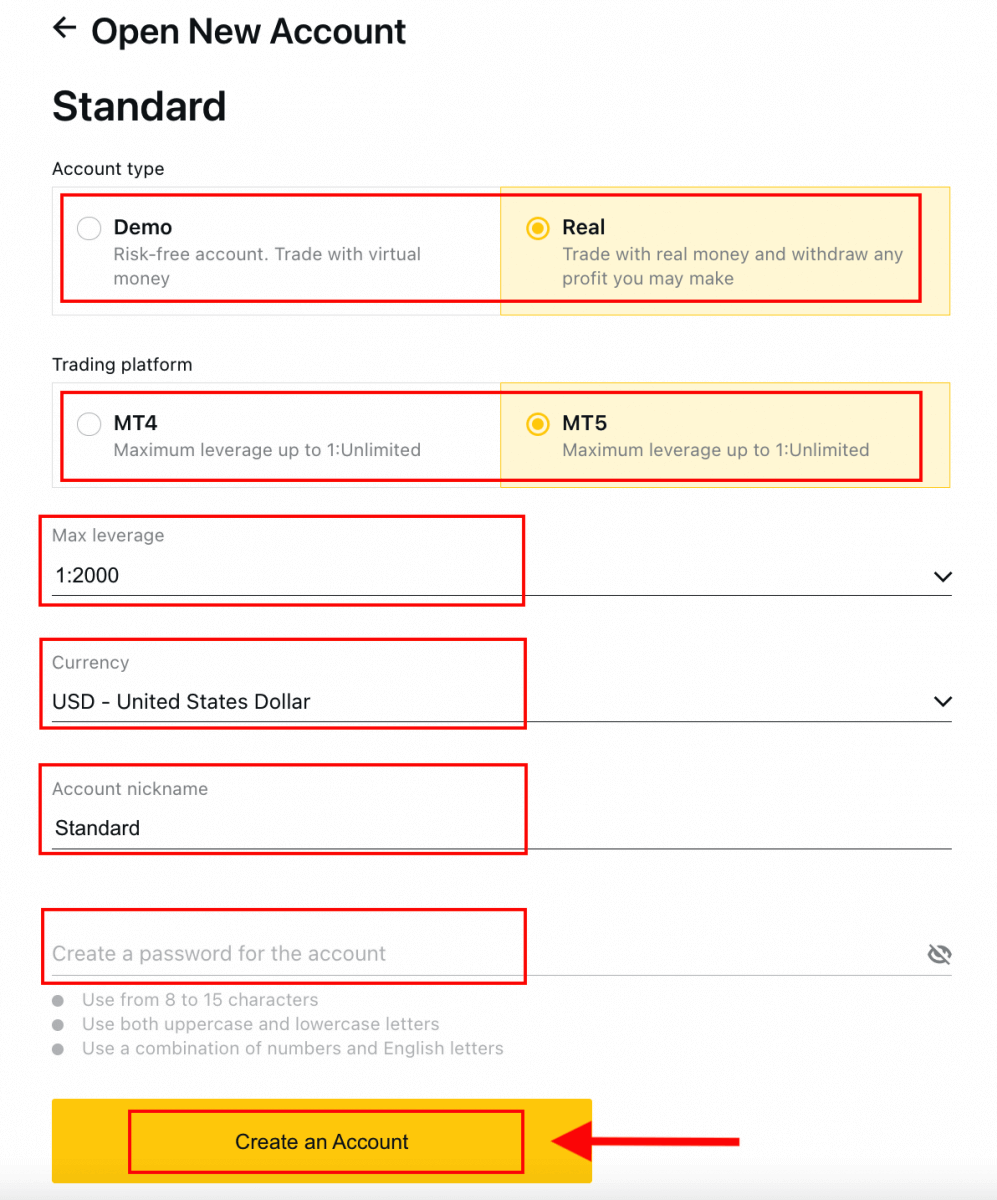
3. The next screen presents the following settings:
- Another chance to select a Real or Demo account.
- A choice between MT4 and MT5 trading terminals.
- Set your Max Leverage.
- Choose your account currency (note that this cannot be changed for this trading account once set).
- Create a nickname for this trading account.
- Set a trading account password.
- Click Create an Account once you are satisfied with your settings.
4. Your new trading account will show up in the ‘My Accounts’ tab.
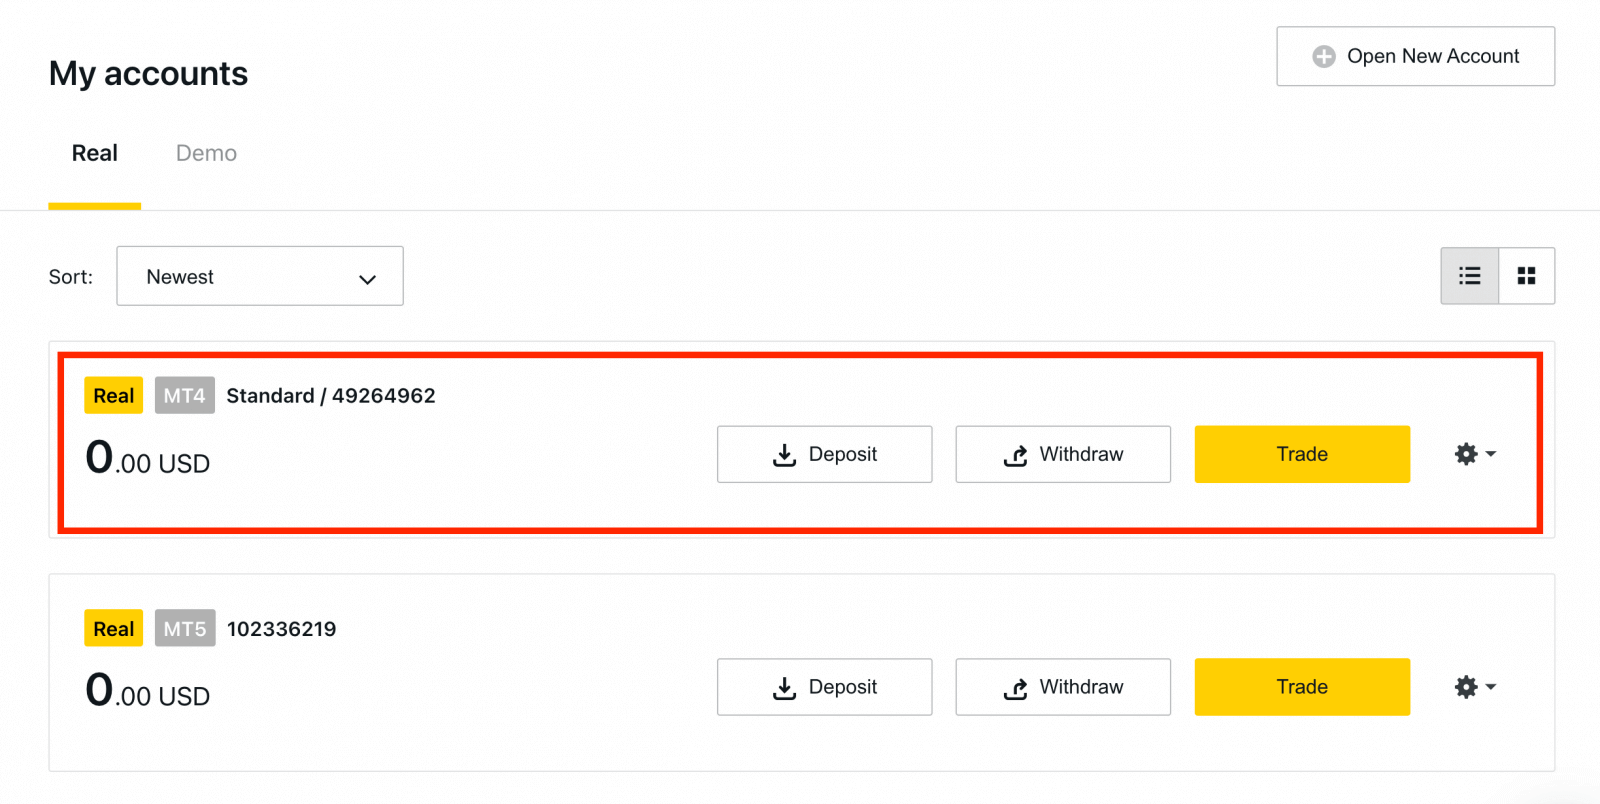
Congratulations, you’ve opened a new trading account.
How to Deposit in Exness
How to Sign up Exness Account on the Exness Trader app
Set up and Sign up for an account
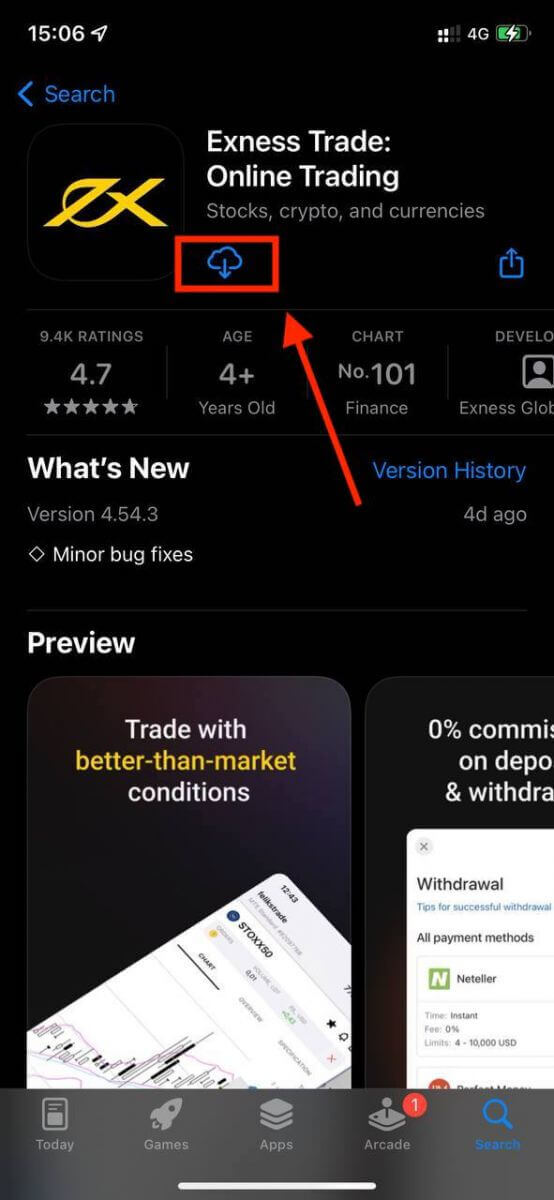
1. Download Exness Trader from the App Store or Google Play.2. Install and load Exness Trader.
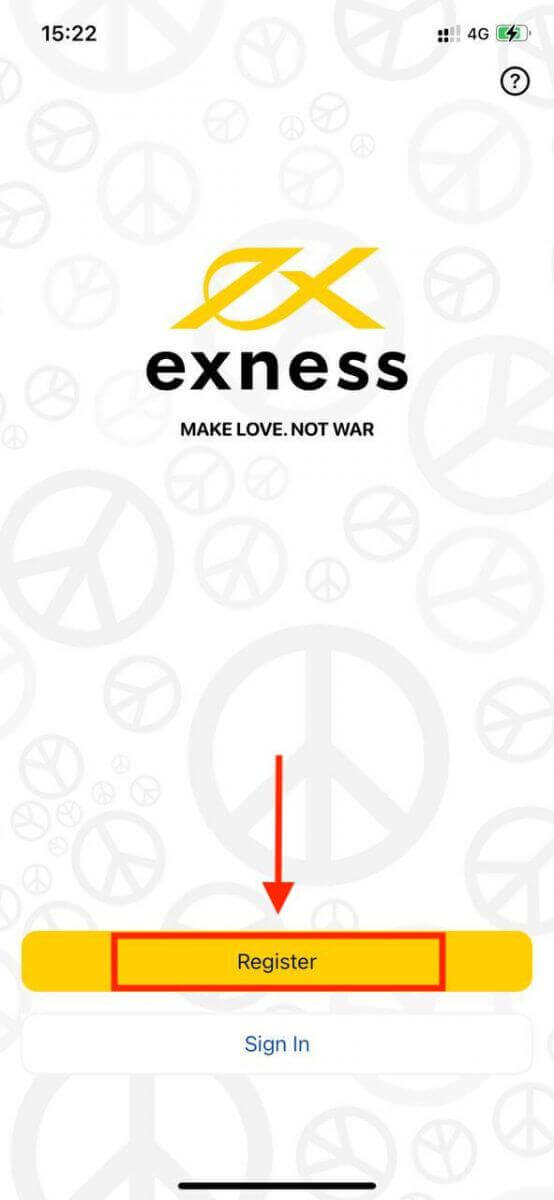
3. Select Register.
4. Tap Change Country/Region to select your country of residence from the list, then tap Continue.
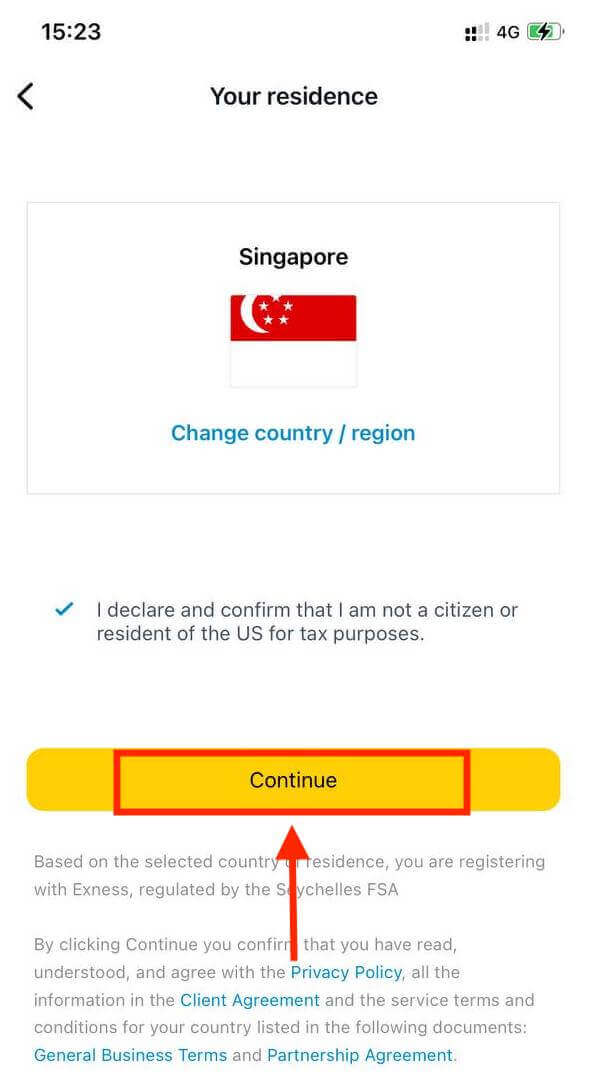
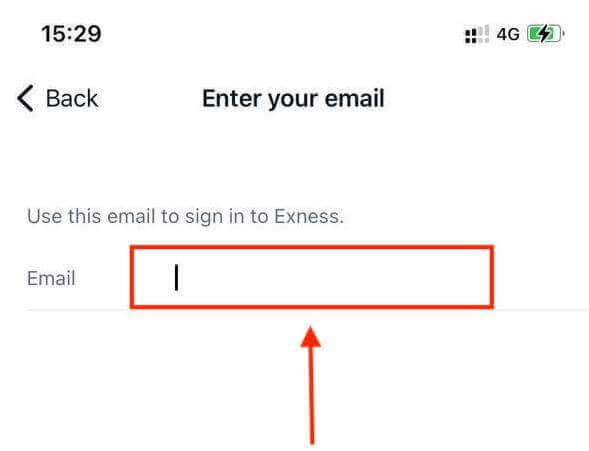
5. Enter your email address and Continue.
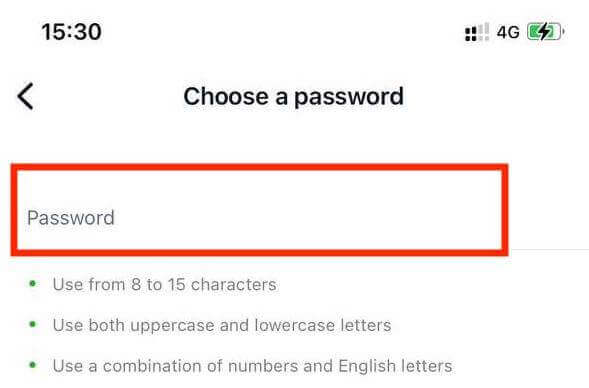
6. Create a password that meets the requirements. Tap Continue.
7. Provide your phone number and tap Send me a code.
8. Enter the 6-digit verification code sent to your phone number, then tap Continue. You can tap Resend me a code if the time runs out.
9. Create a 6-digit passcode, and then re-enter it to confirm. This is not optional, and must be completed before you can enter Exness Trader.
10. You can set up biometrics by tapping Allow if your device supports it, or you can skip this step by tapping Not now.
11. The deposit screen will be presented, but you can tap back to return to the main area of the app.
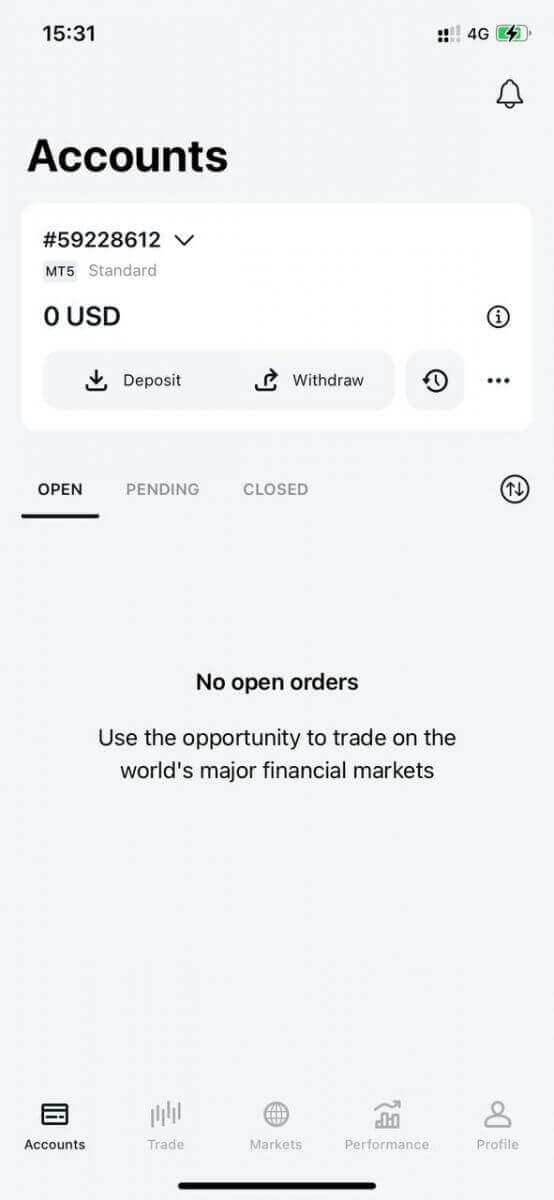
Congratulations, Exness Trader is set up and ready to use.
Upon registration, a demo account is created for you (with USD 10 000 virtual funds) to practice trading.
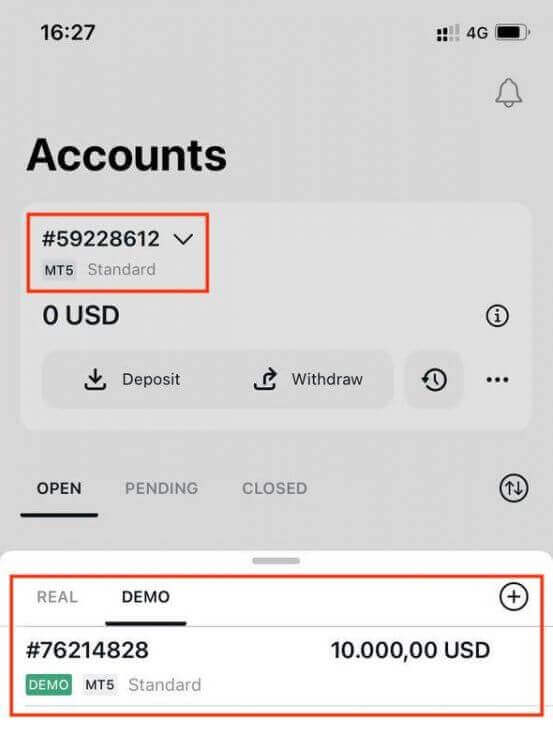
Along with a demo account, a real account is also created for you upon registration.
How to create a new trading account
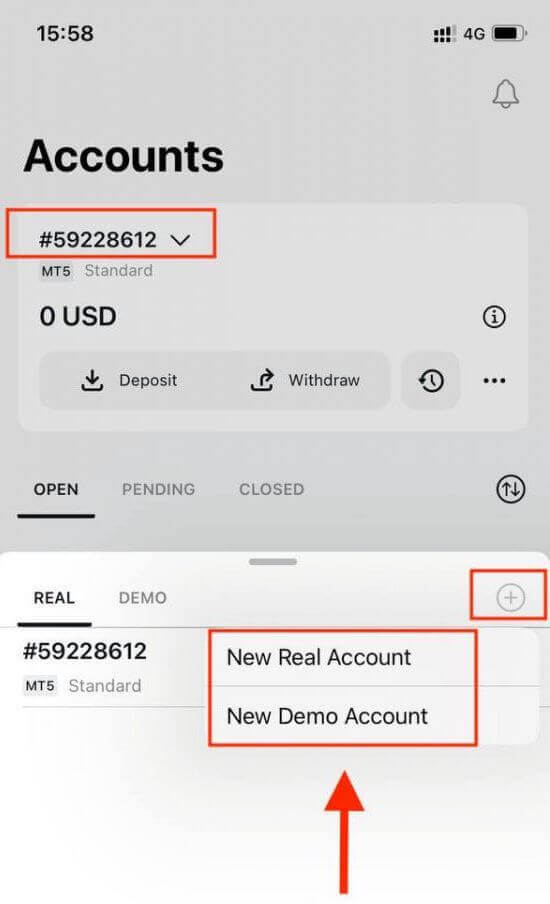
Once you have registered your Personal Area, creating a trading account is really simple. Let us take you through how to create an account on the Exness Trader App.1. Tap on the dropdown menu on your Accounts tab on your main screen.
2. Click on the plus sign on the right side and select New Real Account or New Demo Account.
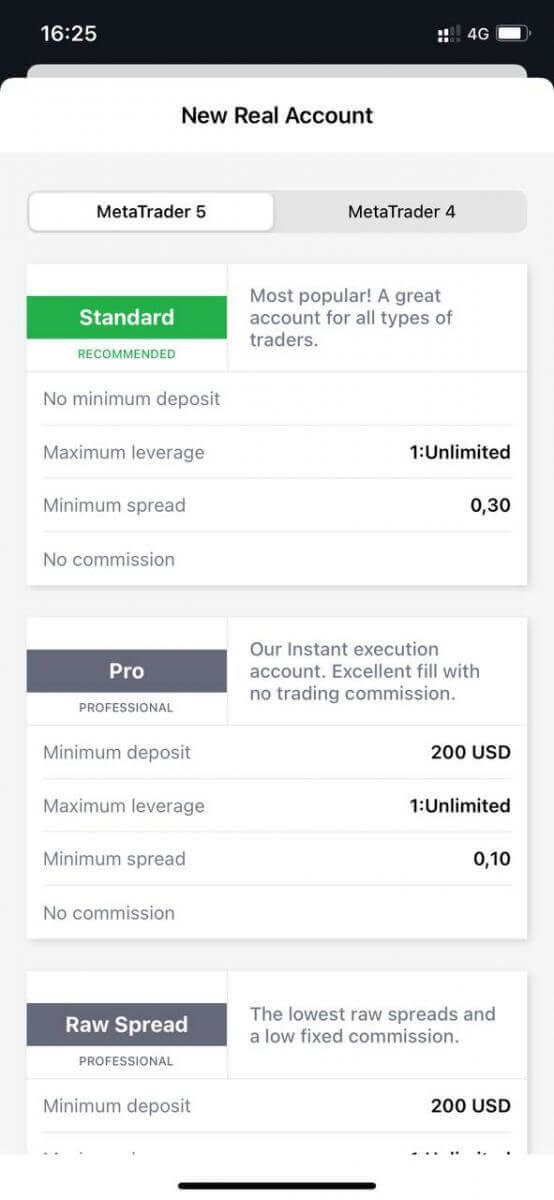
3. Choose your preferred account type under MetaTrader 5 and MetaTrader 4 fields.
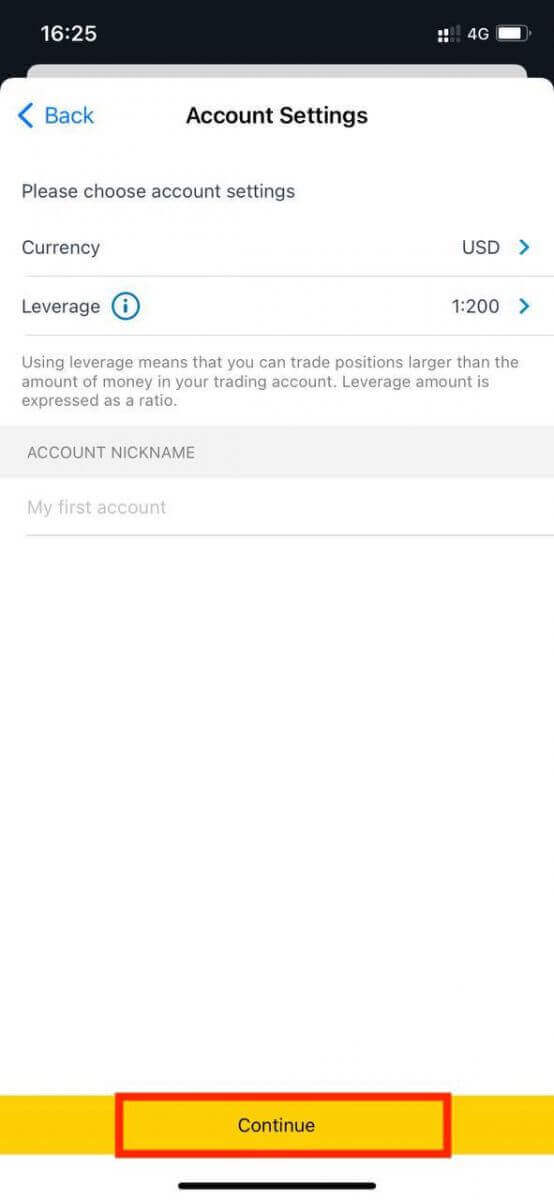
4. Set the account currency, leverage, and enter the account nickname. Tap Continue.
5. Set a trading password as per the displayed requirements.
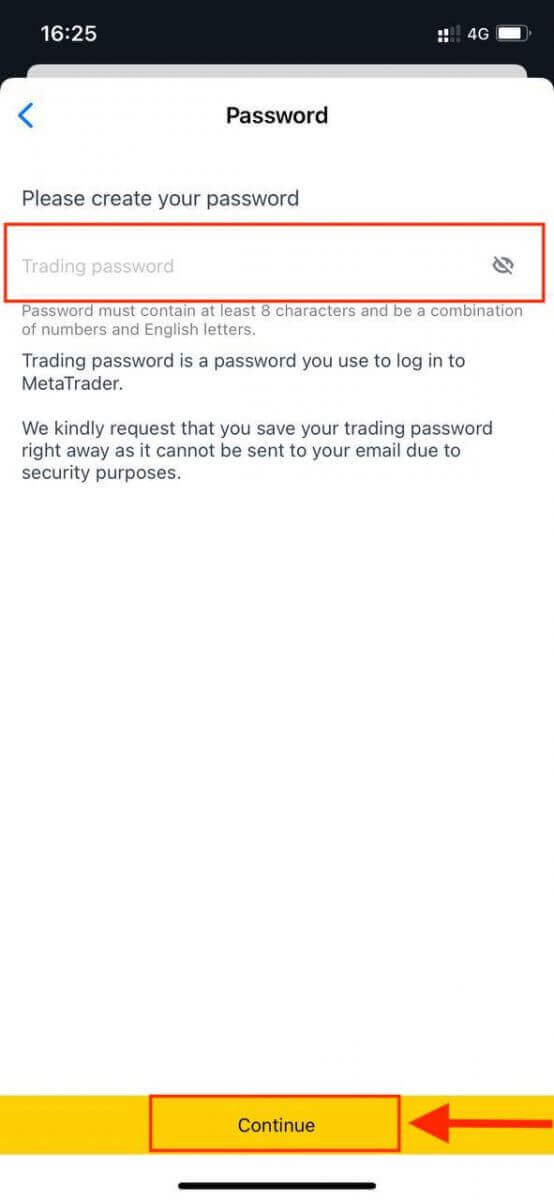
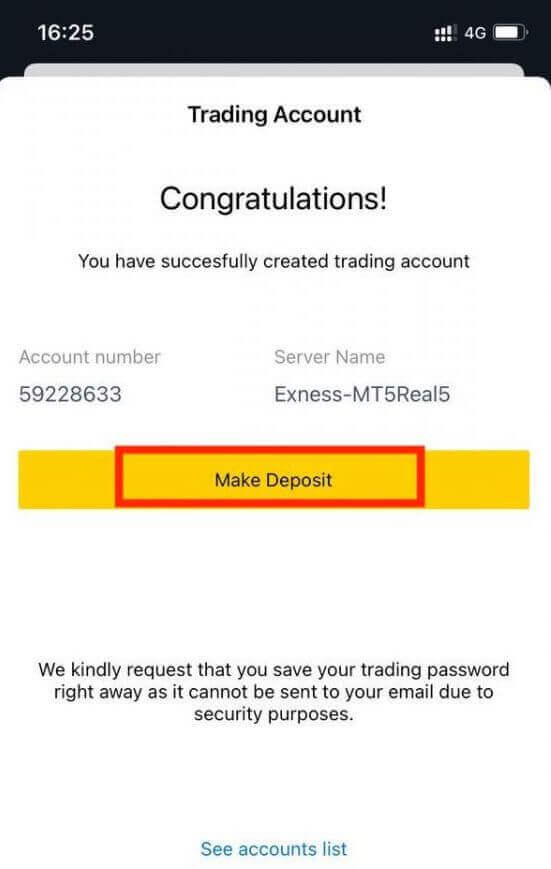
You have successfully created a trading account. Tap Make Deposit to choose a payment method to deposit funds and then tap Trade.
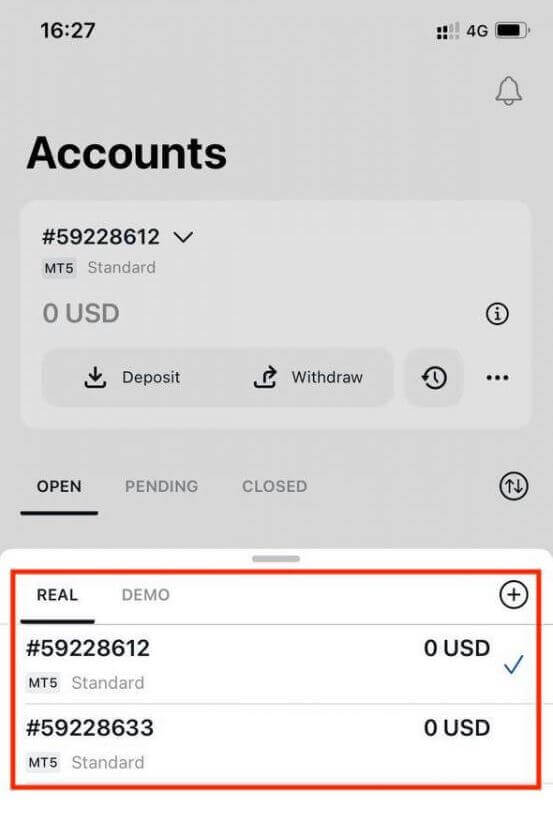
Your new trading account will show up below.
Note that the account currency set for an account cannot be changed once set. If you wish to change your account nickname, you can do so by logging on to the web Personal Area.
How to Verify your account on Exness
When you open your Exness account, you have to complete an Economic Profile and submit Proof of Identity (POI) and Proof of Residence (POR) documents. We need to verify these documents to ensure that all operations on your account are performed by you, the genuine account holder to ensure compliance within both financial regulations and the law.
Watch the steps below to learn how to upload your documents to verify your profile.
How to Verify account
We have prepared a guide for you to make sure you succeed in this document upload process. Let’s get started.
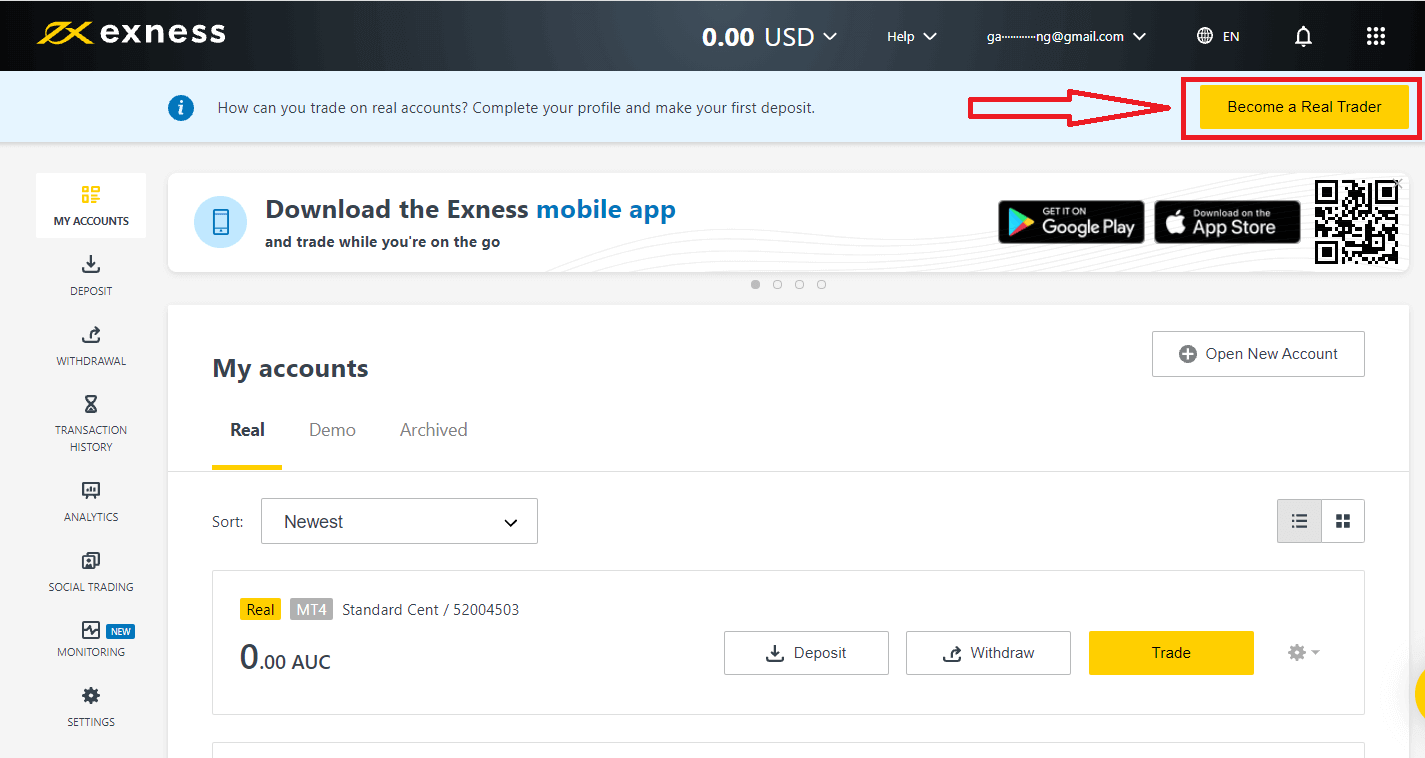
To begin, login to your personal area on the website, click "Become a Real Trader" to complete your profile
Enter your phone number and click "Send me a code" to confirm your phone number.
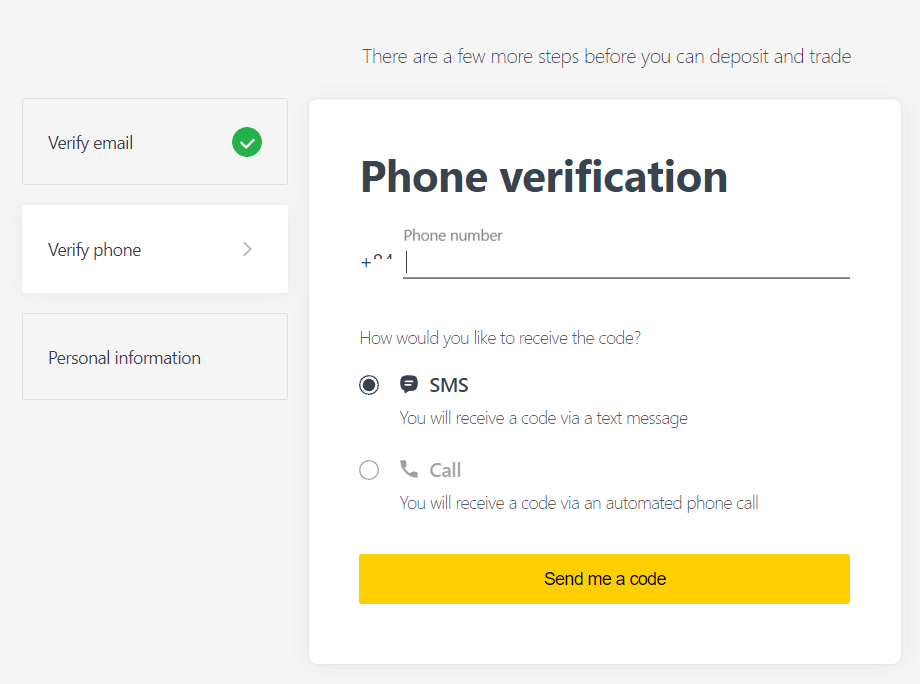
Enter your personal information and click "Continue"
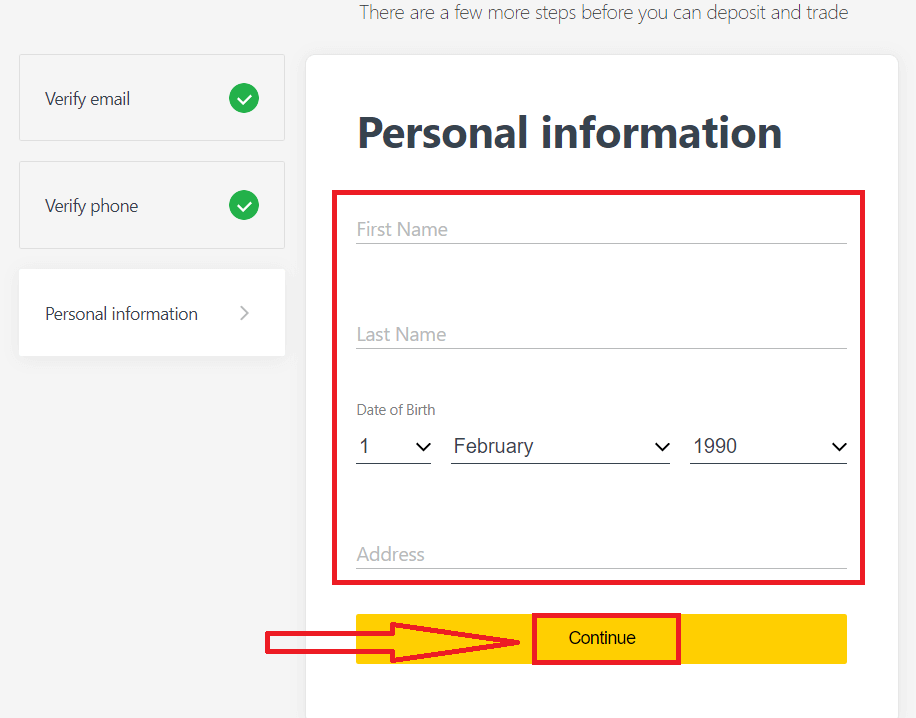
Now you can either make your first deposit by selecting "Deposit now" or continue verify your profile by selecting "Complete Verification"
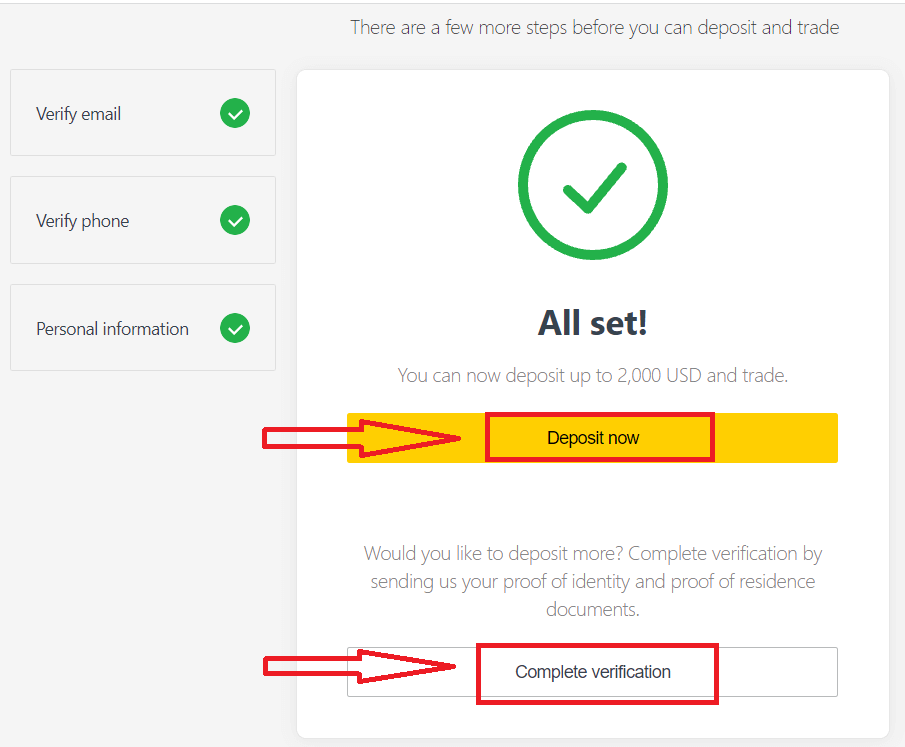
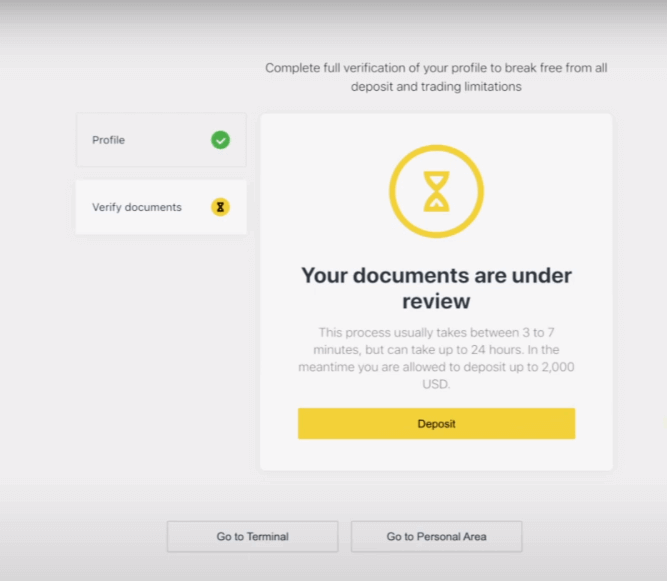
Complete full verification of your profile to break free from all deposit and trading limitations
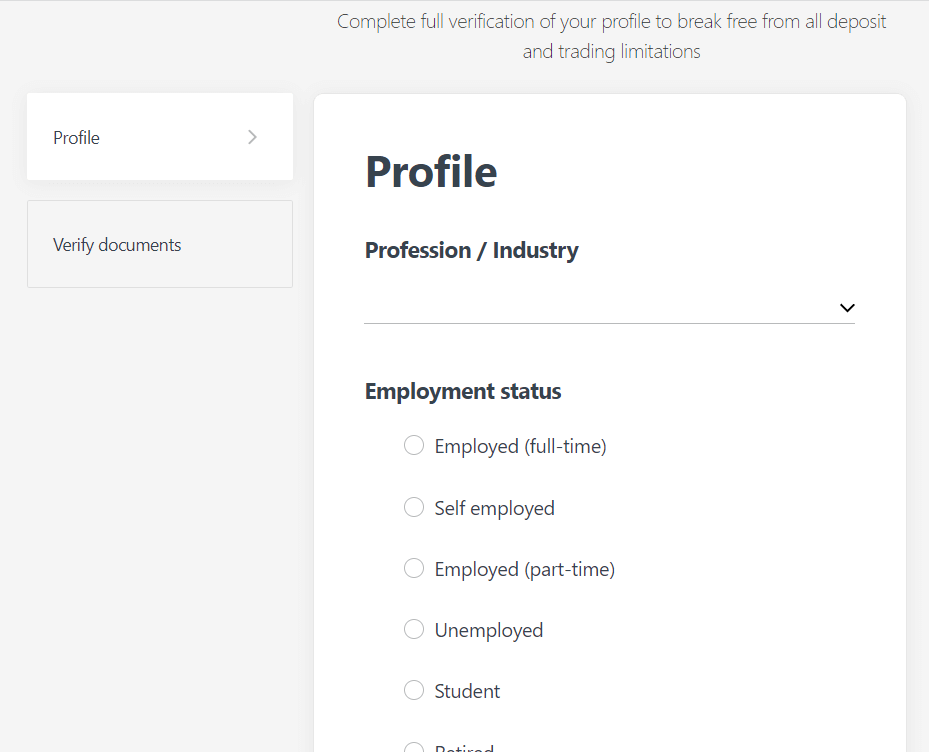
After completing full verification, your documents will be reviewed and your account are automatically updated.
Verification Document Requirement
Here are the requirements for you to keep in mind while uploading your documents. These are also displayed on the document upload screen for your convenienceFor Proof of Identity (POI)
- A document provided must have the client’s full name.
- A document provided must have a photo of the client.
- A document provided must have the client’s date of birth.
- The full name must match the name of the account holder and the POI document exactly.
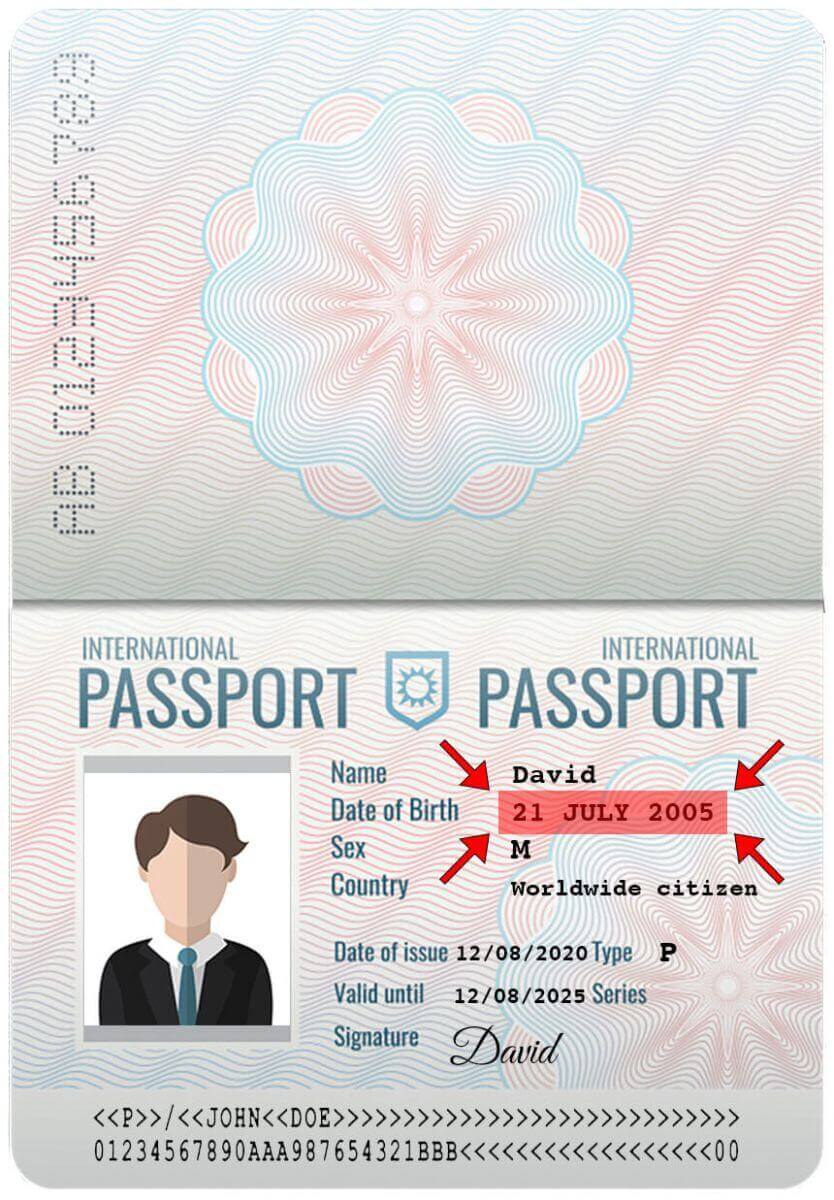
- The client’s age should be 18 or above.
- The document should be valid (at least one month of validity) and not expired.
- If the document is two-sided, please upload both sides of the document.
- All four edges of a document should be visible.
- If uploading a copy of the document, it should be of high quality.
- The document should be issued by the government.
Accepted Documents:
- International Passport
- National Identity Card/Document
- Driver’s Licence
Formats accepted: Photo, Scan, Photocopy (All corners shown)
File extensions accepted: jpg, jpeg, mp4, mov, webm, m4v, png, jpg, bmp, pdf
For Proof of Residence (POR)
- The document should have been issued within the past 6 months.
- Name displayed on the POR document must match the full name of the Exness account holder and POI document exactly.
- All four edges of a document should be visible.
- If the document is two-sided, please upload both sides of the document.
- If uploading a copy of the document, it should be of high quality.
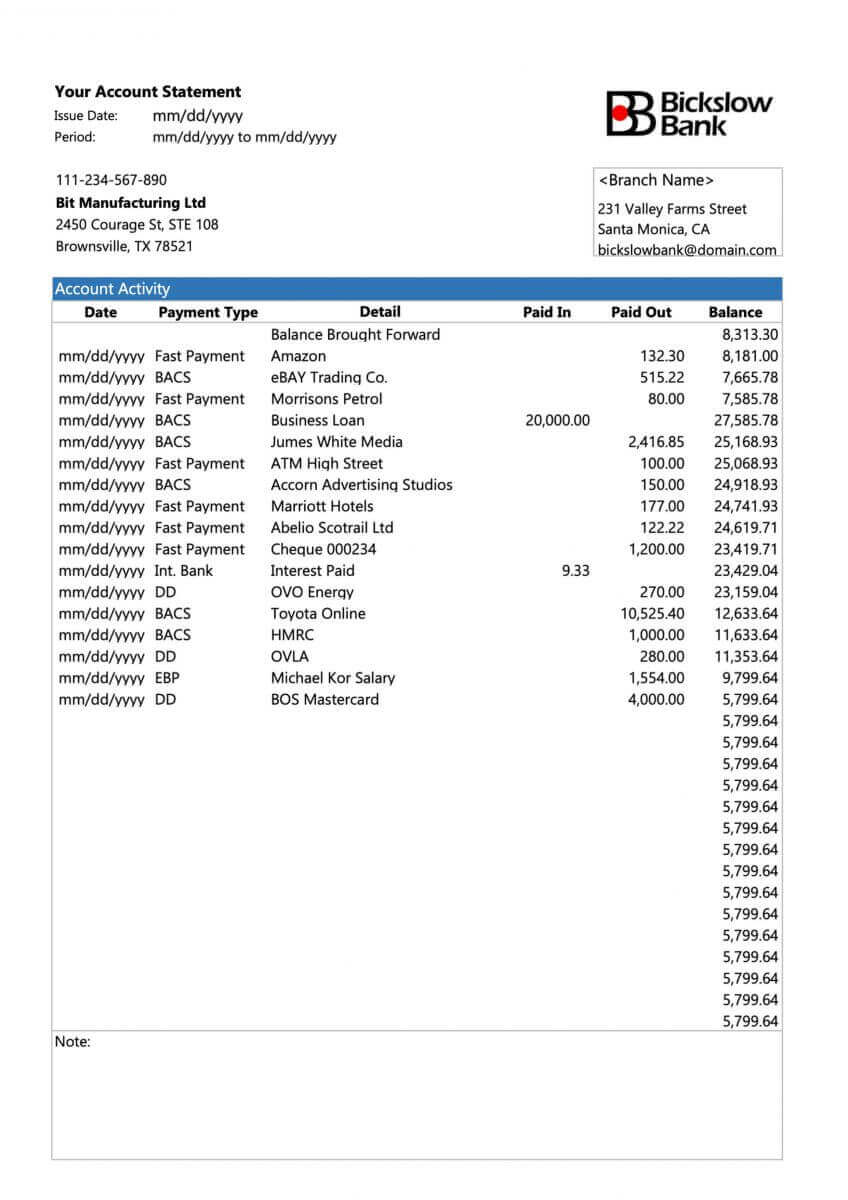
- The document should contain the clients full name and address.
- The document should contain the issue date.
Accepted Documents:
- Utility bill (electricity, water, gas, Internet)
- Certificate of residence
- Tax bill
- Bank account statement
Formats accepted: Photo, Scan, Photocopy (All corners shown)
File extensions accepted: jpg, jpeg, mp4, mov, webm, m4v, png, jpg, bmp, pdf
Please take special care as there are many documents (payslips, university certificates, for example) that are not accepted; you will be informed if a submitted document is not acceptable and are permitted to retry.
Verifying your identity and address is an important step that helps us to keep your account and financial transactions secure. The verification process is just one of a number of measures that Exness has implemented to ensure the highest levels of security.
Examples of incorrect documents uploaded
We have listed a few incorrect uploads for you to take a look at and see what is considered unacceptable.1. Proof of Identity document of an under-age client:
2. Proof of Address document without the name of the client
Examples of correct documents uploaded
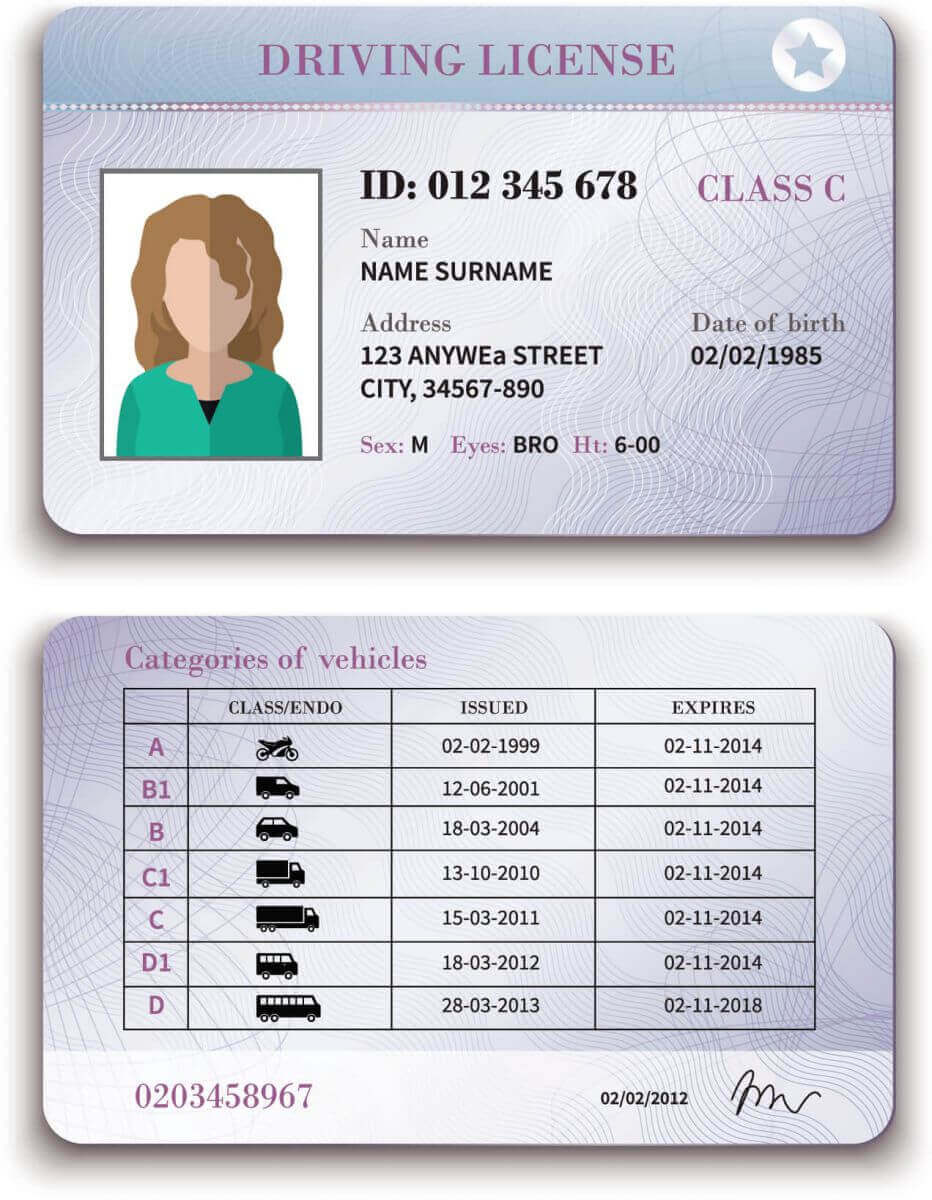
Let us take a look at a few correct uploads:1. Driver’s license uploaded for POI verification
2. Bank statement uploaded for POR verification
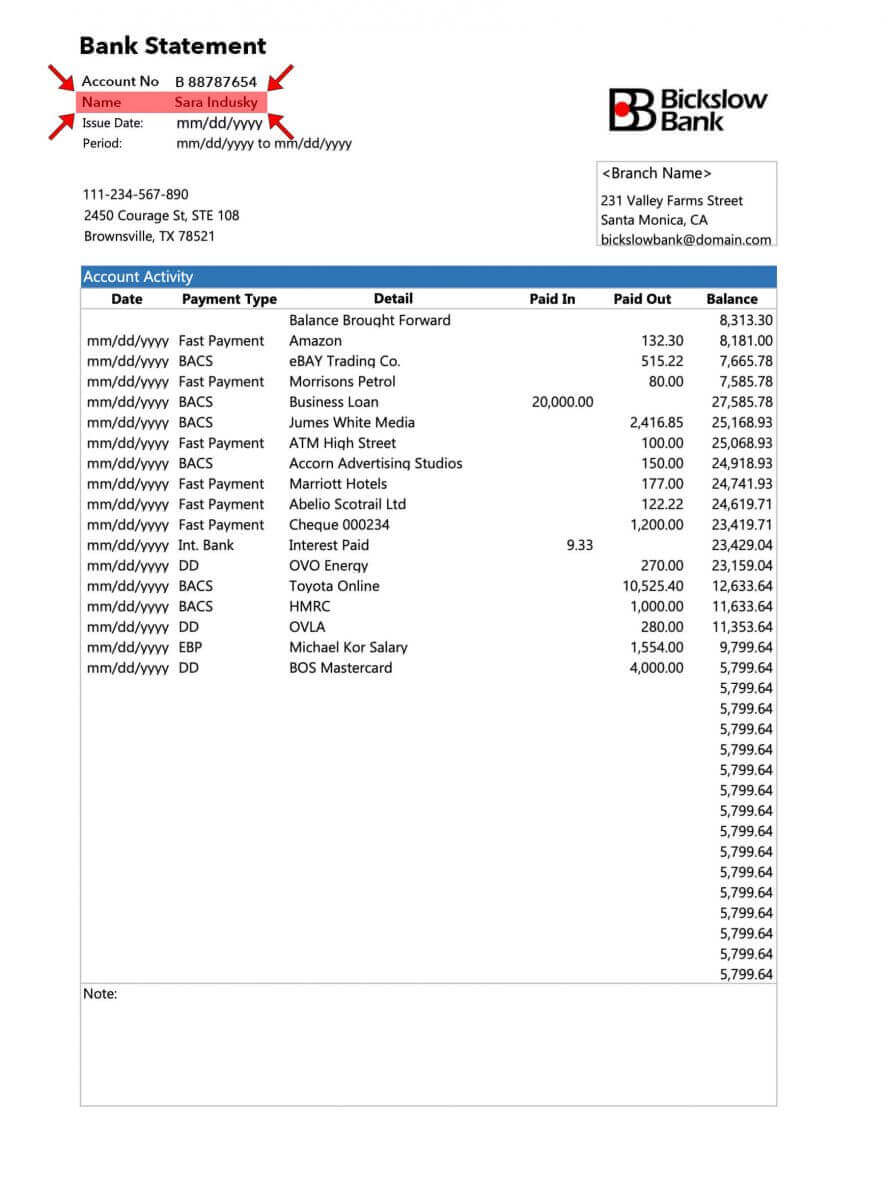
Now that you have a clear idea of how to upload your documents, and what to keep in mind - go ahead and complete your document verification.
How to Deposit Money into your Exness account
Deposit Tips
Funding your Exness account is quick and easy. Here are some tips for hassle-free deposits:
- The PA displays payment methods in groups of ones which are readily available for use and those that are available post account verification. In order to access our complete payment method offering, make sure your account is fully verified, meaning that your Proof of Identity and Proof of Residence documents are reviewed and accepted.
- Your account type may present a minimum deposit required to begin trading; for Standard accounts the minimum deposit depends on the payment system, while Professional accounts have a set minimum initial deposit limit starting from USD 200.
- Double-check minimum deposit requirements for using a specific payment system.
- The payment services you use must be managed under your name, the same name as the Exness account holder.
- While choosing your deposit currency, remember that you will need to make withdrawals in the same currency chosen during the deposit. The currency used to deposit does not need to be the same as your account currency, but note that exchange rates at the time of transaction do apply.
- Finally, whichever payment method you are using, please double-check that you haven’t made any mistakes when you entered your account number, or any important personal information required.
Visit the Deposit section of your Personal Area to deposit funds into your Exness account, any time, any day, 24/7.
How to Deposit on Exness
Bank Card
Please note that the following bank cards are accepted:
- VISA and VISA Electron
- Mastercard
- Maestro Master
- JCB (Japan Credit Bureau)*
*The JCB card is the only bank card accepted in Japan; other bank cards cannot be used.
Before making your first deposit using your bank card, you need to fully verify your profile.
Note: payment methods requiring profile verification before use are grouped separately in the PA under the Verification required section.
The minimum deposit amount with a bank card is USD 10 and maximum deposit amount is USD 10 000 per transaction, or the equivalent in your account currency.
Bank cards cannot be used as a payment method for PAs registered to the Thailand region.
1. Select Bank Card in the Deposit area of your Personal Area.
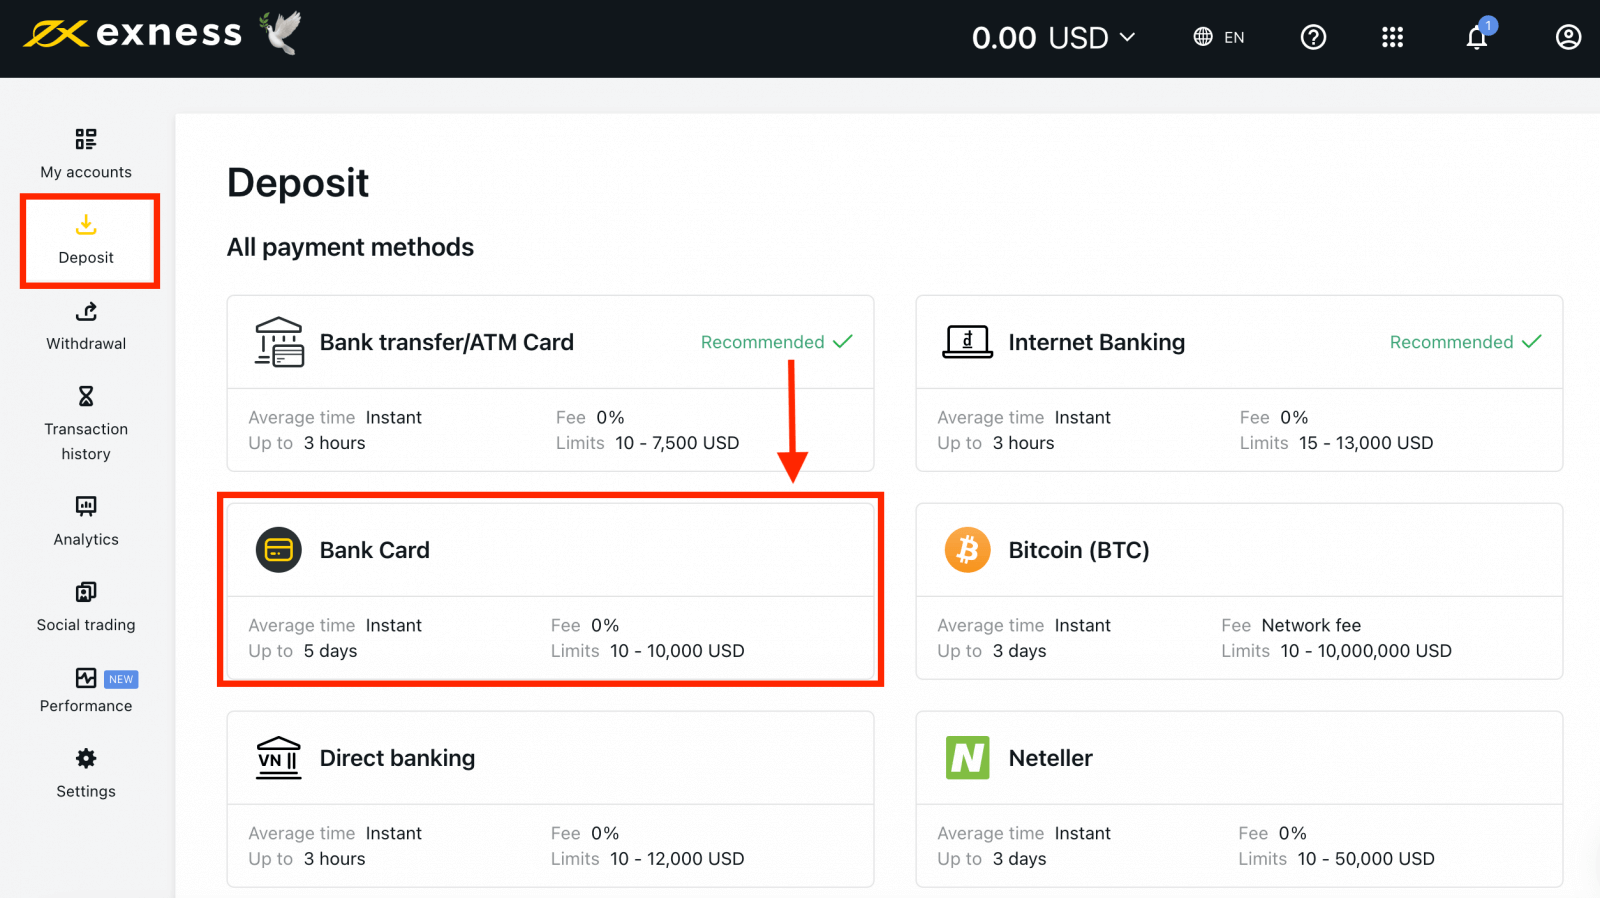
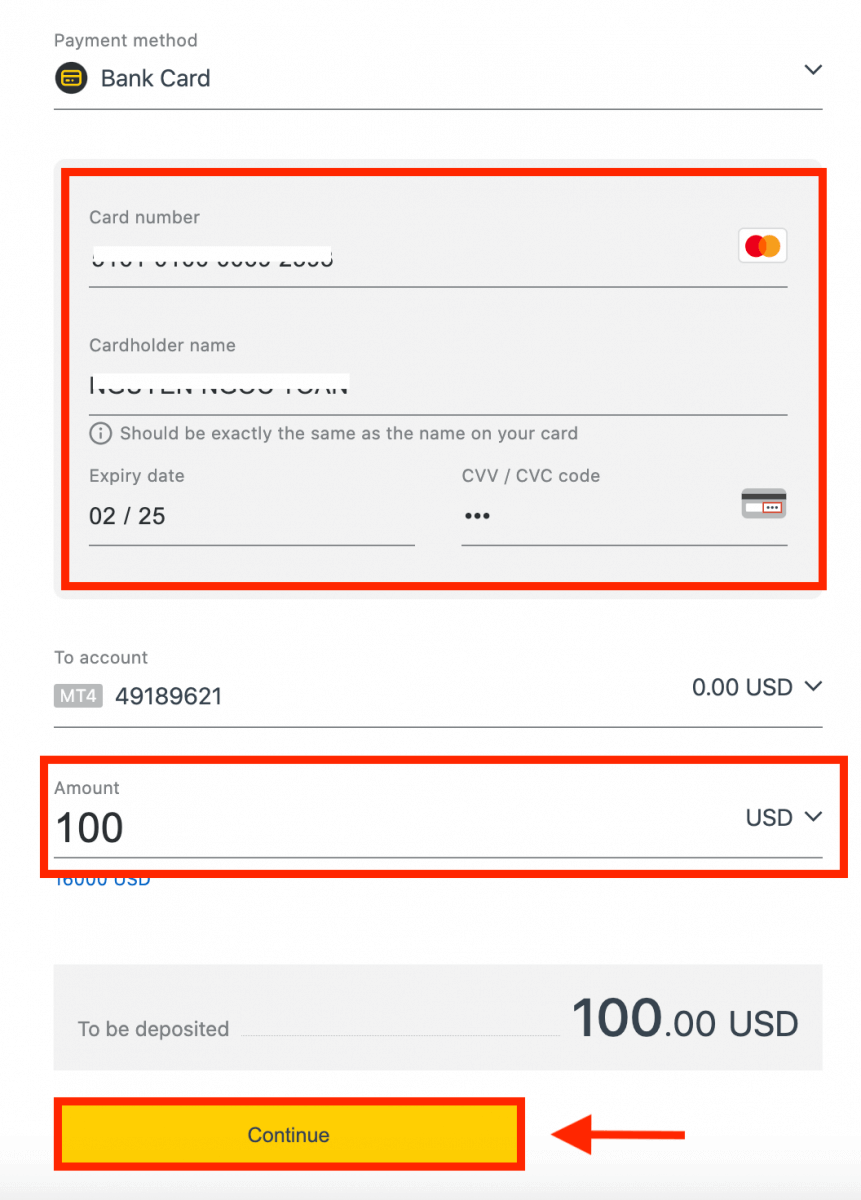
2. Complete the form including your bank card number, cardholder’s name, expiry date, and the CVV code. Then, select the trading account, currency and deposit amount. Click Continue.
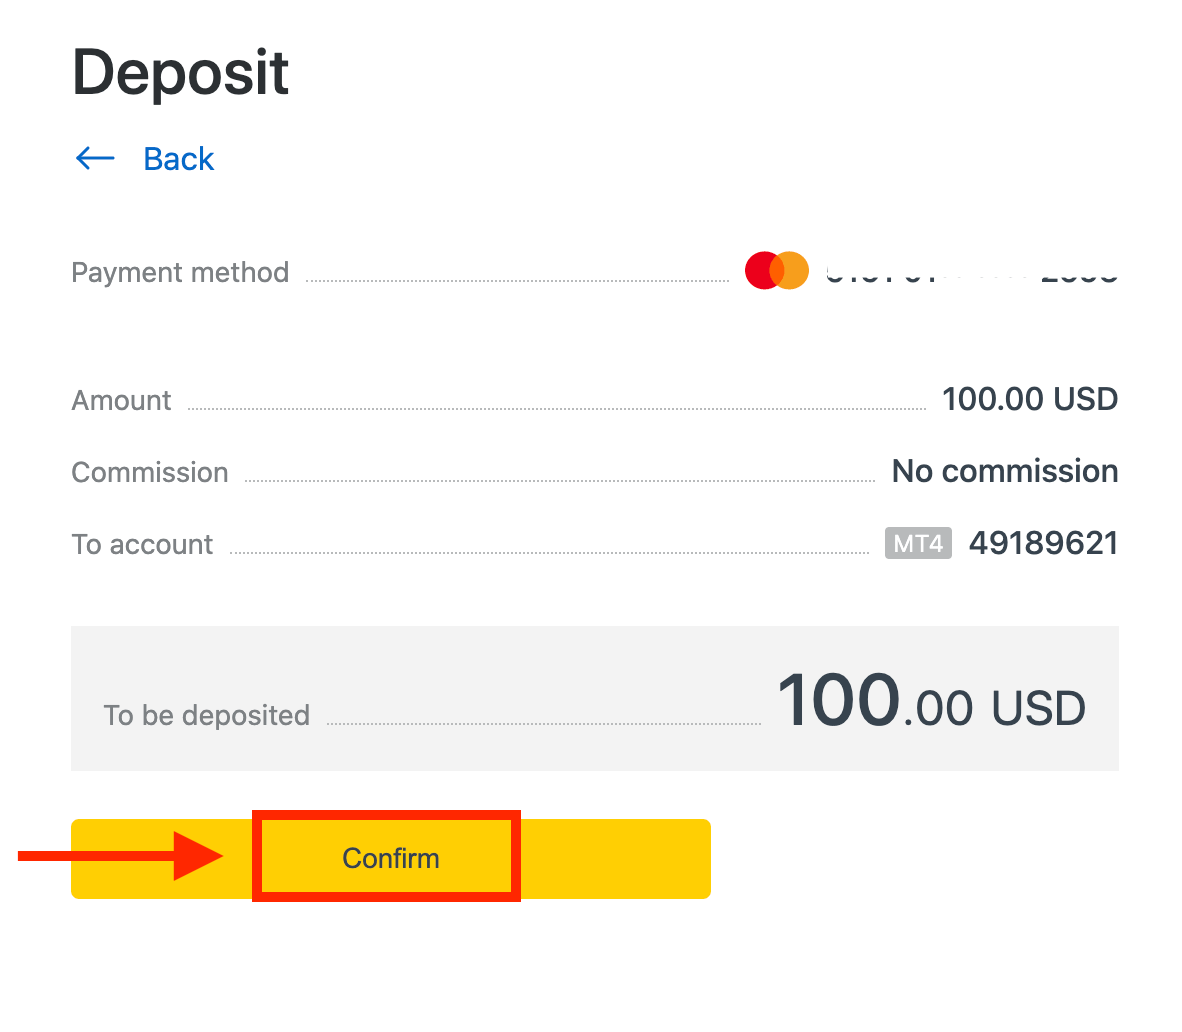
3. A summary of the transaction will be displayed. Click Confirm.
4. A message will confirm the deposit transaction is complete.
In some cases, an additional step to enter an OTP sent by your bank may be required before the deposit transaction is completed. Once a bank card has been used to deposit, it is automatically added to your PA and can be selected in step 2 for further deposits.
Electronic Payment Systems (EPS)
Electronic payments are growing to be exceedingly popular because of their speed and convenience to the user. Cashless payments save time and are also very easy to perform.Currently, we accept deposits through:
- Neteller
- WebMoney
- Skrill
- Perfect Money
- Sticpay
Visit your Personal Area to see the available payment methods, as some may not be available in your region. If a payment method is shown to be recommended, then it has a high rate of success for your registered region.
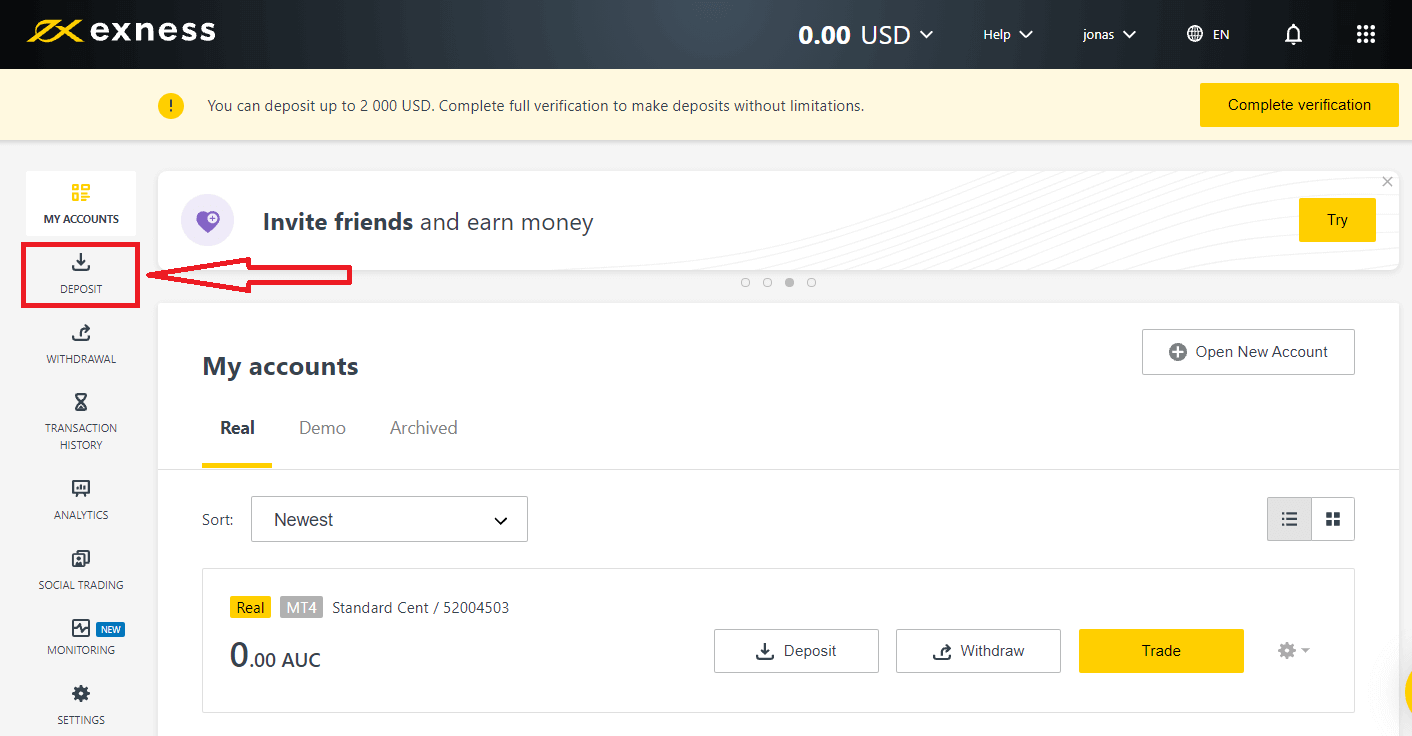
1. Click on the Deposit section.
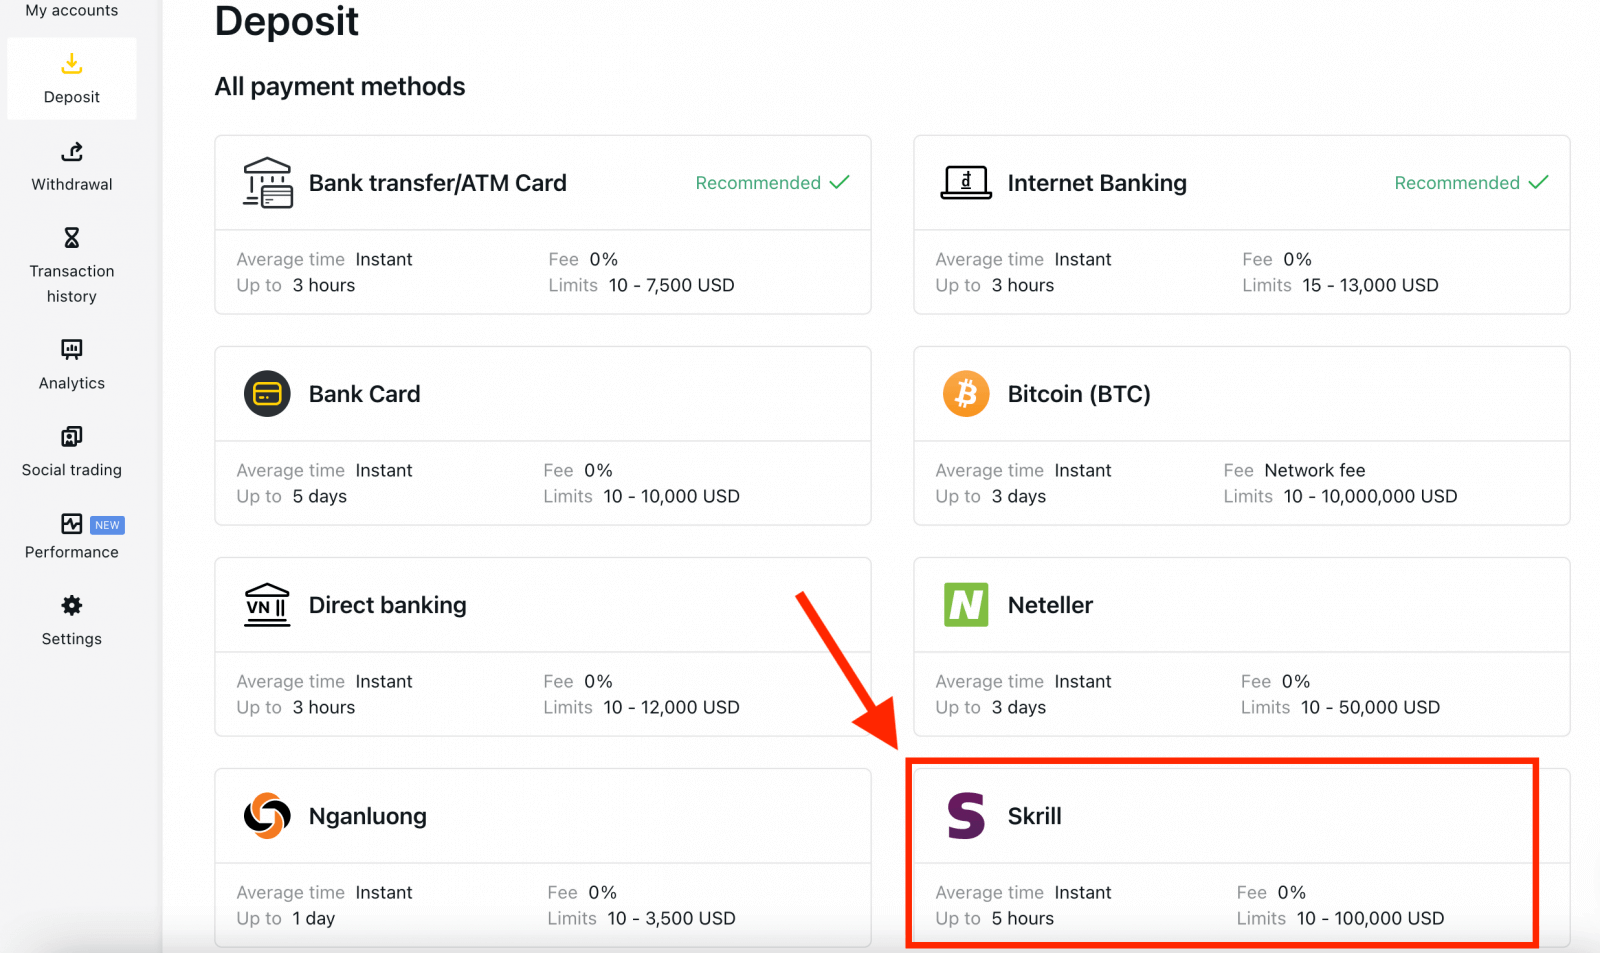
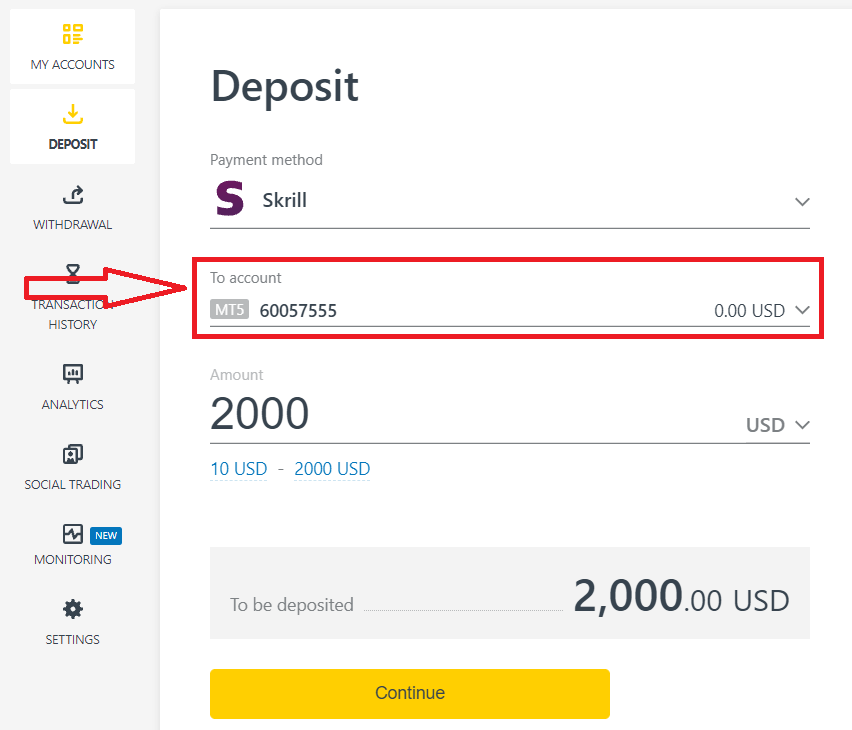
4. Enter the currency and amount of your deposit and click "Continue".
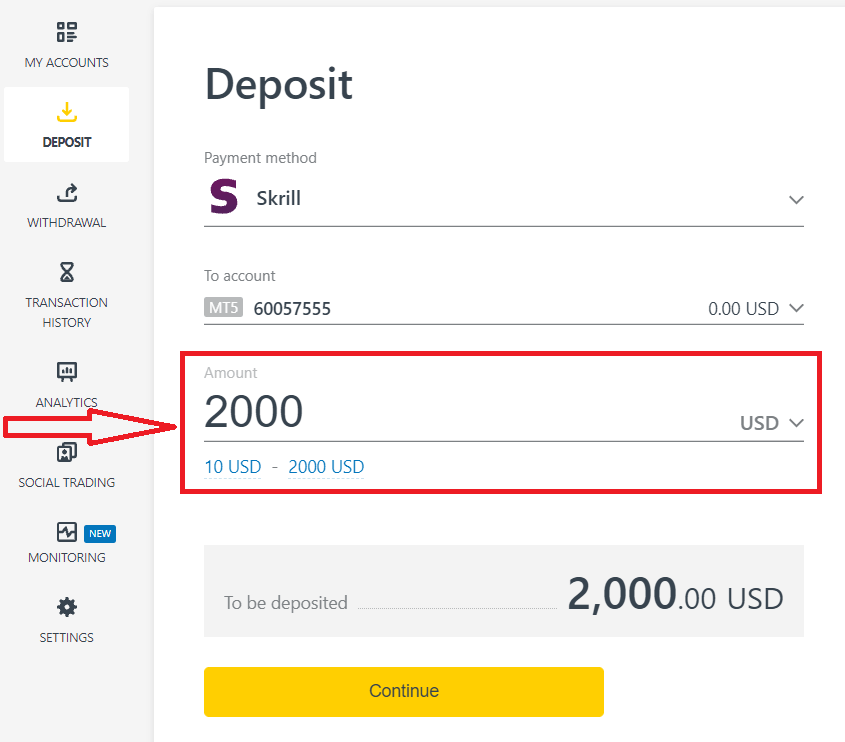
5. Double check your deposit details and click "Confirm".
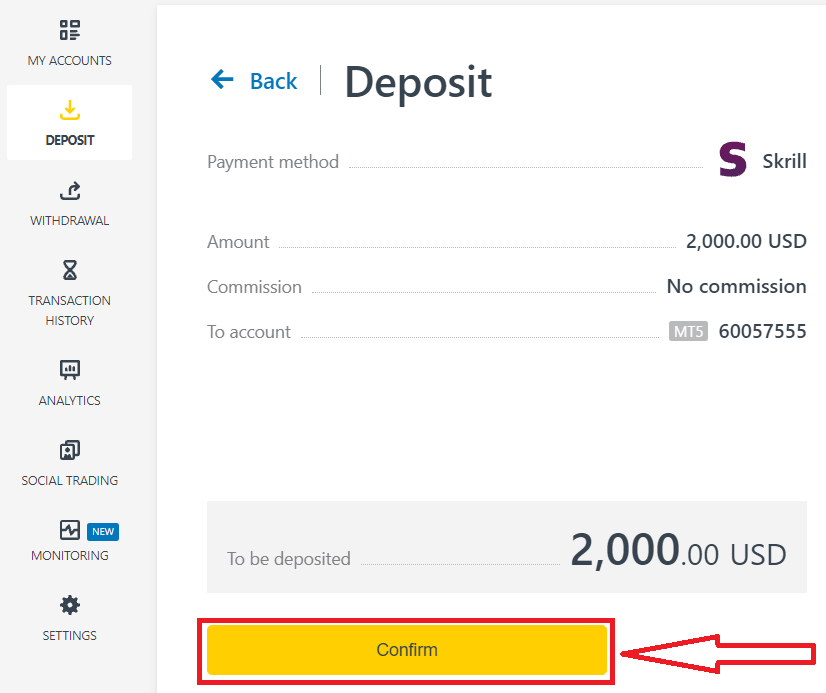
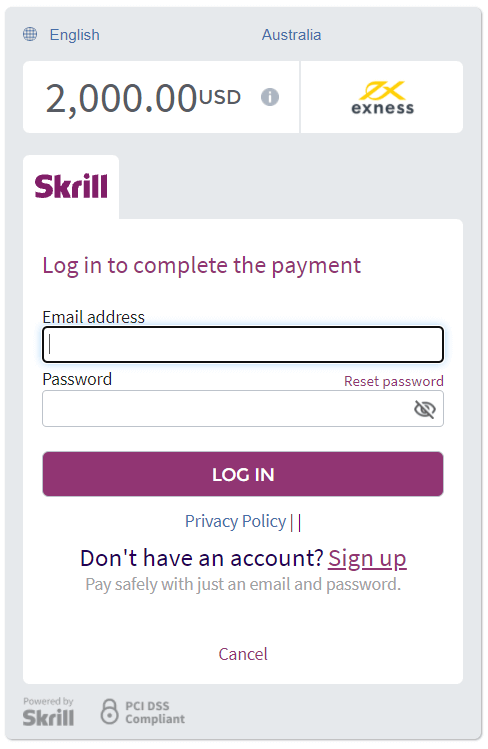
6. You will be redirected to the website of your chosen payment system, where you can complete your transfer.
Bitcoin (BTC) - Tether (USDT ERC 20)
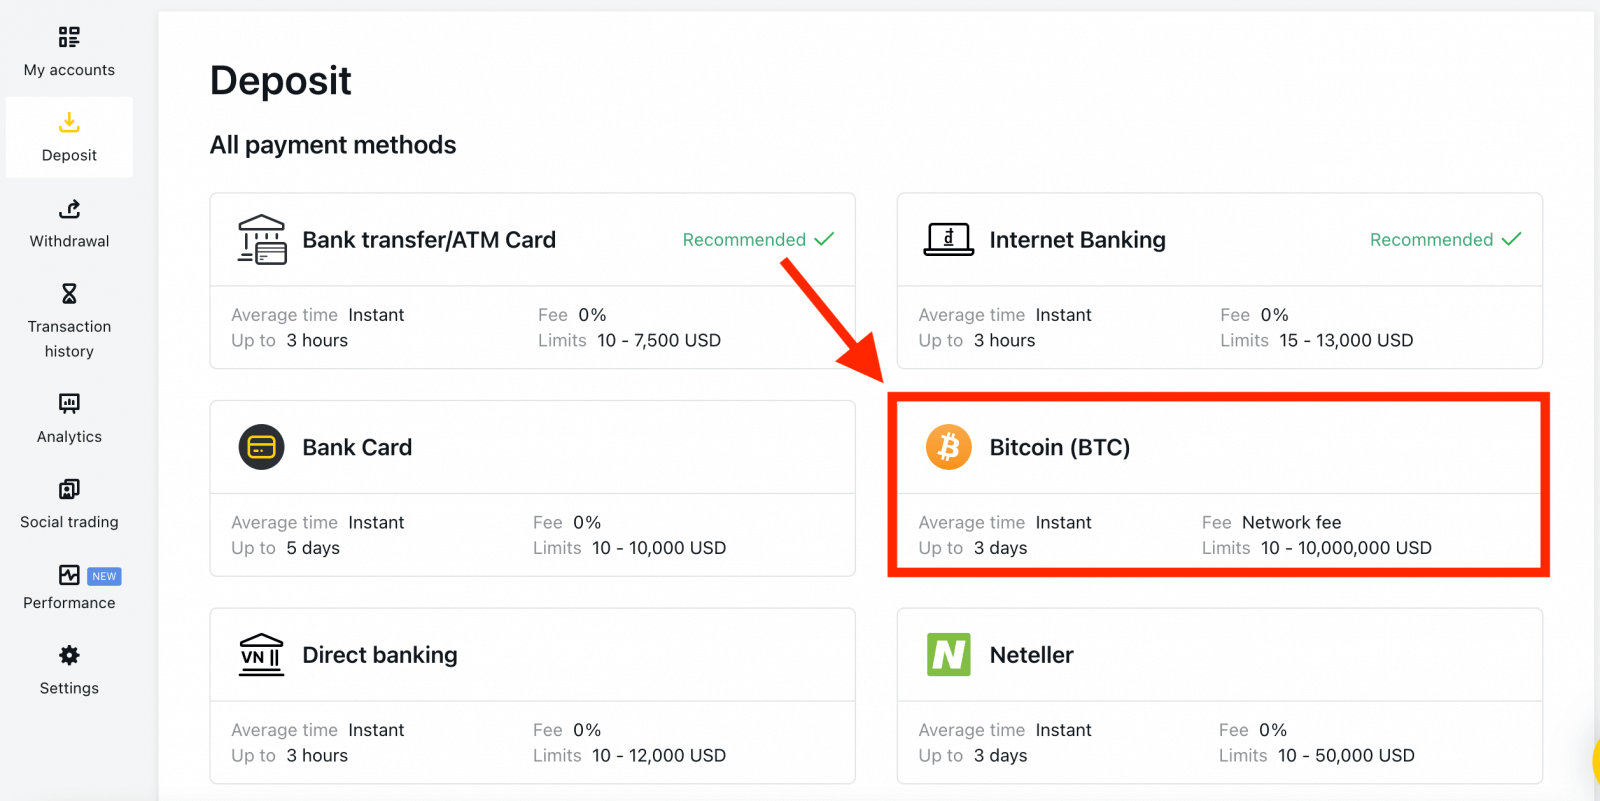
You can fund your trading account via Bitcoin in 3 simple steps:1. Go to the Deposit section in your Personal Area, and click Bitcoin (BTC).
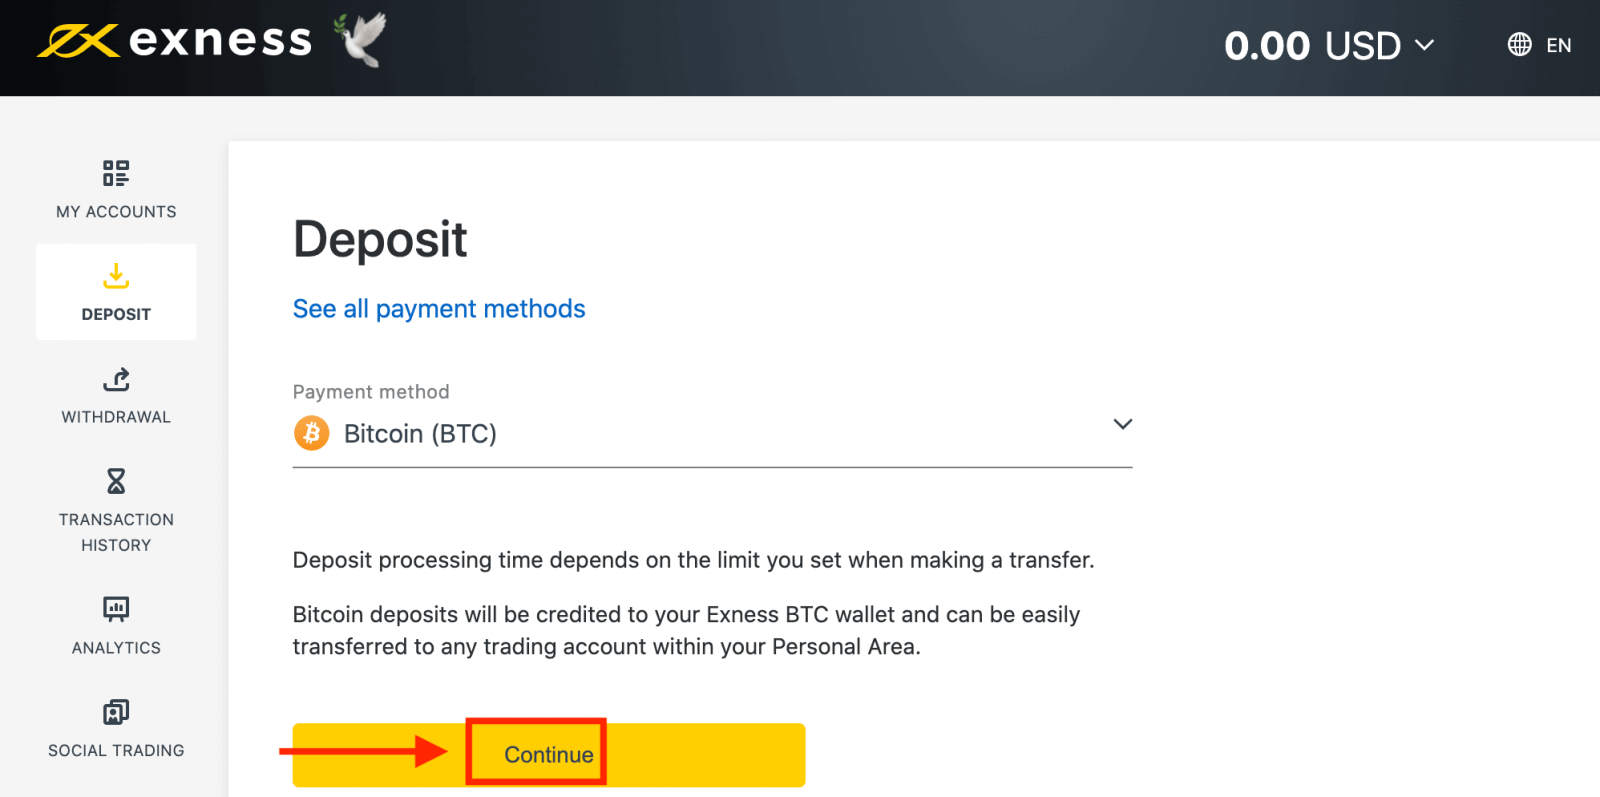
2. Click Continue.
3. The assigned BTC address will be presented, and you will need to send the desired deposit amount from your private wallet to the Exness BTC address.
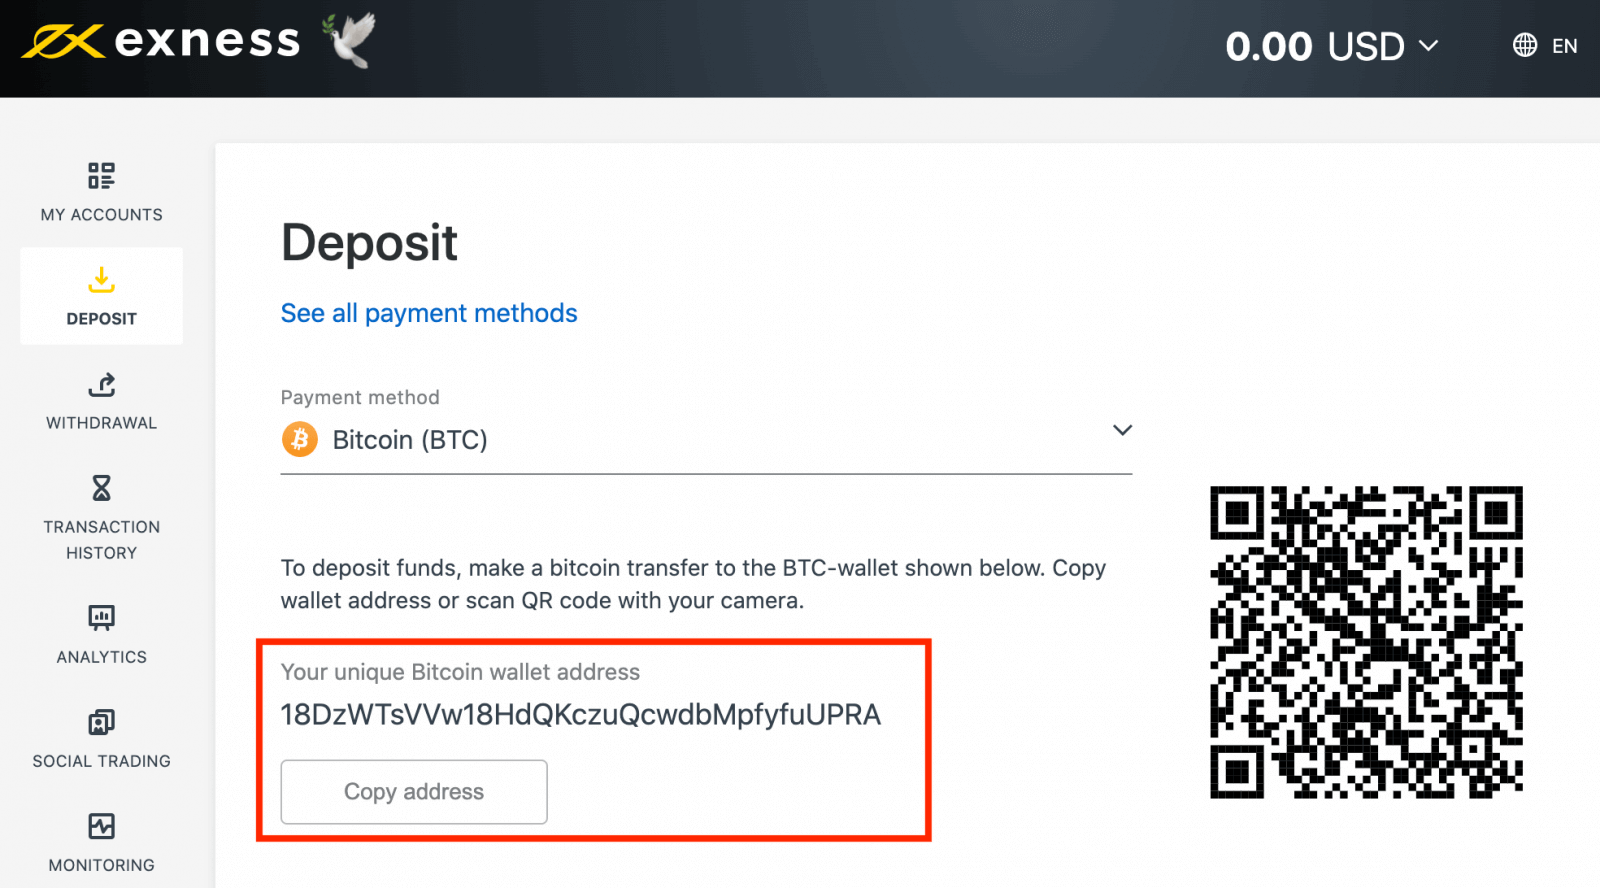
4. Once this payment is successful, the amount will reflect in your chosen trading account in USD. Your deposit action is now complete.
Bank Transfer/ATM Card
1. Go to the Deposit section in your Personal Area, and choose Bank Transfer/ATM Card.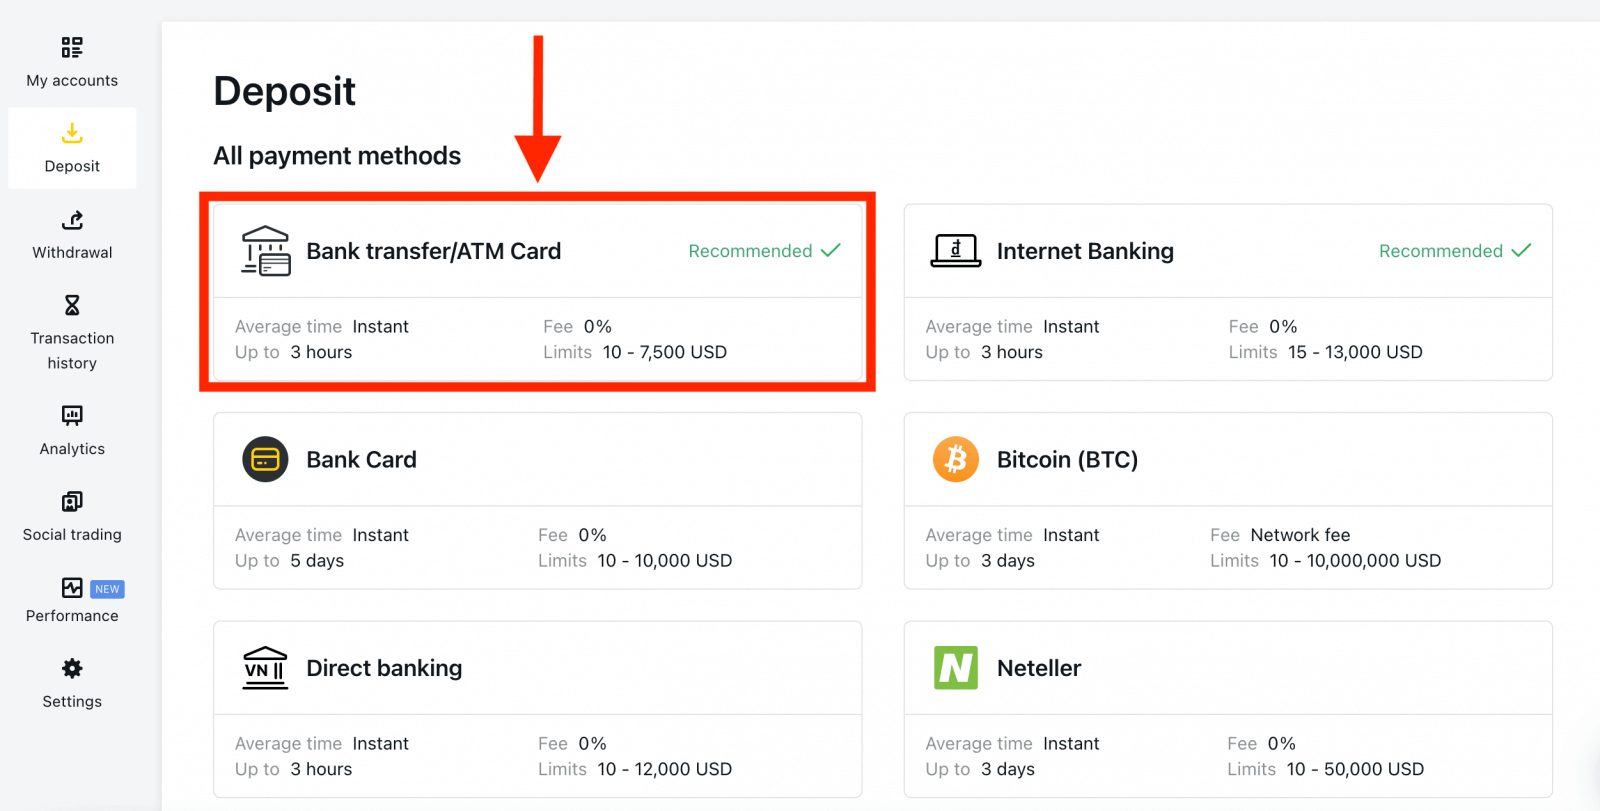
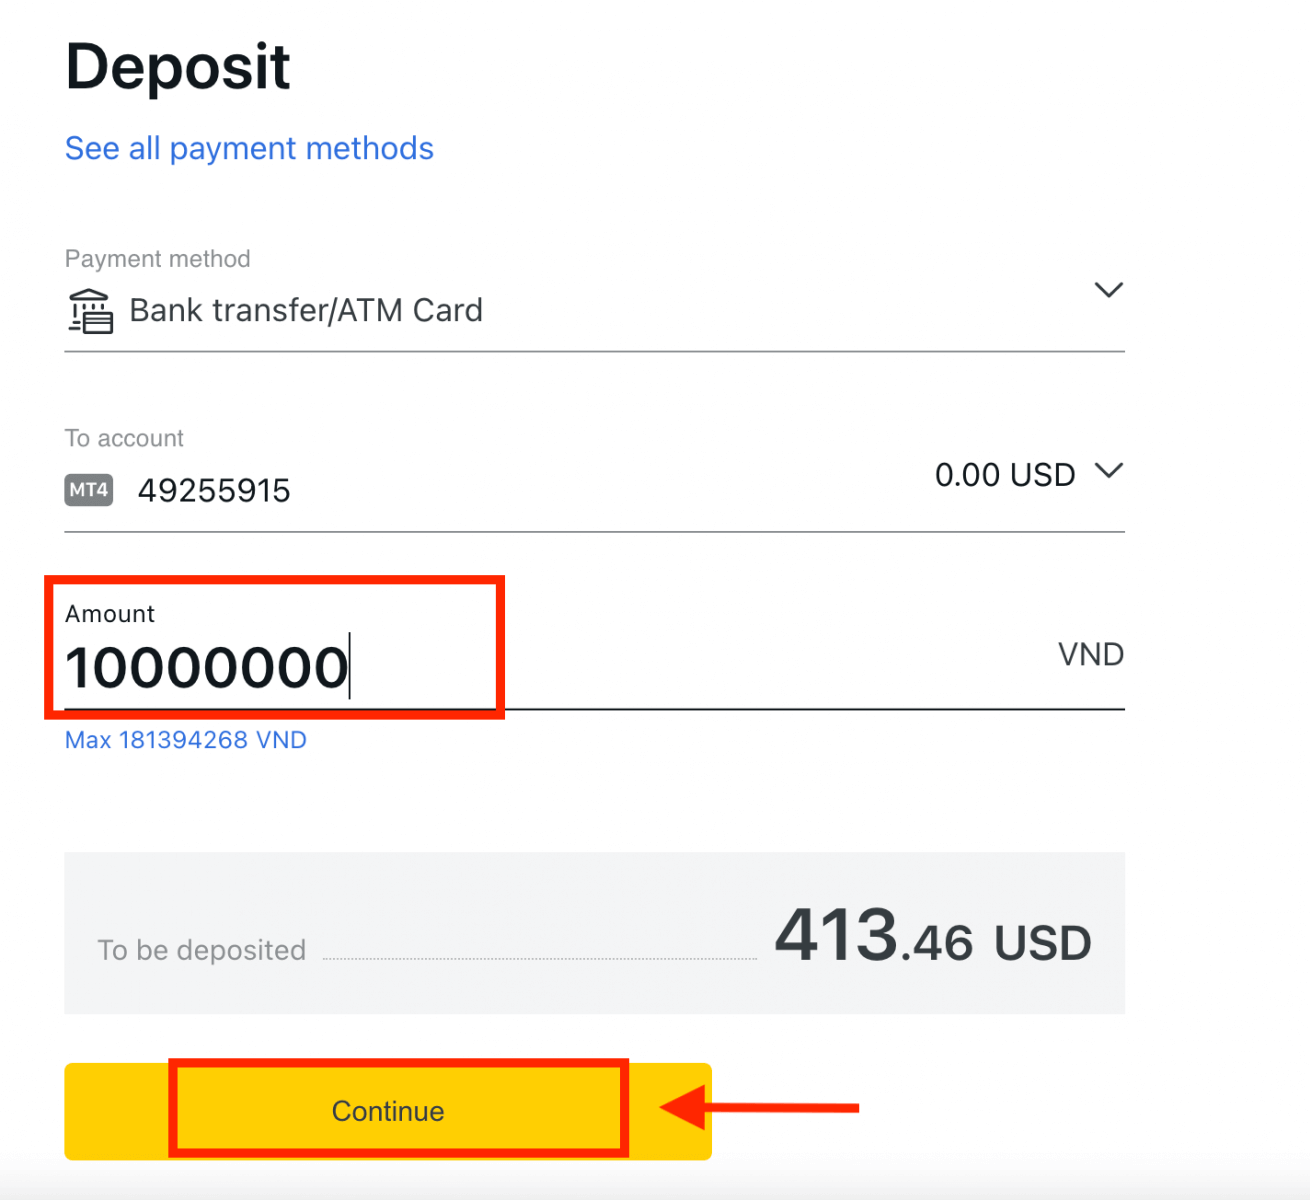
2. Select the trading account you would like to top up and the desired deposit amount noting the currency required, and then click Continue.
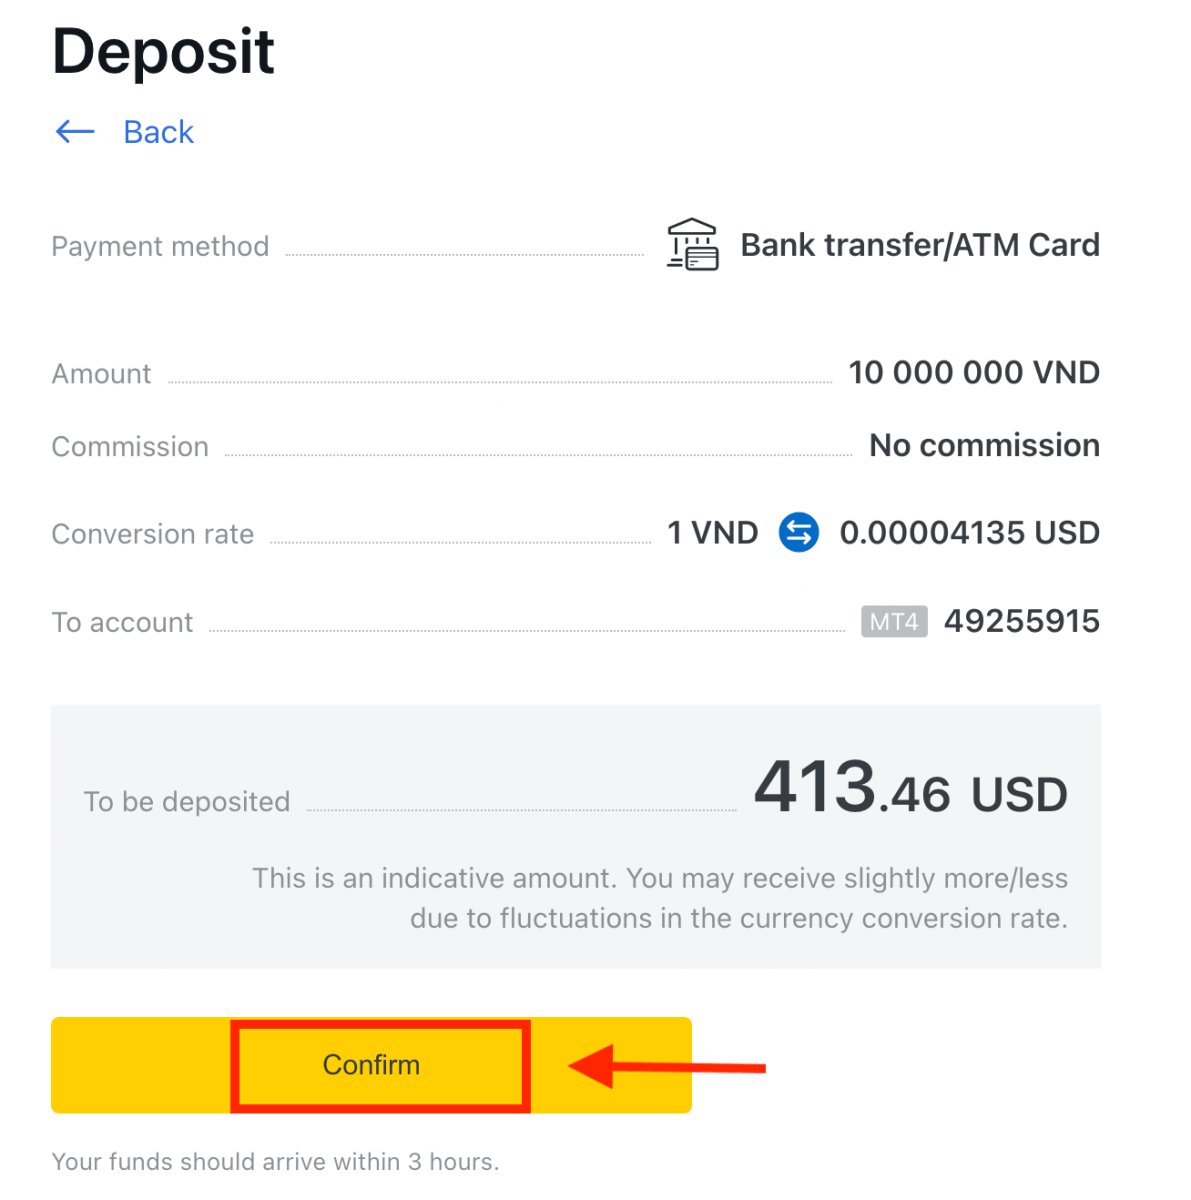
3. A summary of the transaction will be presented to you; click Confirm to continue.
4. Select your bank from the list provided.
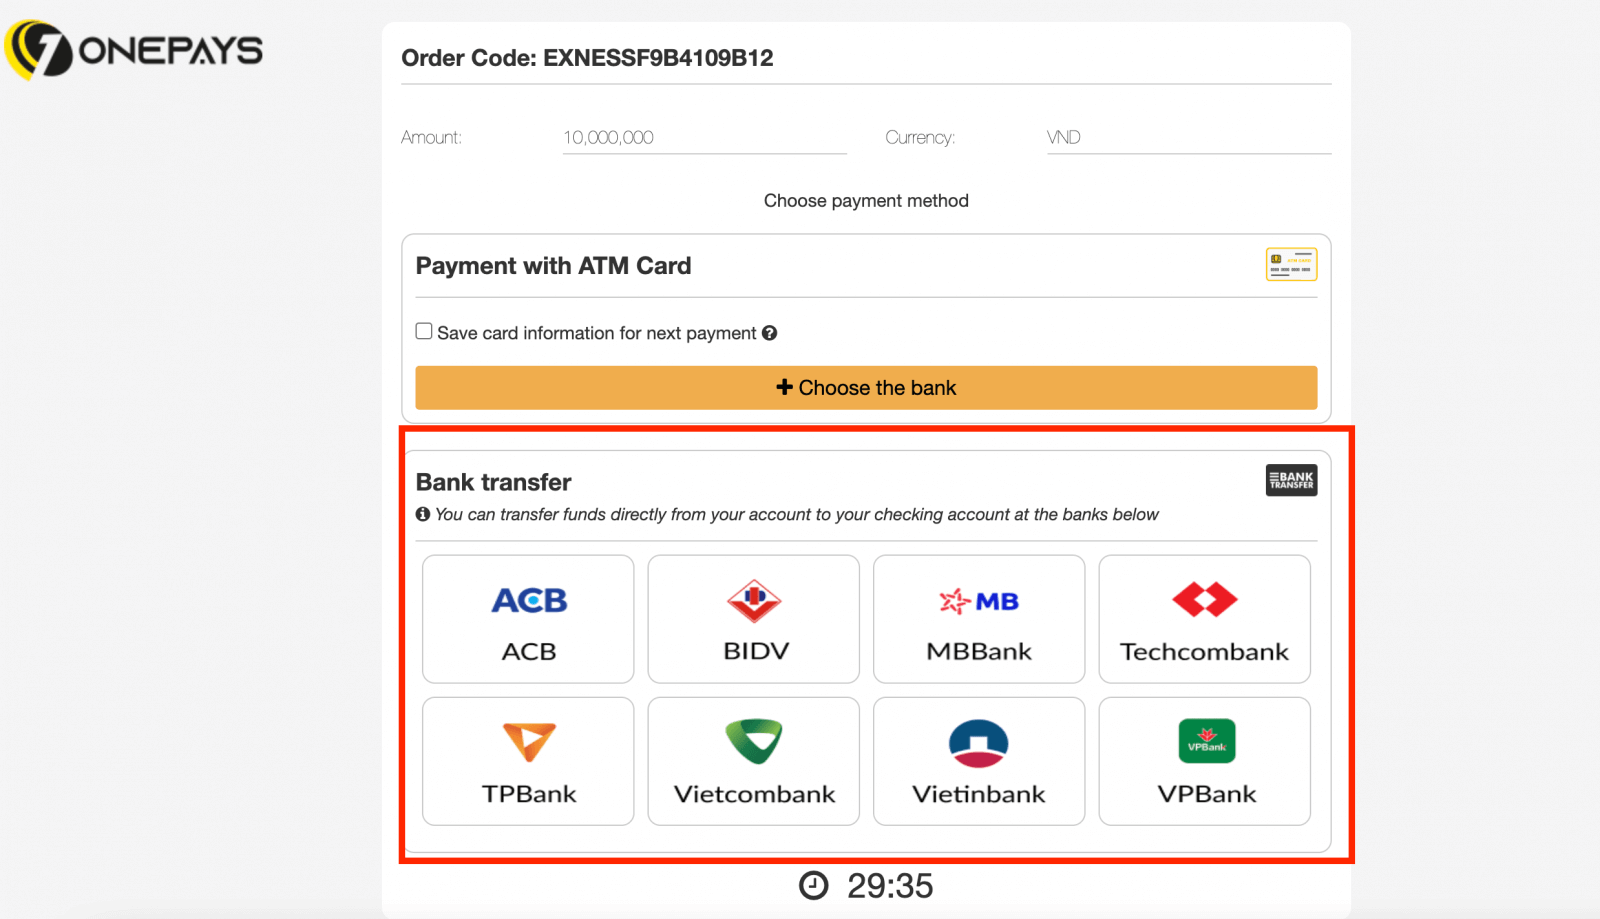
a. If your bank appears greyed out and unavailable, then the amount input at step 2 falls outside of that bank’s minimum and maximum deposit amounts.
5. The next step will depend on your chosen bank; either:
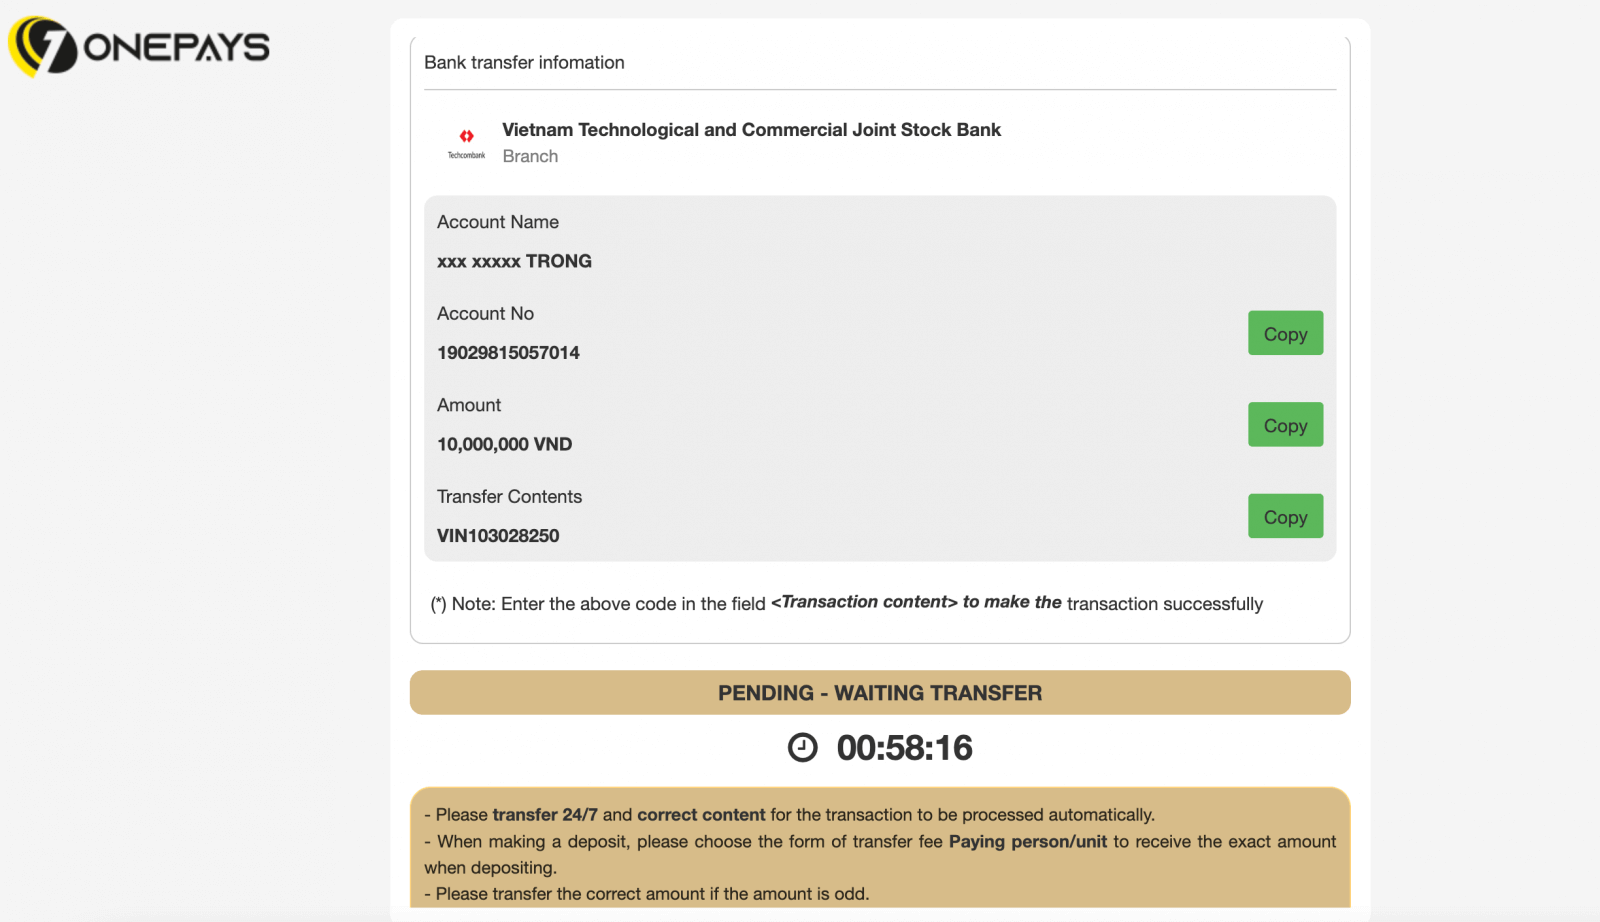
a. Log into your bank account and follow the on-screen instructions to complete the deposit.
b. Complete the form including your ATM card number, account name, and card expiration date, then click Next. Confirm with the OTP sent and click Next to complete the deposit.
Wire Transfers
1. Select Wire Transfer from the Deposit area in your PA.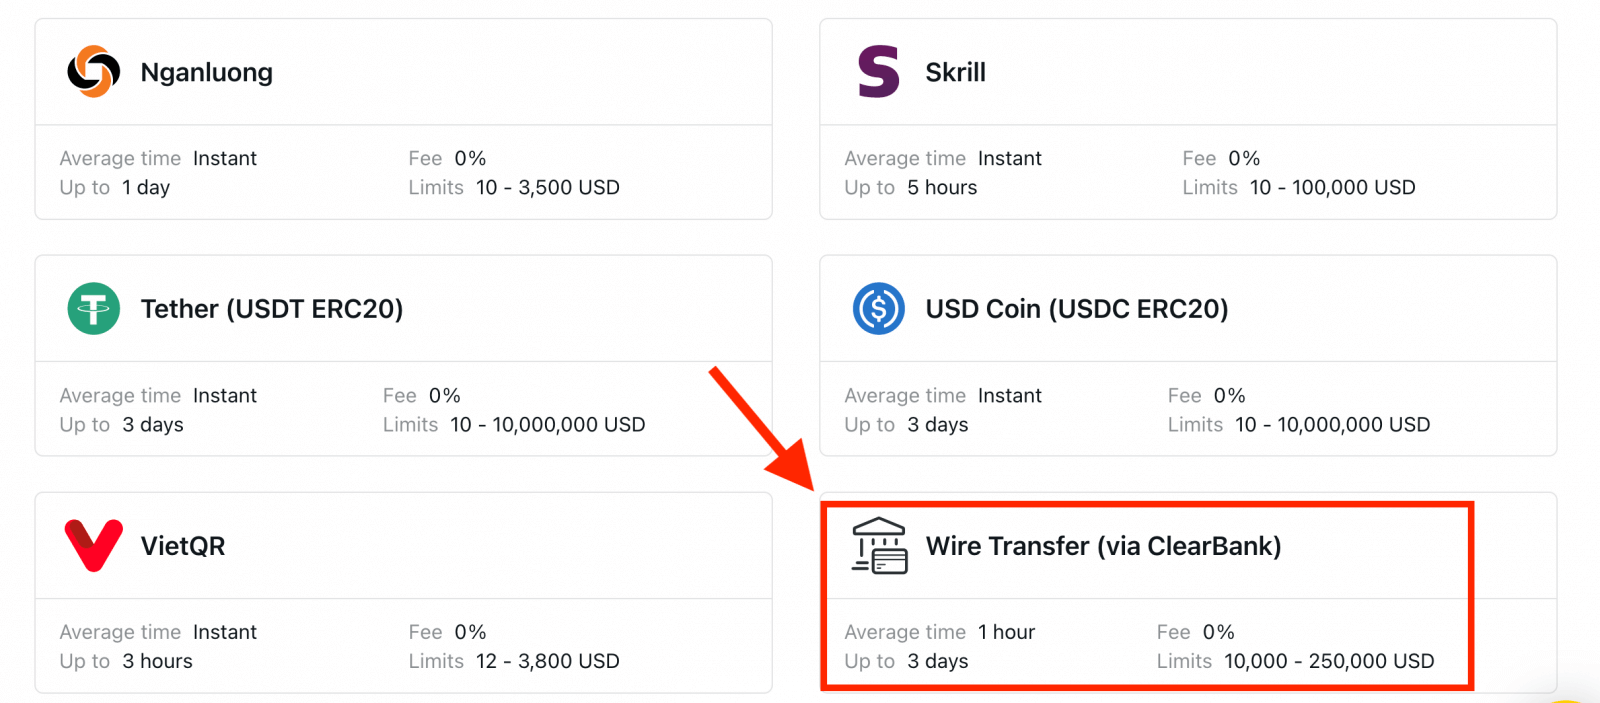
2. Choose the trading account you would like to deposit into, as well as the account currency and deposit amount, then click Continue.
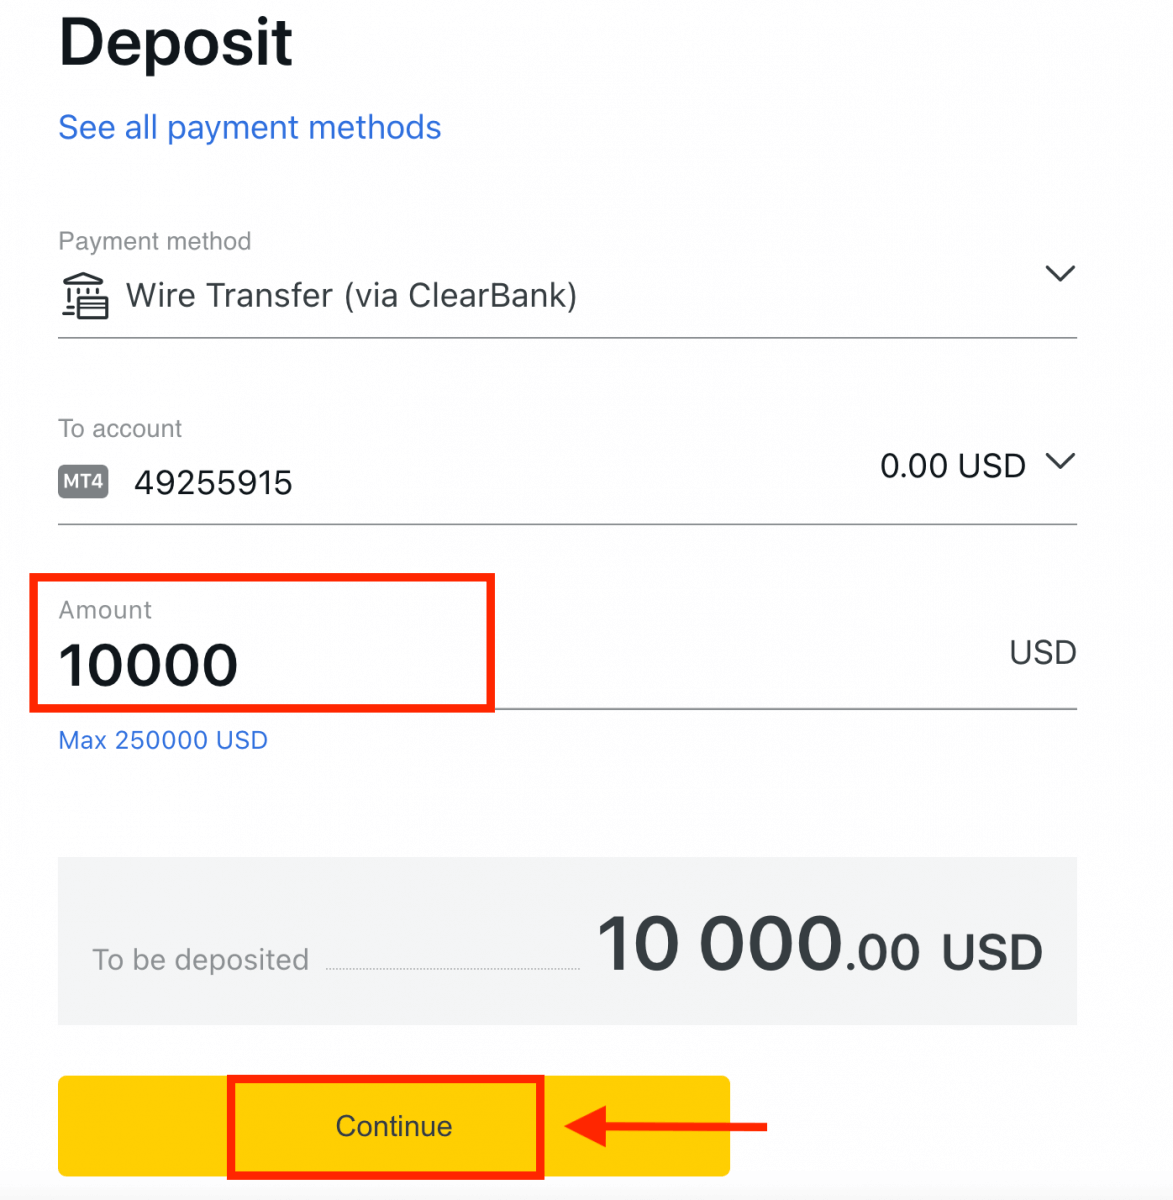
3. Review the summary presented to you; click Confirm to continue.
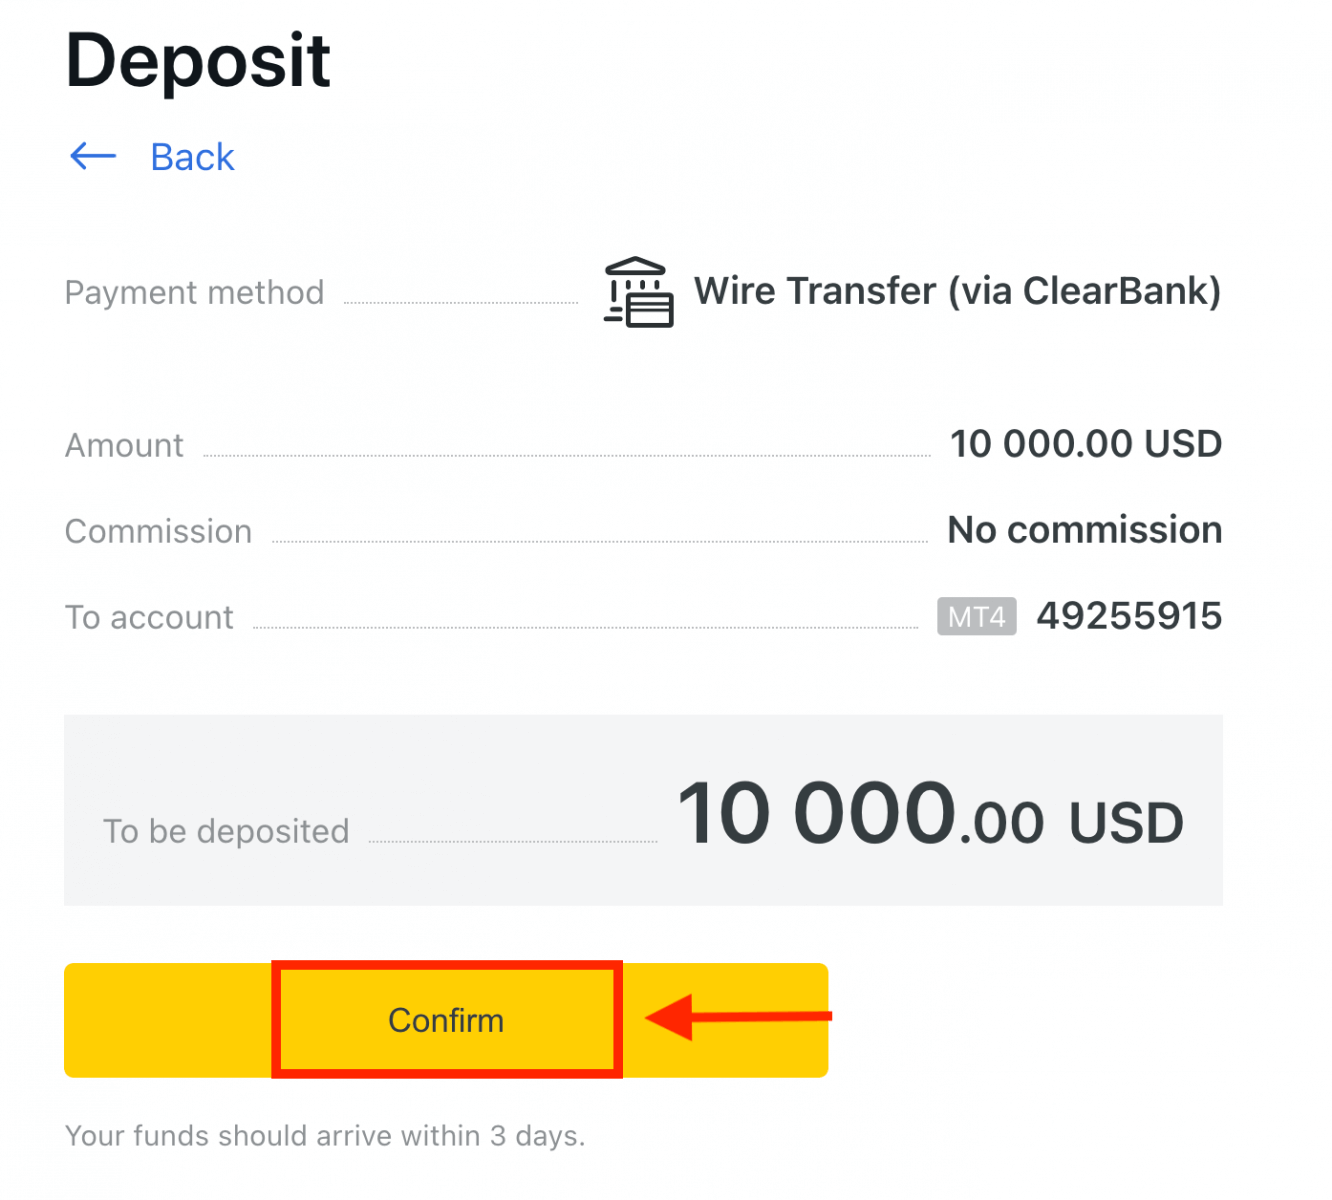
4. Complete the form including all critical information, and then click Pay.
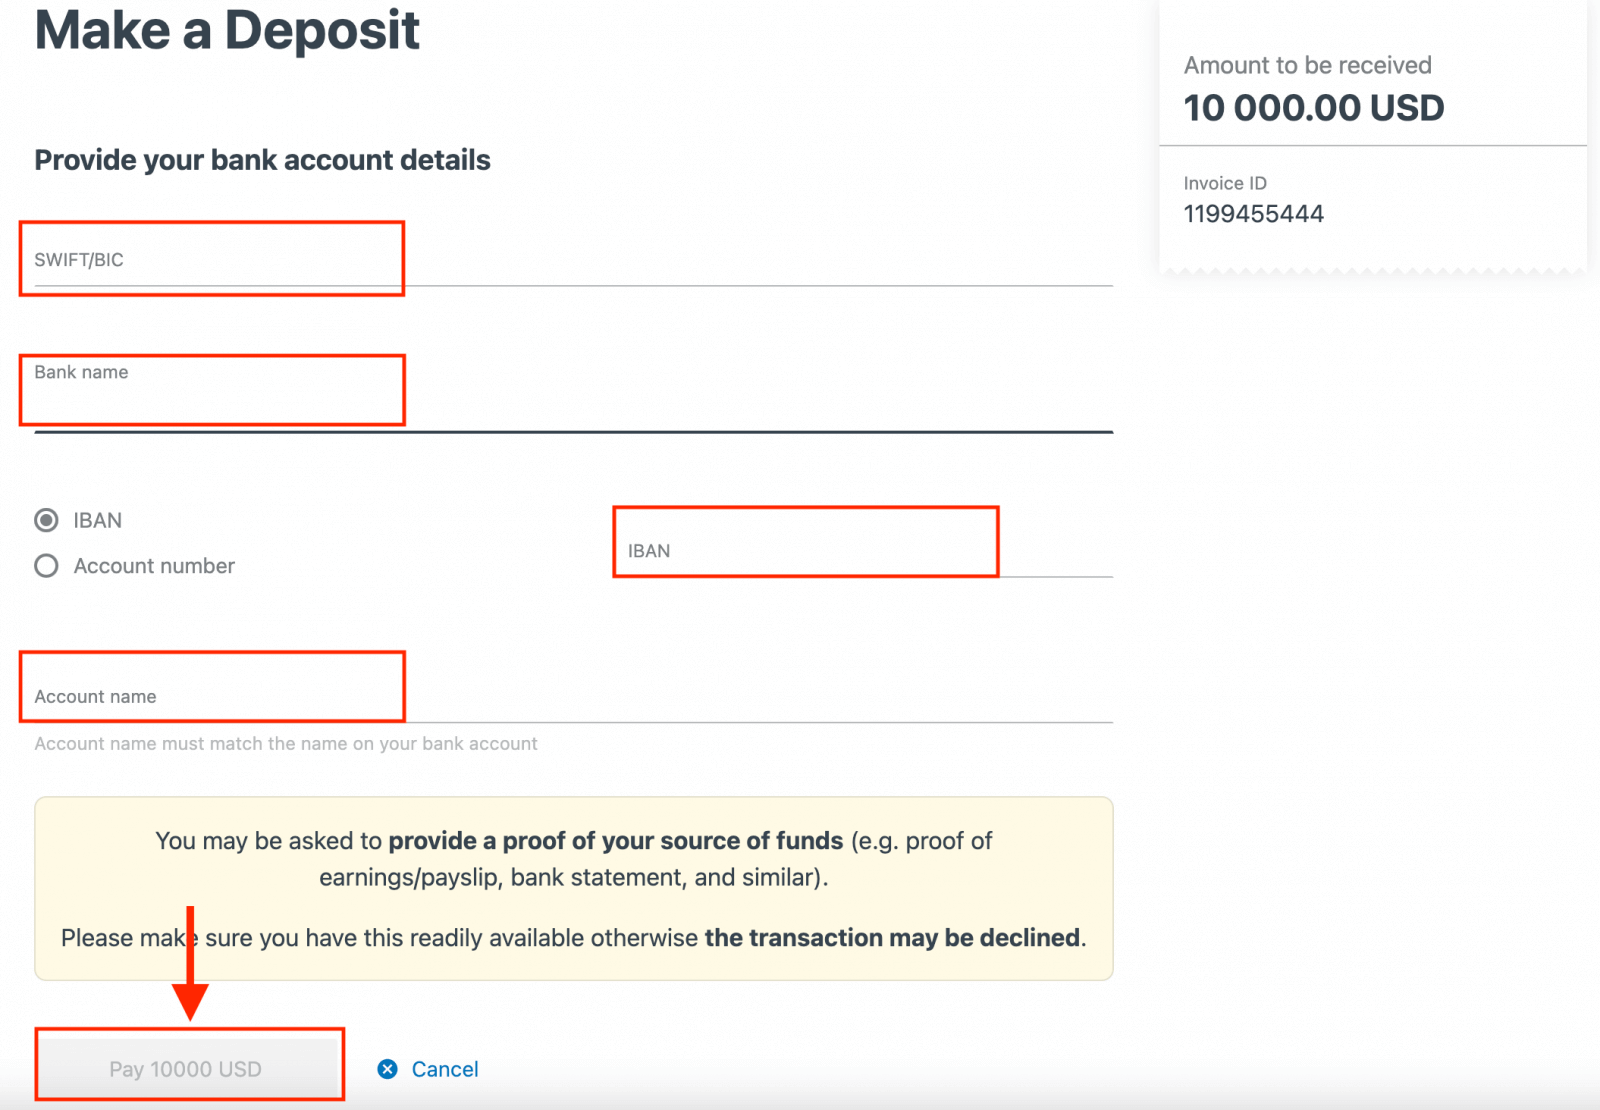
5. You will be presented with further instructions; follow these steps to complete the deposit action.
How to Trade Forex on Exness
How to place a New Order on Exness MT4
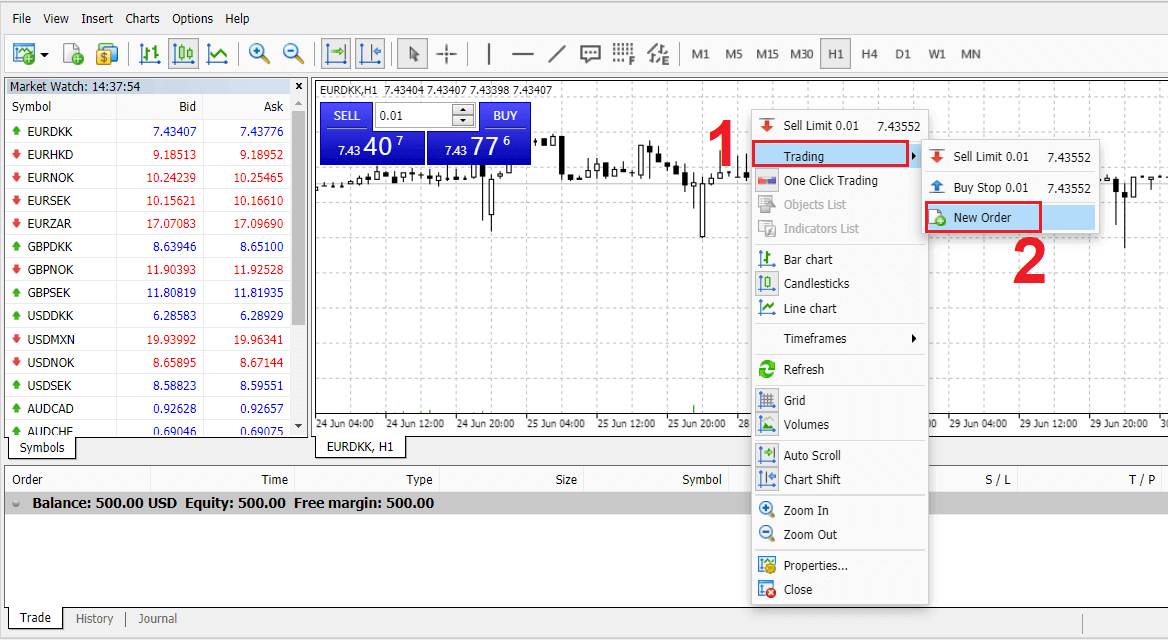
Right click the chart, Then click “Trading" → select “New Order".Or
Double click on the currency you want to place an order on MT4. The Order window will appear
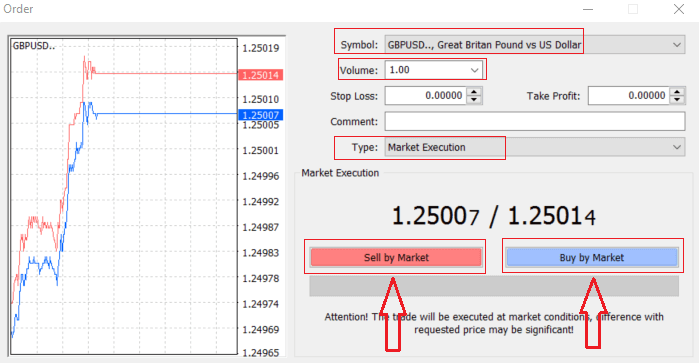
Symbol: check the Currency symbol you wish to trade is displayed in the symbol box
Volume: you must decide the size of your contract, you can click on the arrow and choose the volume from the listed options of the drop-down box or left click in the volume box and type in the required value
Dont forget that your contract size directly affects your possible profit or loss.
Comment: this section is not obligatory but you can use it to identify your trades by adding comments
Type: which is set to market execution by default,
- Market Execution is the model of executing orders at the current markets price
- Pending Order is used to setup a future price that you intend to open your trade with.
Finally you need to decide what order type to open, you can choose between a sell and a buy order
Sell by Market are opened at bid price and closed at ask price, in this order type your trade may bring profit if the price goes down
Buy by Market are opened at ask price and closed at bid price, in this order type your trade may bring profit It the price goes up
Once you click on either Buy or Sell, your order will be instantly processed, you can check your order in the Trade Terminal

How to place a Pending Order
How Many Pending Orders on Exness MT4
Unlike instant execution orders, where a trade is placed at the current market price, pending orders allow you to set orders that are opened once the price reaches a relevant level, chosen by you. There are four types of pending orders available , but we can group them to just two main types:
- Orders expecting to break a certain market level
- Orders expecting to bounce back from a certain market level

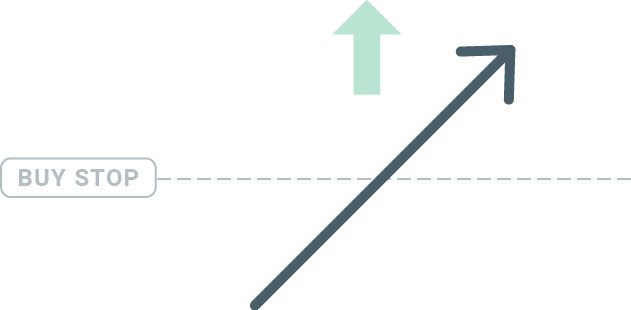
Buy Stop
The Buy Stop order allows you to set a buy order above the current market price. This means that if the current market price is $20 and your Buy Stop is $22, a buy or long position will be opened once the market reaches that price.
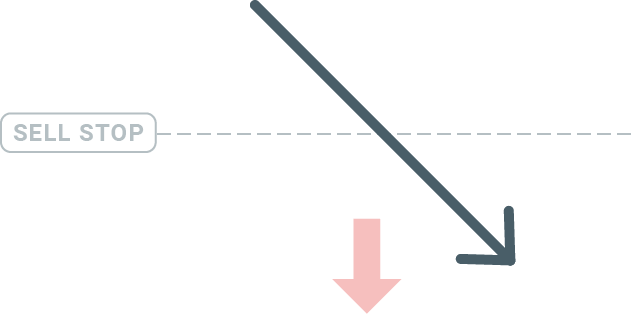
Sell Stop
The Sell Stop order allows you to set a sell order below the current market price. So if the current market price is $20 and your Sell Stop price is $18, a sell or ‘short’ position will be opened once the market reaches that price.
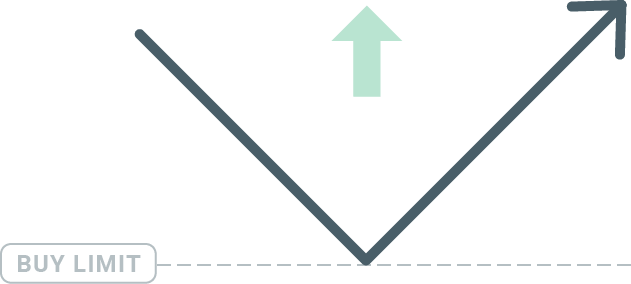
Buy Limit
The opposite of a buy stop, the Buy Limit order allows you to set a buy order below the current market price. This means that if the current market price is $20 and your Buy Limit price is $18, then once the market reaches the price level of $18, a buy position will be opened.
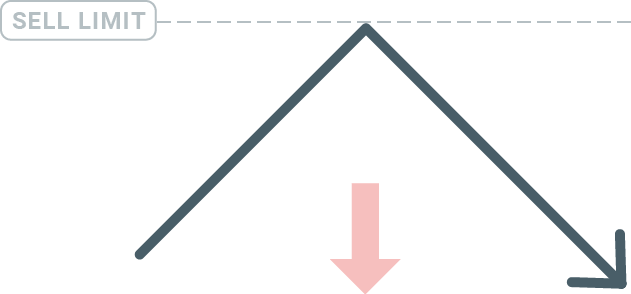
Sell Limit
Finally, the Sell Limit order allows you to set a sell order above the current market price. So if the current market price is $20 and the set Sell Limit price is $22, then once the market reaches the price level of $22, a sell position will be opened on this market.
Opening Pending Orders
You can open a new pending order simply by double-clicking on the name of the market on the Market Watch module. Once you do so, the new order window will open and you will be able to change the order type to Pending order.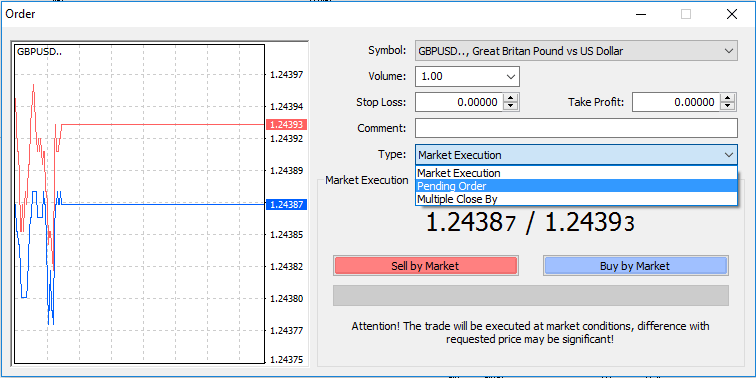
Next, select the market level at which the pending order will be activated. You should also choose the size of the position based on the volume.
If necessary, you can set an expiration date (‘Expiry’). Once all these parameters are set, select a desirable order type depending on whether you would like to go long or short and stop or limit and select the ‘Place’ button.
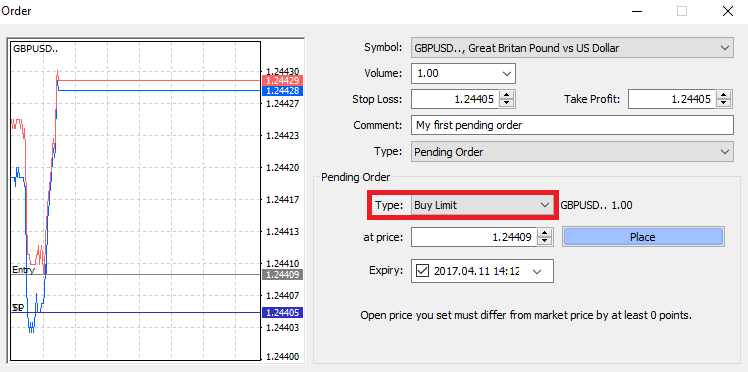
As you can see, pending orders are very powerful features of MT4. They are most useful when youre not able to constantly watch the market for your entry point, or if the price of an instrument changes quickly, and you don’t want to miss the opportunity.
How to close Orders on Exness MT4
To close an open position, click the ‘x’ in the Trade tab in the Terminal window.
Or right-click the line order on the chart and select ‘close’.
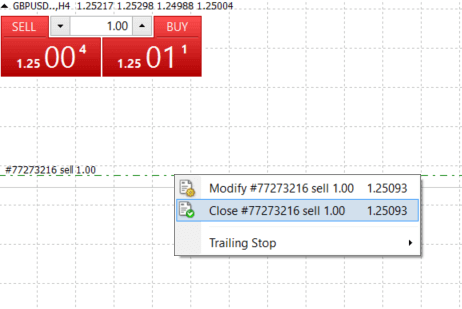
If you’d like to close only a part of position, click the right-click on the open order and select ‘Modify’. Then, in the Type field, select instant execution and choose what part of the position you want to close.
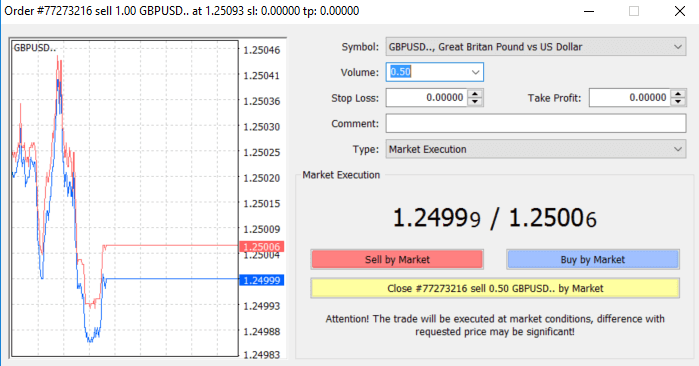
As you can see, opening and closing your trades on MT4 is very intuitive, and it literally takes just one click.
Using Stop Loss, Take Profit and Trailing Stop on Exness MT4
One of the keys to achieving success in financial markets over the long term is prudent risk management. That’s why stop losses and take profits should be an integral part of your trading.So let’s have a look how to use them on our MT4 platform to ensure you know how to limit your risk and maximise your trading potential.
Setting Stop Loss and Take Profit
The first and the easiest way to add Stop Loss or Take Profit to your trade is by doing it right away, when placing new orders.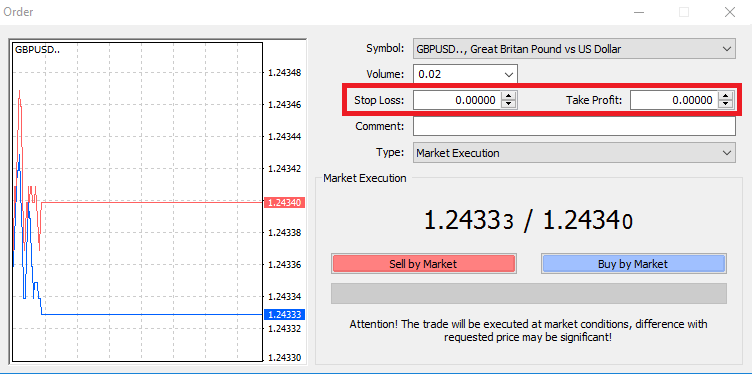
To do this, simply enter your particular price level in Stop Loss or Take Profit fields. Remember that Stop Loss will be executed automatically when the market moves against your position (hence the name: stop losses), and Take Profit levels will be executed automatically when the price reaches your specified profit target. This means that you’re able to set your Stop Loss level below the current market price and Take Profit level above current market price.
It’s important to remember that a Stop Loss (SL) or a Take Profit (TP) is always connected to an open position or a pending order. You can adjust both once your trade has been opened and you’re monitoring the market. It’s a protective order to your market position, but of course they are not necessary to open a new position. You always can add them later, but we highly recommend to always protect your positions*.
Adding Stop Loss and Take Profit Levels
The easiest way to add SL/TP levels to your already opened position is by a using trade line on the chart. To do so, simply drag and drop the trade line up or down to specific level.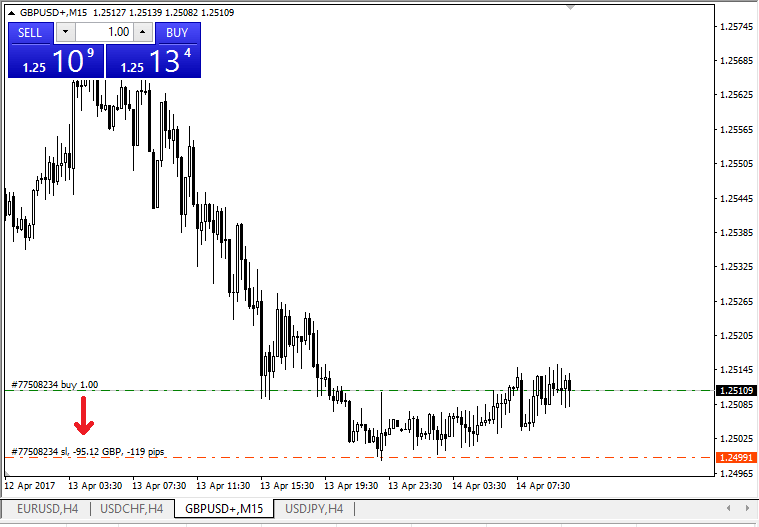
Once you’ve entered SL/TP levels, the SL/TP lines will appear on the chart. This way you can also modify SL/TP levels simply and quickly.
You can also do this from the bottom ‘Terminal’ module as well. To add or modify SL/TP levels, simply right-click on your open position or pending order, and choose ‘Modify or delete order’.
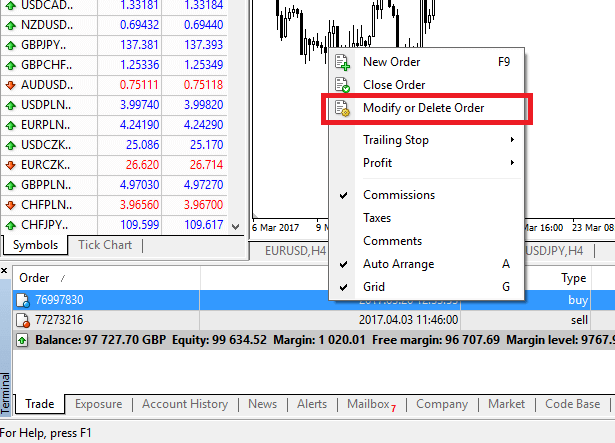
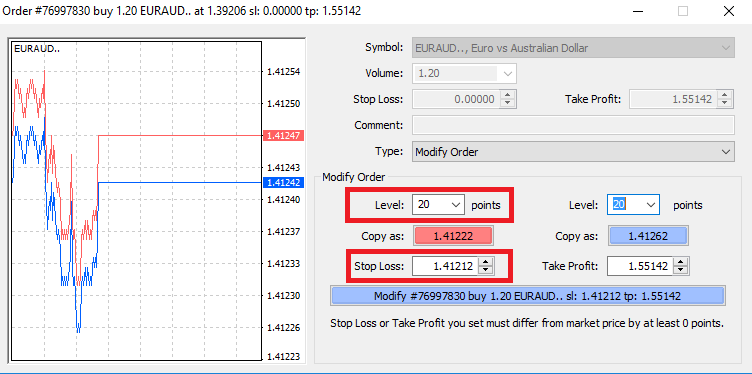
The order modification window will appear and now you’re able to enter/modify SL/TP by the exact market level, or by defining the points range from the current market price.
Trailing Stop
Stop Losses are intended for reducing losses when the market moves against your position, but they can help you lock in your profits as well.While that may sound a bit counterintuitive at first, its actually very easy to understand and master.
Let’s say you’ve opened a long position and the market moves in the right direction, making your trade a profitable one at present. Your original Stop Loss, which was placed at a level below your open price, can now be moved to your open price (so you can break even) or above the open price (so you are guaranteed a profit).
To make this process automatic, you can use a Trailing Stop. This can be a really useful tool for your risk management, particularly when price changes are rapid or when you’re unable to constantly monitor the market.
As soon as the position turns profitable, your Trailing Stop will follow the price automatically, maintaining the previously established distance.
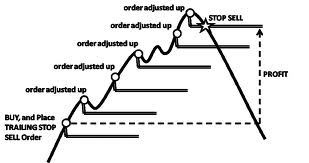
Following the example above, please bear in mind, however, that your trade needs to be running a profit large enough for the Trailing Stop to move above your open price, before your profit can be guaranteed.
Trailing Stops (TS) are attached to your opened positions, but it’s important to remember that if you have a trailing stop on MT4, you need to have the platform open for it to be successfully executed.
To set a Trailing Stop, right-click the open position in the ‘Terminal’ window and specify your desired pip value of distance between the TP level and the current price in the Trailing Stop menu.
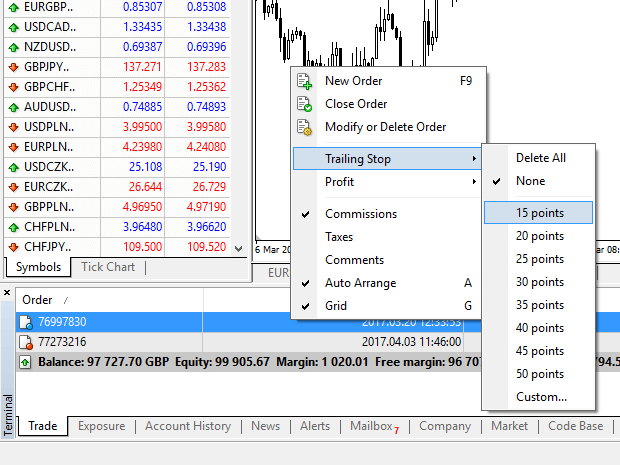
Your Trailing Stop is now active. This means that if prices change to the profitable market side, TS will ensure the stop loss level follows the price automatically.
Your Trailing Stop can easily be disabled by setting ‘None’ in the Trailing Stop menu. If you want to quickly deactivate it in all opened positions, just select ‘Delete All’.
As you can see, MT4 provides you with plenty of ways to protect your positions in just a few moments.
*Whilst Stop Loss orders are one of the best ways to ensure your risk is managed and potential losses are kept to acceptable levels, they don’t provide 100% security.
Stop losses are free to use and they protect your account against adverse market moves, but please be aware that they cannot guarantee your position every time. If the market becomes suddenly volatile and gaps beyond your stop level (jumps from one price to the next without trading at the levels in between), it’s possible your position could be closed at a worse level than requested. This is known as price slippage.
Guaranteed stop losses, which have no risk of slippage and ensure the position is closed out at the Stop Loss level you requested even if a market moves against you, are available for free with a basic account.
How to Withdraw money from Exness
Withdrawal rules
Withdrawals can be made any day, any time giving you round-the-clock access to your funds. You can withdraw funds from your account in the Withdrawal section of your Personal Area. You may check the status of the transfer under Transaction History at any time.
However, be aware of these general rules for withdrawing funds:
- The amount you can withdraw at any time is equal to your trading account’s free margin shown in your Personal Area.
- A withdrawal must be made using the same payment system, same account, and same currency used as for the deposit. If you have used a number of different payment methods to deposit funds into your account, withdrawals are to be made to those payment systems in the same proportion as the deposits were made. In exceptional cases this rule may be waived, pending account verification and under strict advice of our payment specialists.
- Before any profit can be withdrawn from a trading account, the full amount that was deposited into that trading account using your bank card or Bitcoin must be completely withdrawn in an operation known as a refund request.
- Withdrawals must follow the payment system priority; withdraw funds in this order (bank card refund request first, followed by bitcoin refund request, bank card profit withdrawals, then anything else) to optimize transaction times. See more about this system at the end of this article.
These general rules are very important, so we’ve included an example to help you understand how they all work together:
You’ve deposited USD 1 000 total into your account, with USD 700 with a bank card and USD 300 with Neteller. As such, youll only be allowed to withdraw 70% of the total withdrawal amount with your bank card and 30% through Neteller.
Lets assume that you’ve earned USD 500 and wish to withdraw everything, including profit:
- Your trading account has a free margin of USD 1 500, making up the total of your initial deposit and subsequent profit.
- You will first need to make your refund requests, following the payment system priority; i.e. USD 700 (70%) refunded to your bank card first.
- Only after all refund requests are complete can you withdraw profit made to your bank card following the same proportions; USD 350 profit (70%) to your bank card.
- The purpose of the payment priority system is to ensure that Exness follows financial regulations forbidding money laundering and potential fraud, making it an essential rule without exception.
How to Withdraw Money
Bank Card
Please note that the following bank cards are accepted:
- VISA and VISA Electron
- Mastercard
- Maestro Master
- JCB (Japan Credit Bureau)*
*The JCB card is the only bank card accepted in Japan; other bank cards cannot be used.
*Minimum withdrawal for refunds is USD 0 for web and mobile platforms, and USD 10 for the Social Trading app.
**Minimum withdrawal for profit withdrawals is USD 3 for web and mobile platforms, and USD 6 for the Social Trading app. Social Trading is unavailable for clients registered with our Kenyan entity.
***The maximum profit withdrawal is USD 10 000 per transaction.
1. Select Bank Card in the Withdrawal area of your Personal Area.
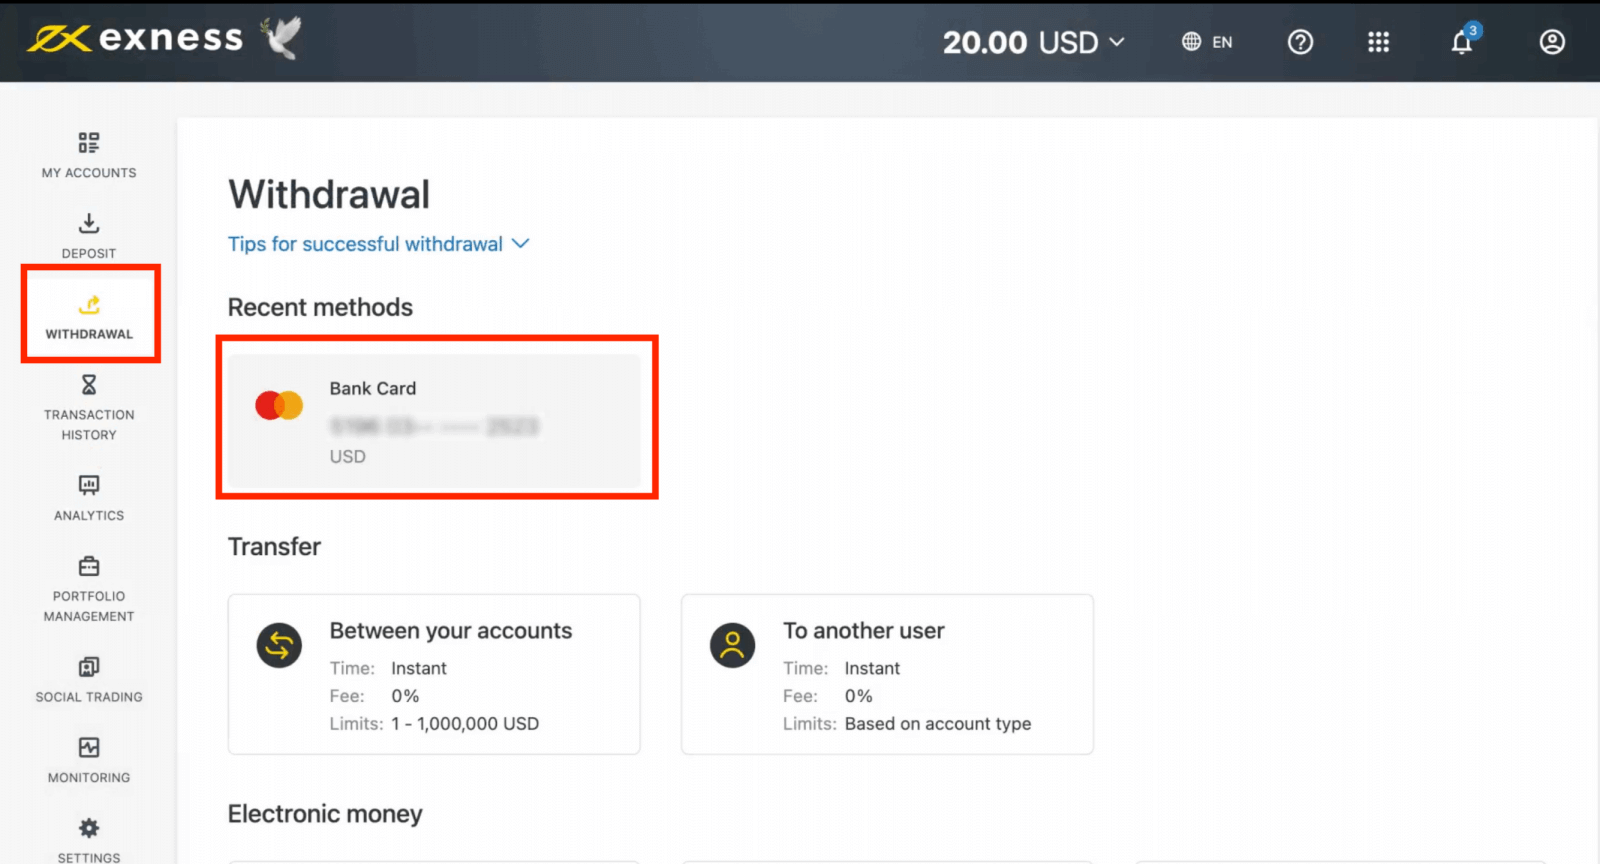
2. Complete the form, including:
b. Choose the trading account to withdraw from.
c. Enter the amount to withdraw in your account currency.
Click Continue.
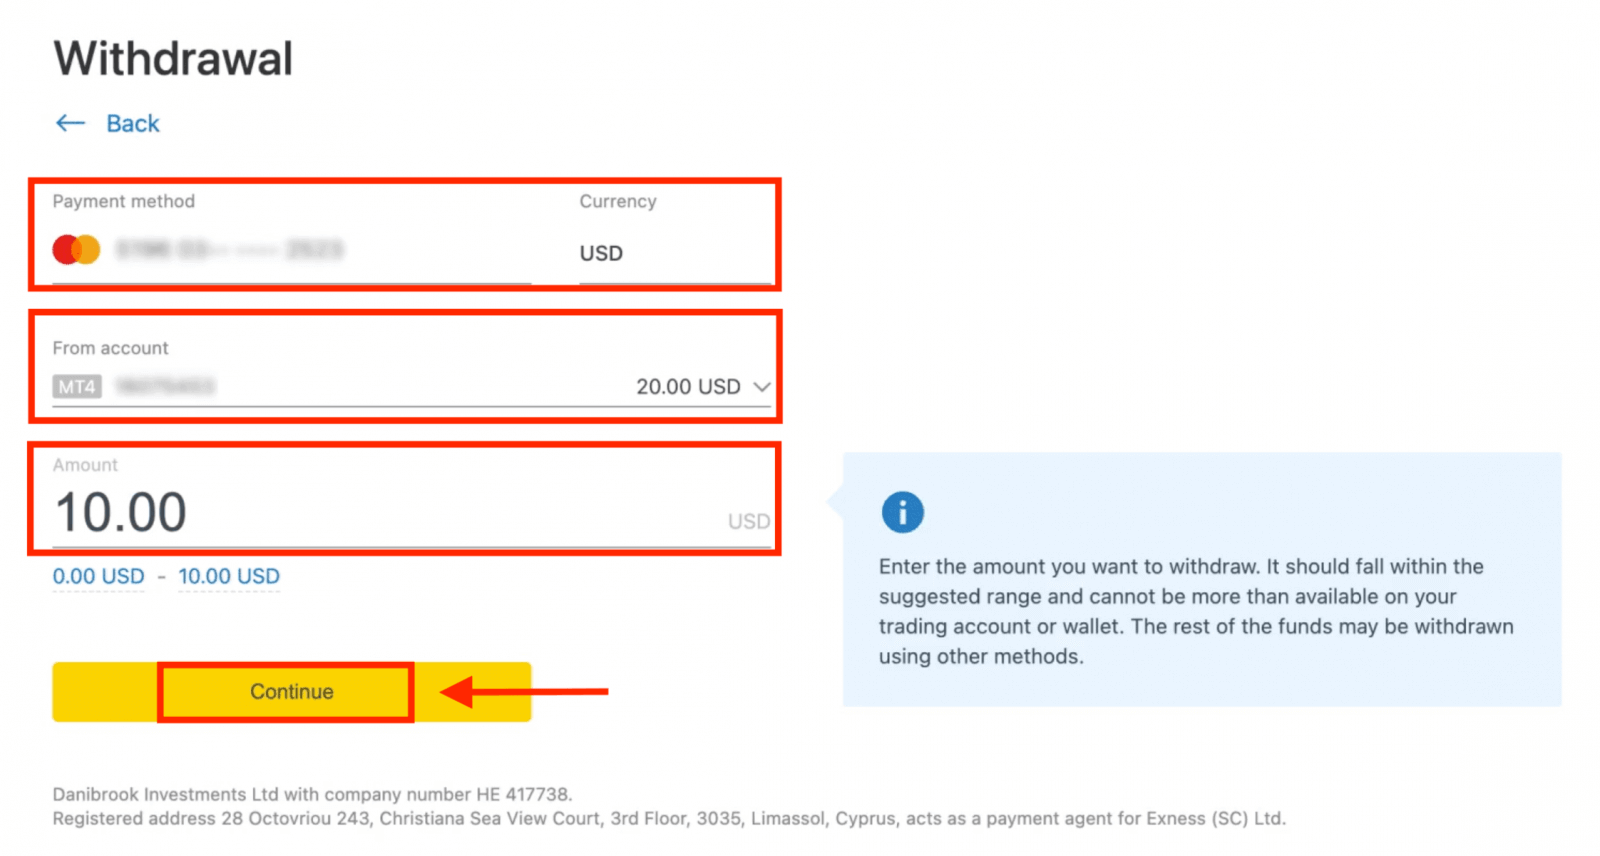
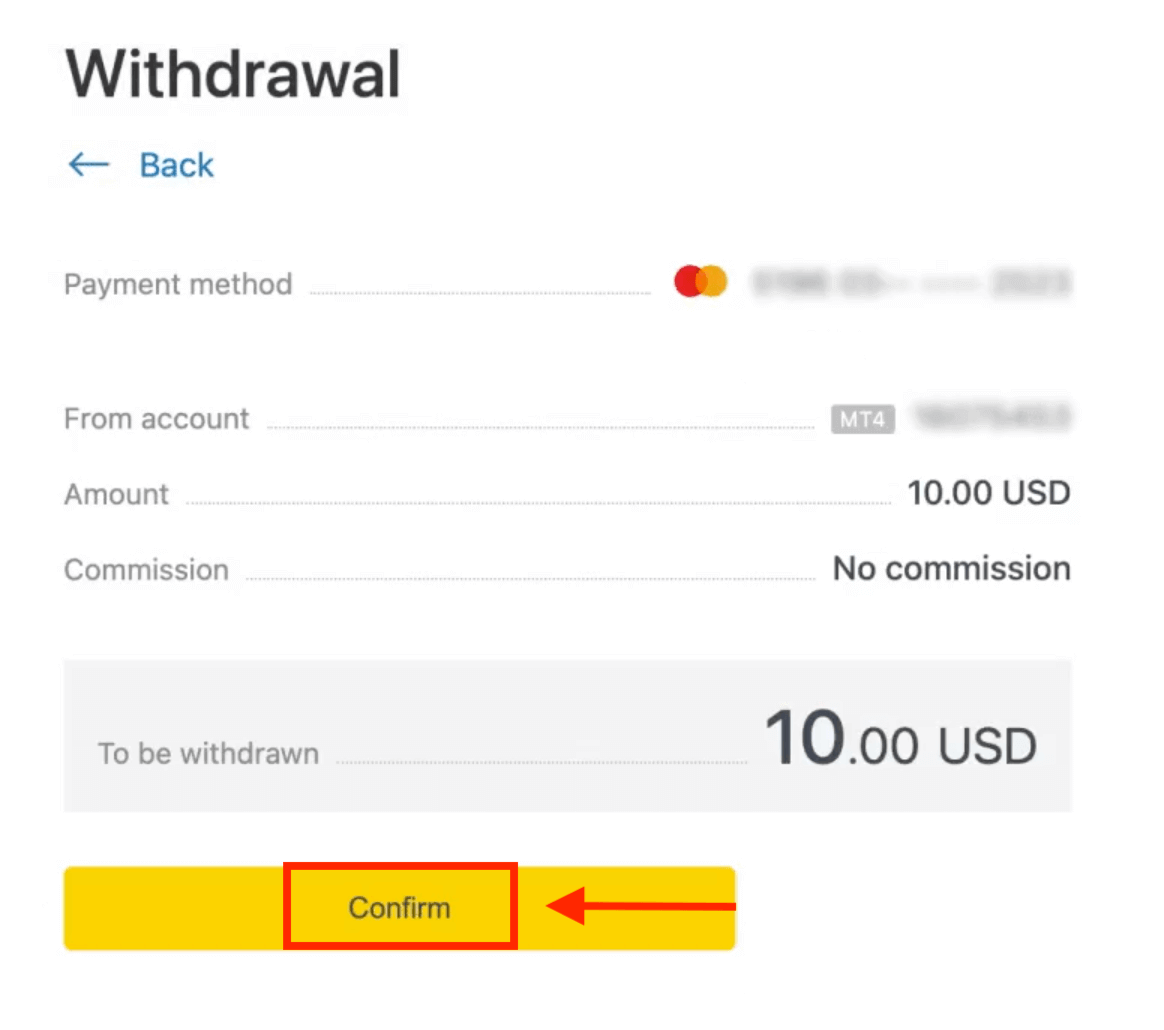
3. A transaction summary will be presented; click Confirm to continue.
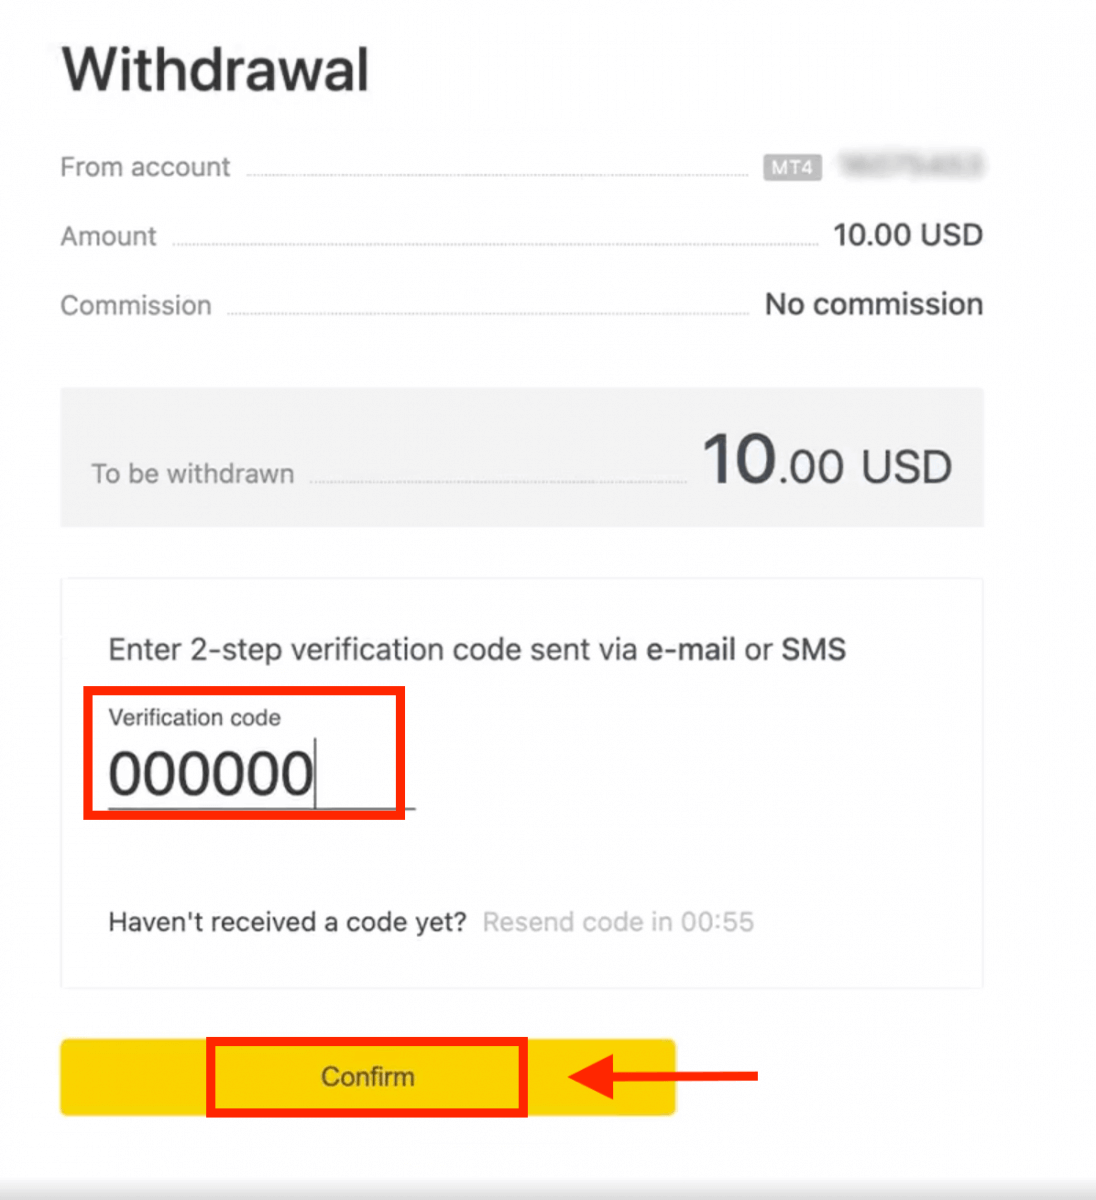
4. Enter the verification code sent to you either by email or SMS (depending on your Personal Area security type), then click Confirm.
5. A message will confirm the request is complete.
If your bank card has expired
When your bank card has expired and the bank has issued a new card linked to the same bank account, the refund process is straightforward. You may submit your refund request in the usual way:
- Go to Withdrawal in your Personal Area and select Bank card.
- Select the transaction related to the expired bank card.
- Proceed with the withdrawal process.
However, if your expired card isn’t linked to a bank account because your account has been closed, you should contact the Support Team and provide proof regarding this. We will then inform you what you should do to request a refund on another available Electronic Payment System.
If your bank card has been lost or stolen
In the event that your card has been lost or stolen, and can no longer be used for withdrawals, please contact the Support Team with proof regarding the circumstances of your lost/stolen card. We can then assist you with your withdrawal if the necessary account verification has been satisfactorily completed.
Electronic Payment Systems (EPS)
1. Select the payment you wish to use from the Withdrawal section of your Personal Area, such as Skrill.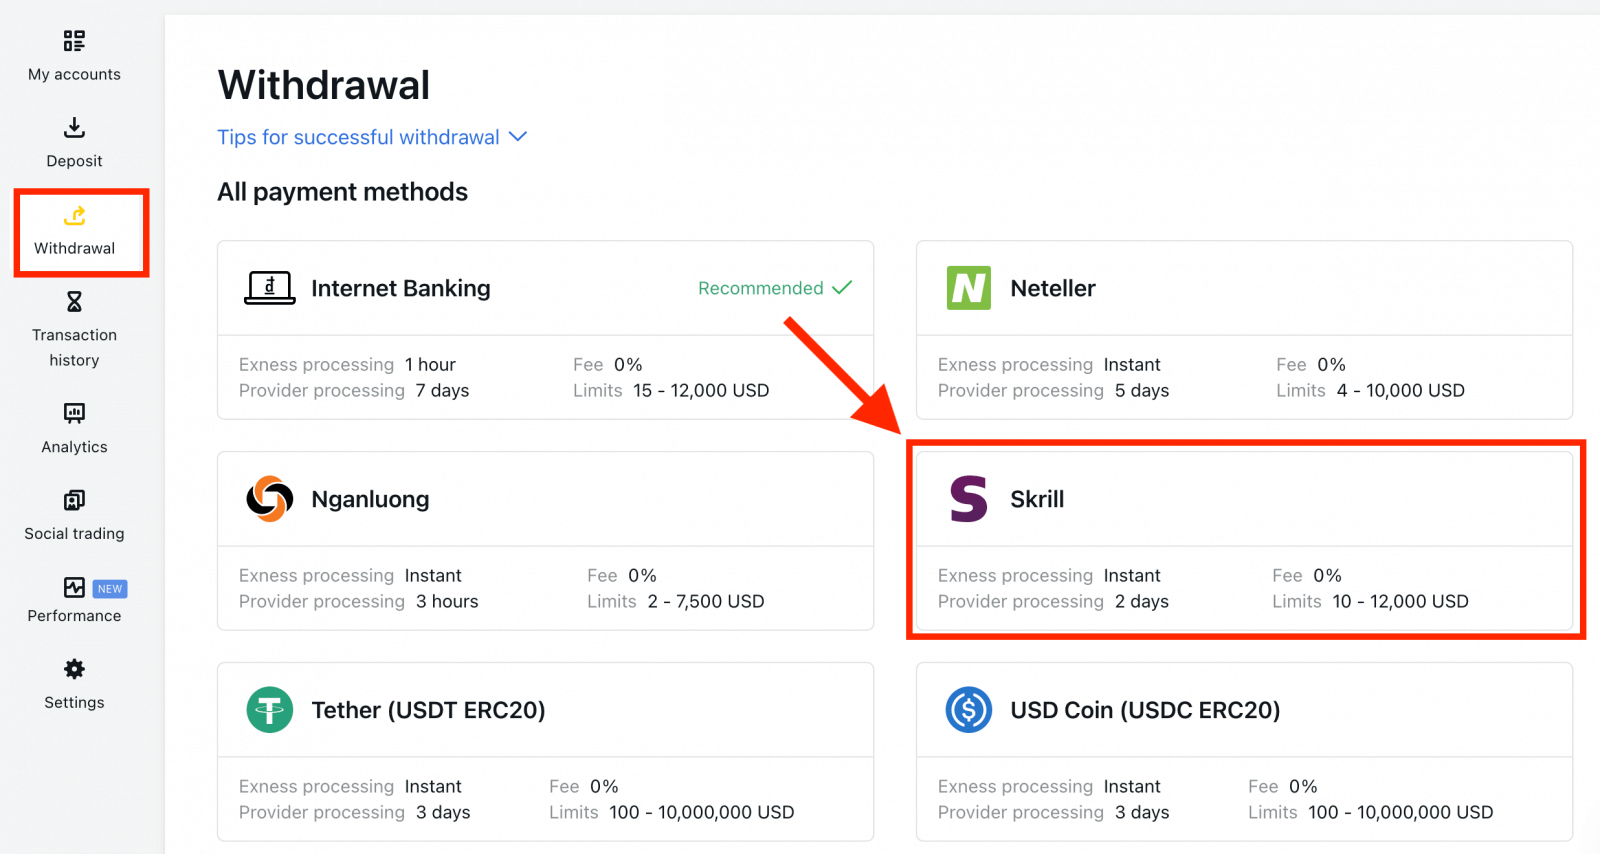
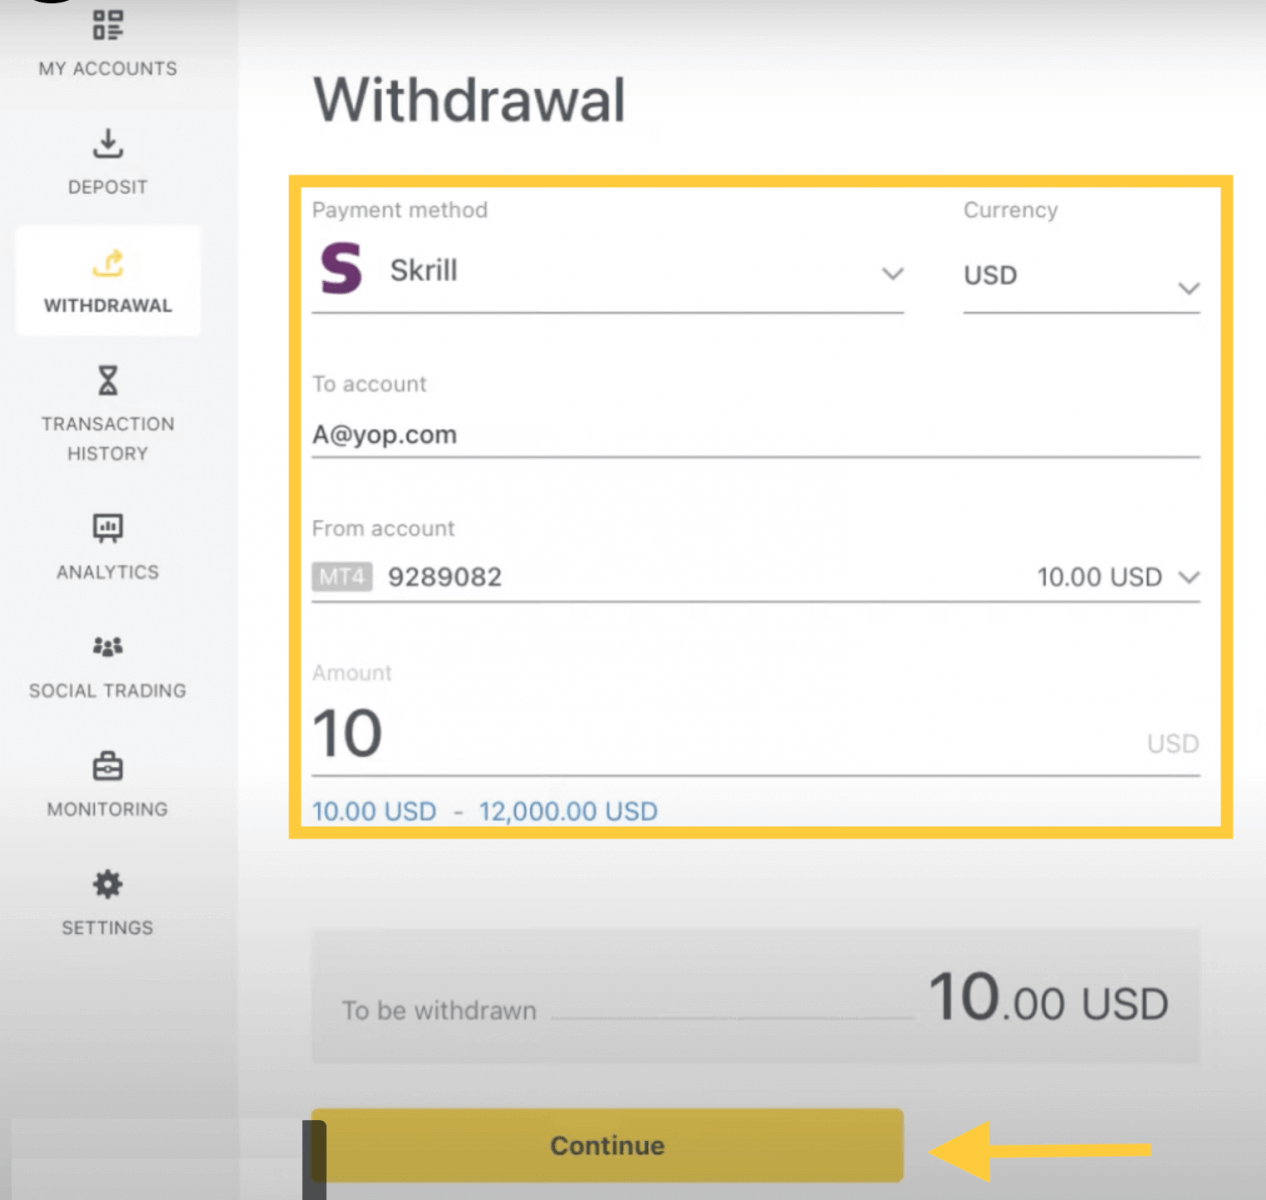
2. Select the trading account you would like to withdraw funds from, and enter your Skrill account email; specify the withdrawal amount in your trading account currency. Click Continue.
3. A summary of the transaction will be shown. Enter the verification code sent to you either by email or SMS depending on your Personal Area security type. Click Confirm.
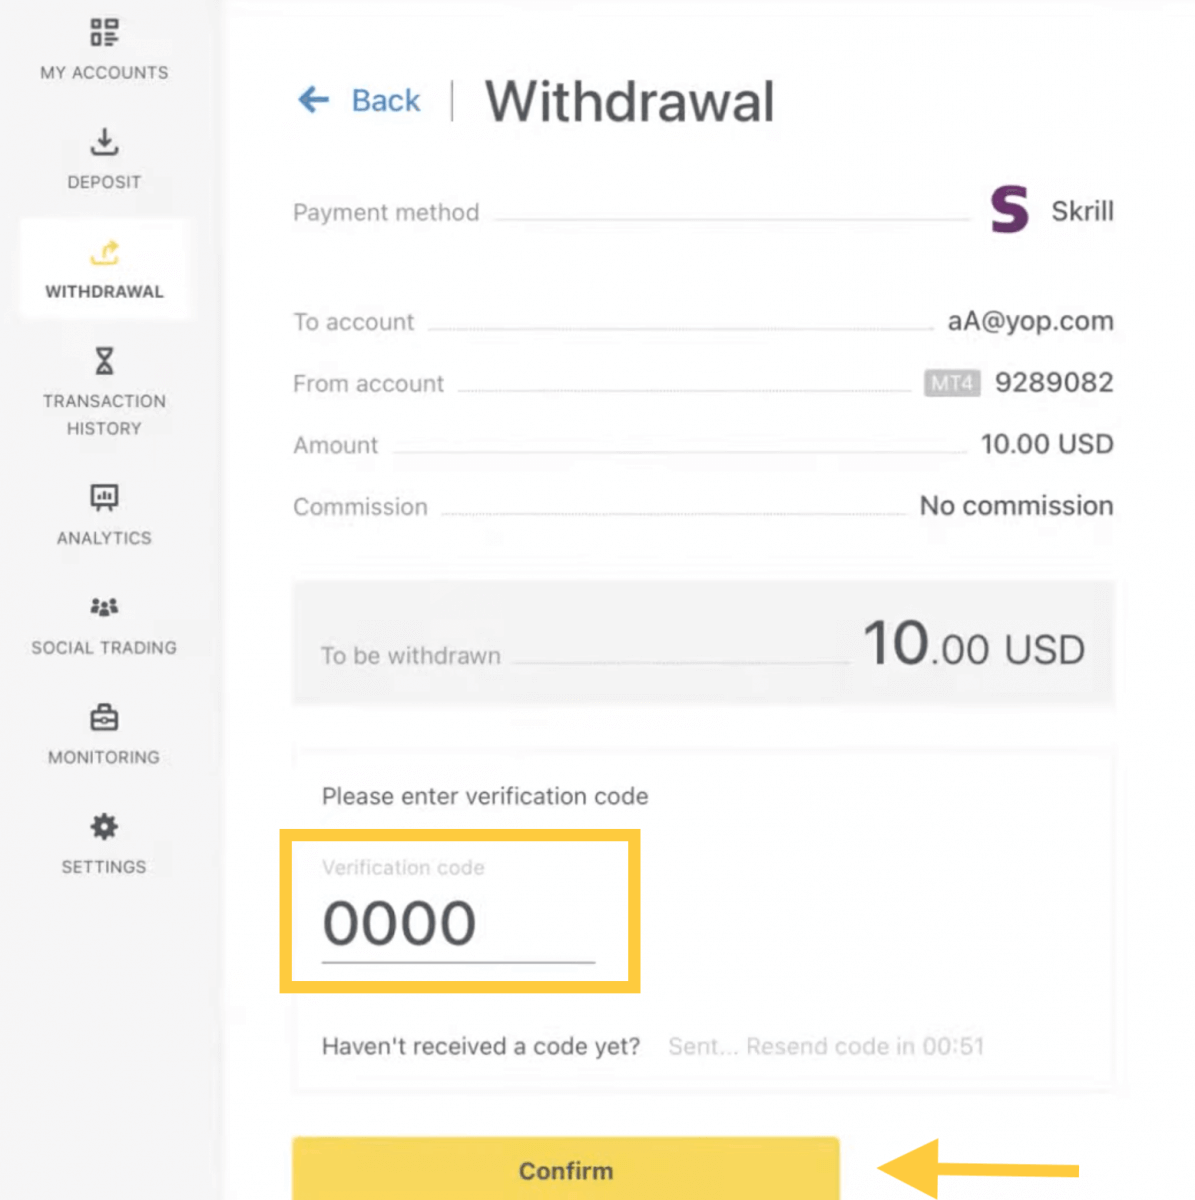
4. Congratulations, your withdrawal will now begin processing.
Note: If your Skrill account is blocked, please contact us via chat or email us at [email protected] with proof that the account has been blocked indefinitely. Our finance department will find a solution for you.
Bitcoin (BTC) - Tether (USDT)
To withdraw funds from your trading account:1. Go to the Withdrawal section in your Personal Area and click Bitcoin (BTC).
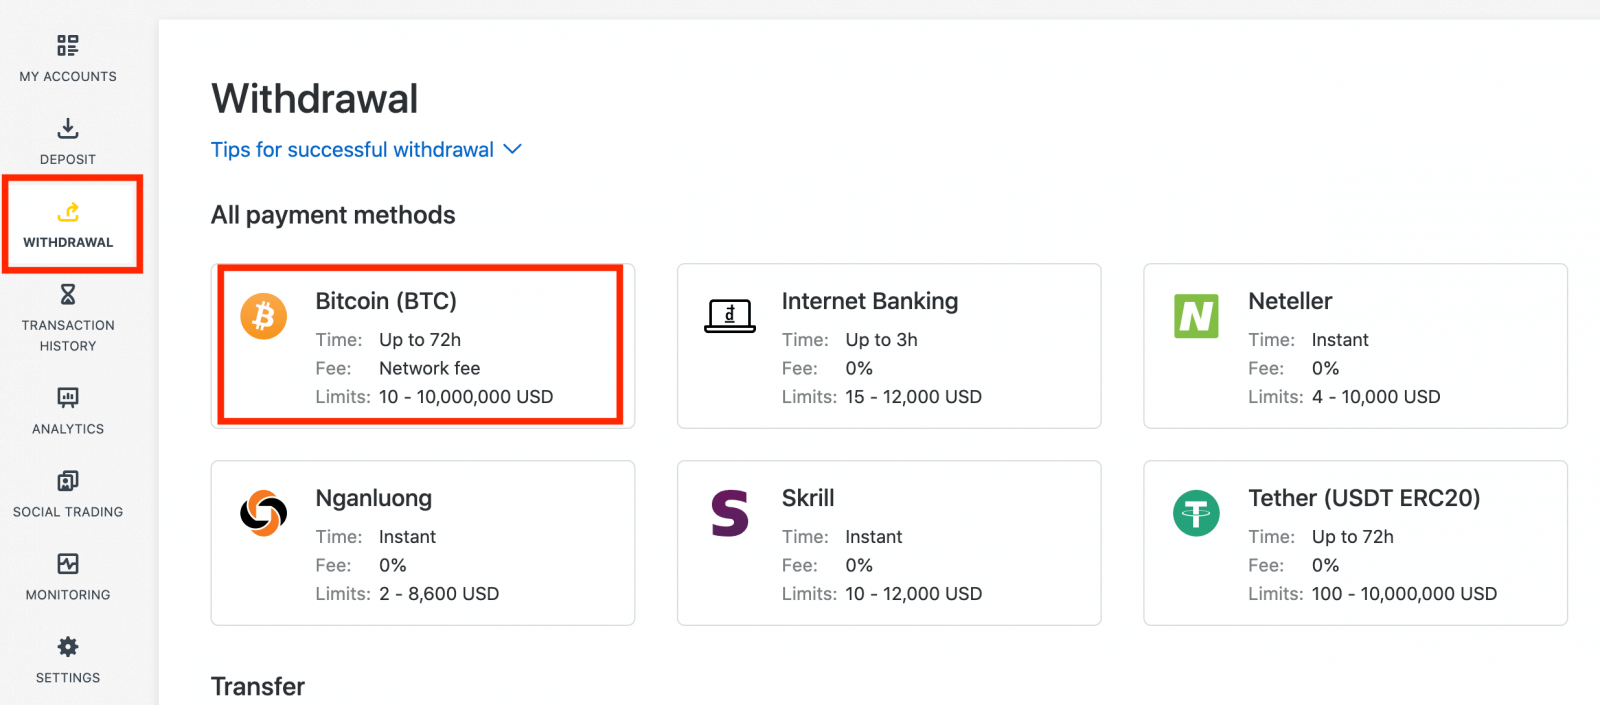
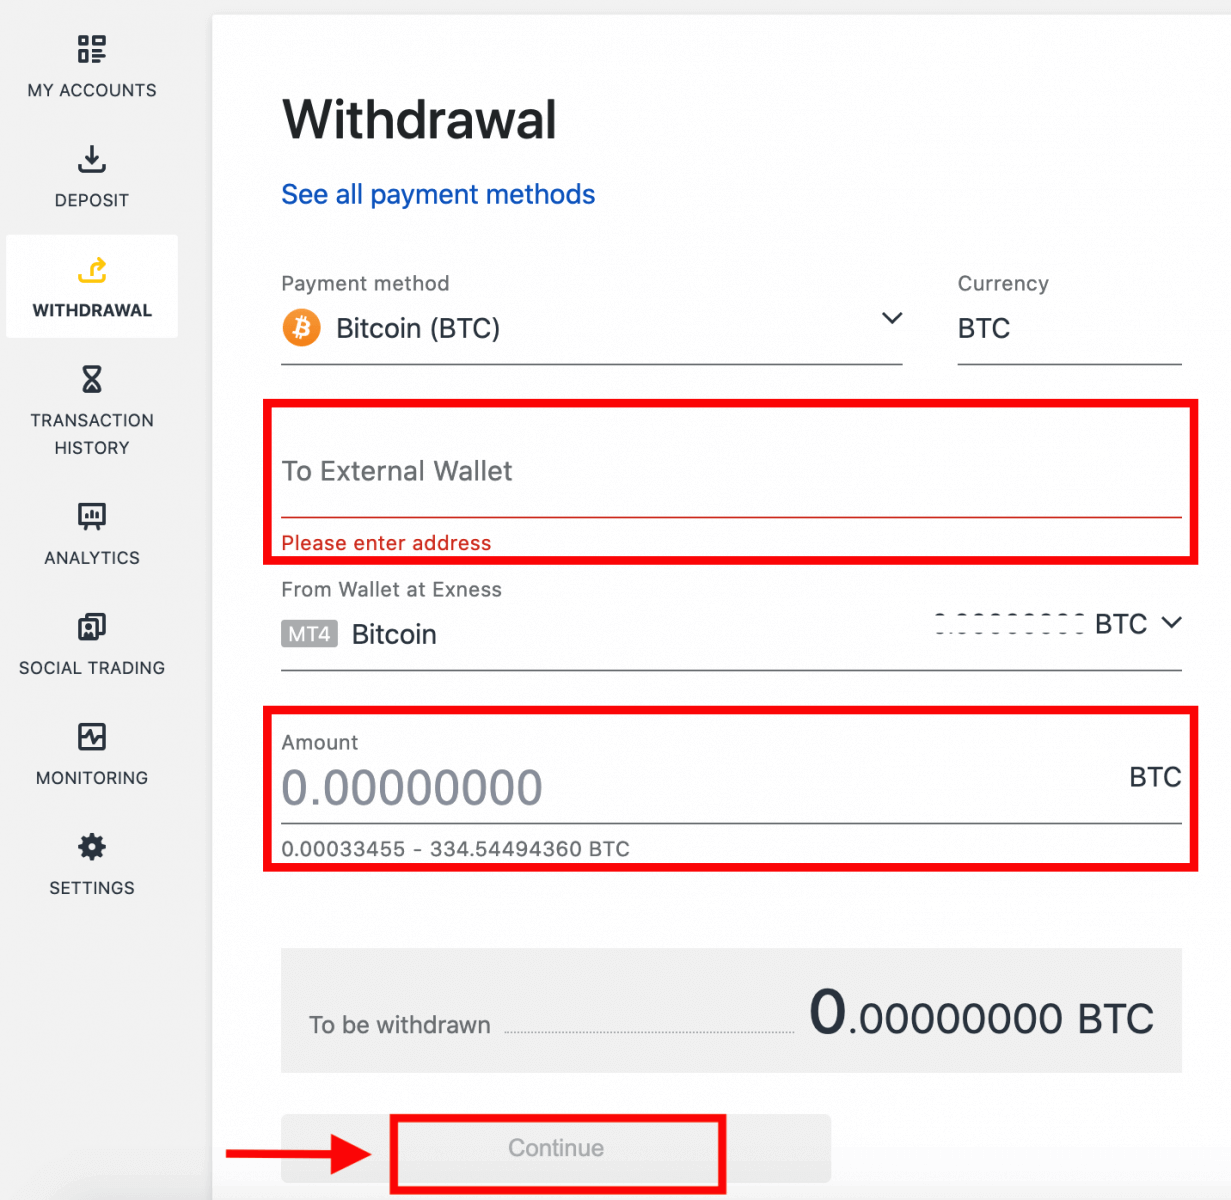
2. You will be asked to provide an external Bitcoin wallet address (this is your personal Bitcoin wallet). Find your external wallet address displayed in your personal Bitcoin wallet, and copy this address.
3. Enter the external wallet address, and the amount you wish to withdraw, then click Continue.
Take care to provide this exact or funds may be lost and irrecoverable and the withdrawal amount.
4. A confirmation screen will show all the details of your withdrawal, including any withdrawal fees; if you are satisfied, click Confirm.
5. A verification message will be sent to your Exness account’s security type; enter the verification code and then click Confirm.
6. One last confirmation message will notify you that the withdrawal is complete and being processed.
See two withdrawal transactions instead of one?
As you are already aware, withdrawal for Bitcoin works in the form of refunds (similar to bank card withdrawals). Therefore, when you withdraw an amount that is more than the non-refunded deposits, the system internally splits that transaction into a refund and a profit withdrawal. This is the reason you see two transactions instead of one.
For example, say you deposit 4 BTC and make a profit of 1 BTC from trading, giving you a total of 5 BTC in total. If you withdraw 5 BTC, you will see two transactions - one for an amount of 4 BTC (refund of your deposit) and another for 1 BTC (profit).
Bank Transfers
To withdraw funds from your trading account:
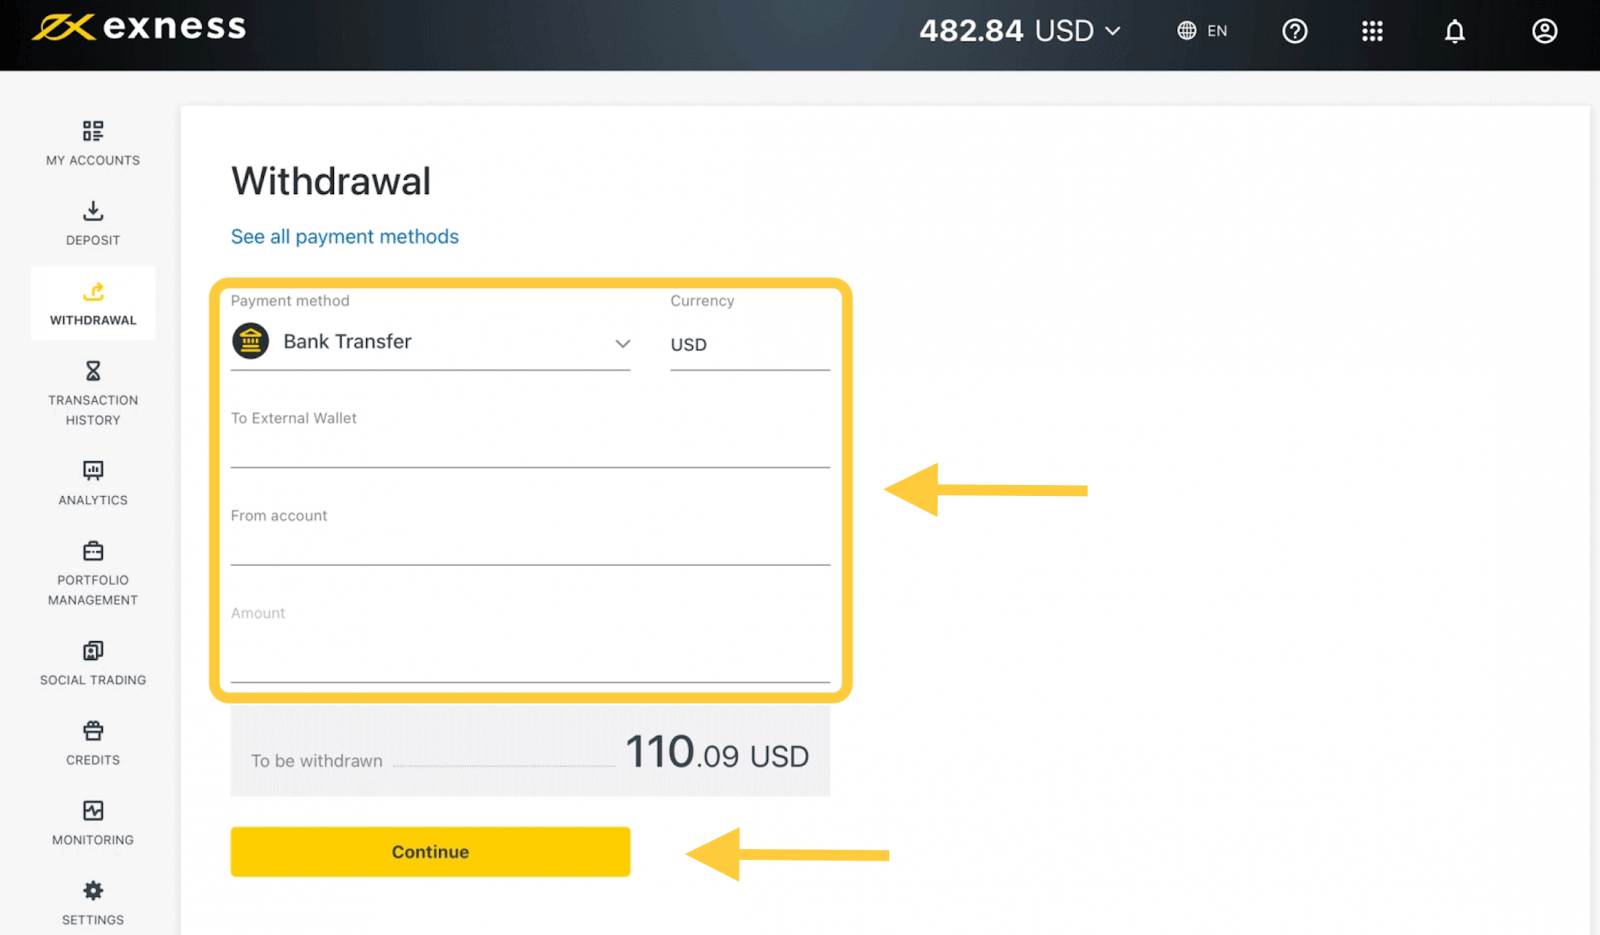
1. Choose Bank Transfer in the Withdrawal section of your Personal Area.
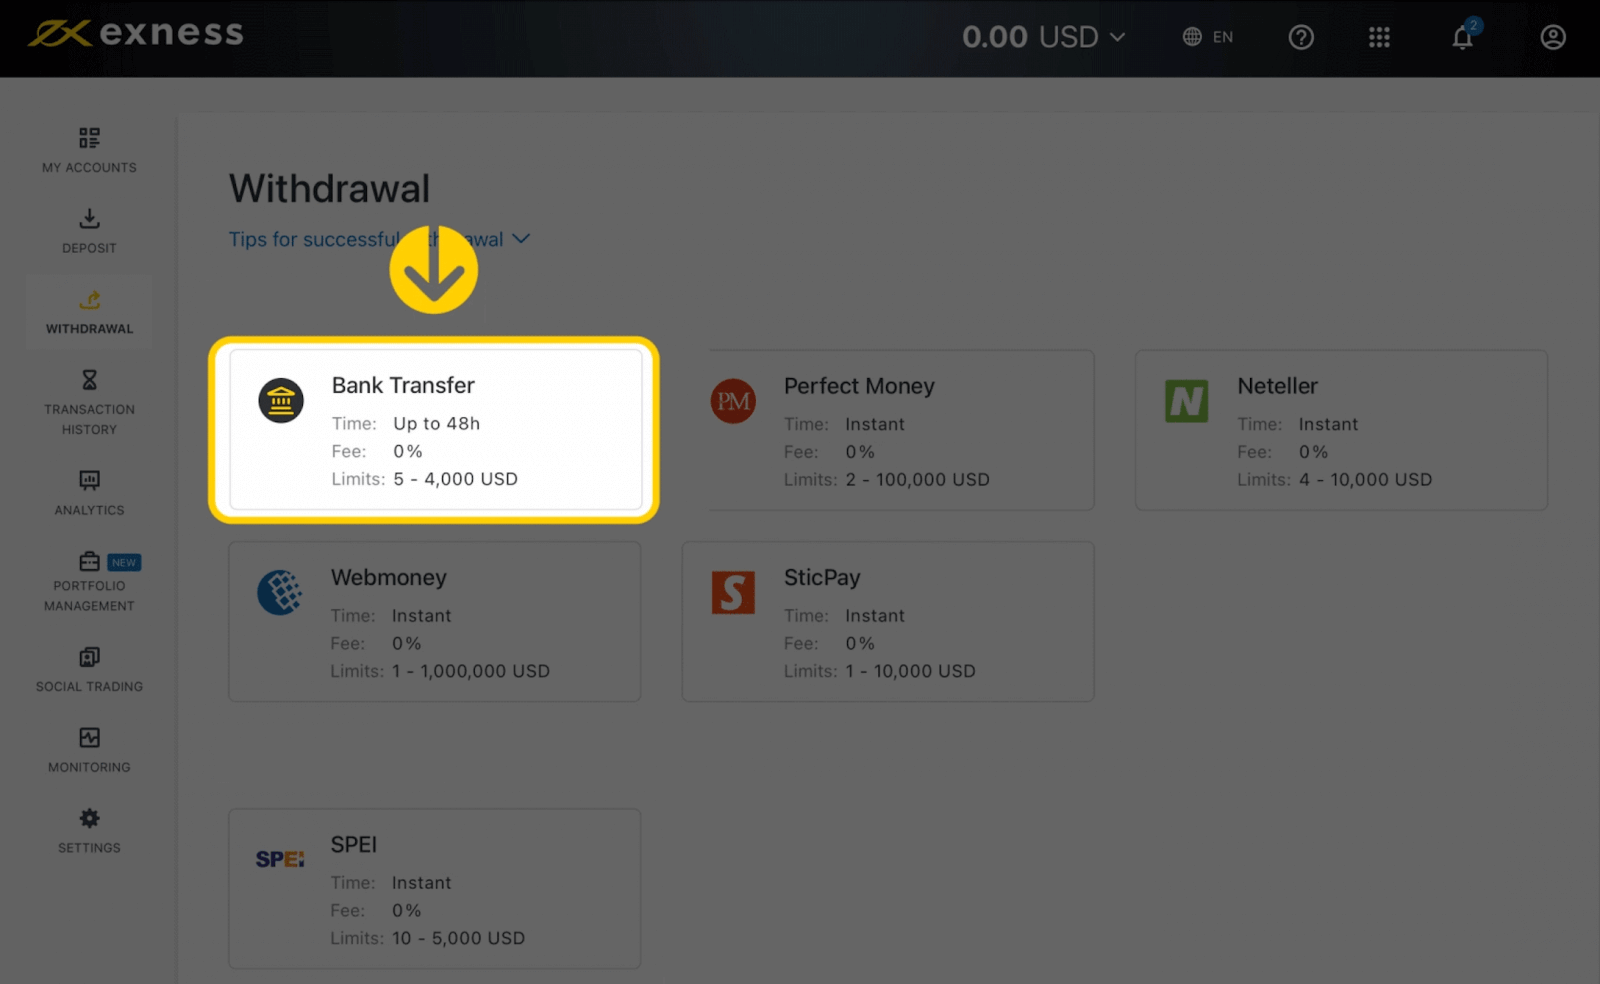
2. Select the trading account you would like to withdraw funds from and specify the withdrawal amount in your account currency. Click Continue.
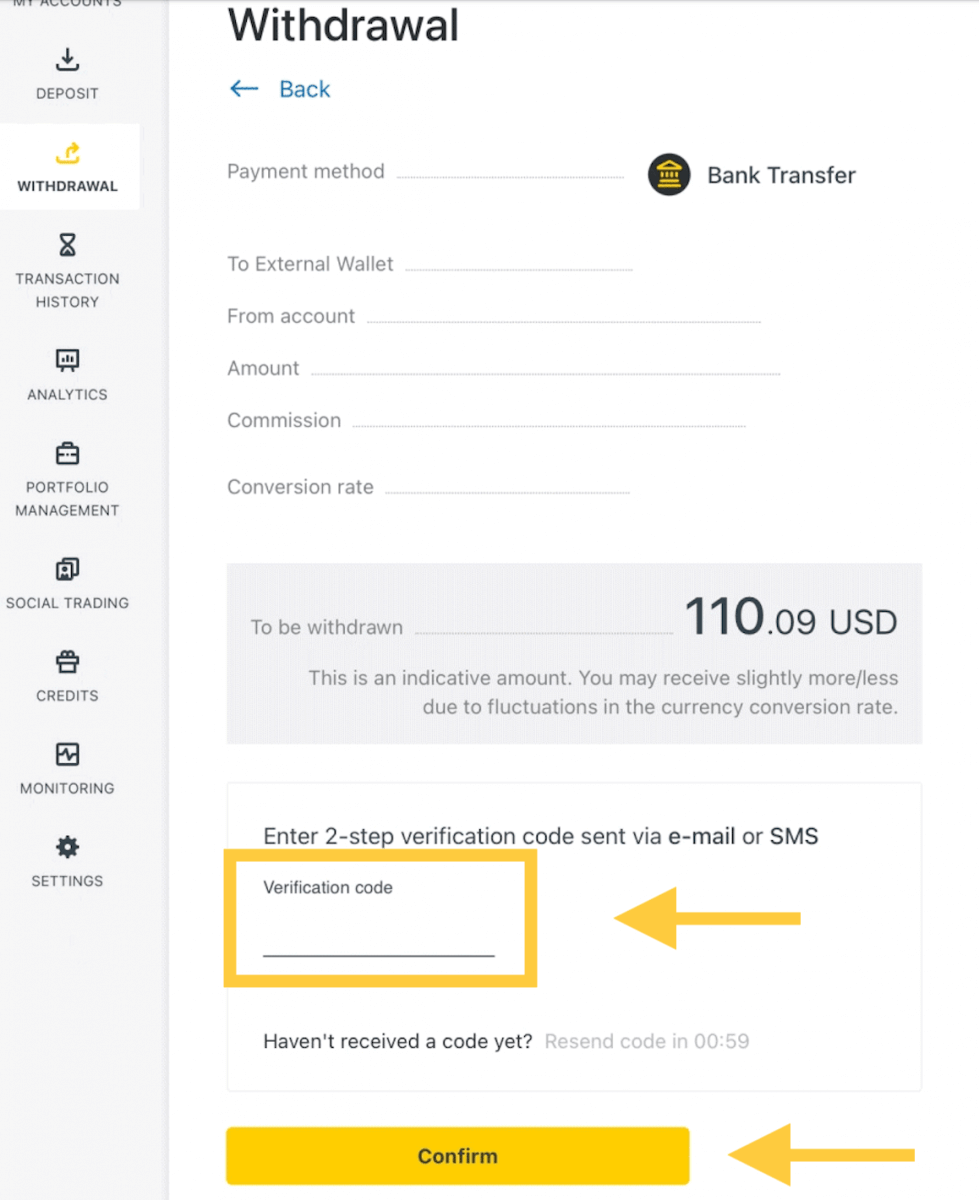
3. A summary of the transaction will be shown. Enter the verification code sent to you either by email or SMS depending on your Personal Area security type. Click Confirm.
4. On the next page you’ll need to select/provide some information, including:
a. Bank name
b. Bank account type
c. Bank account number
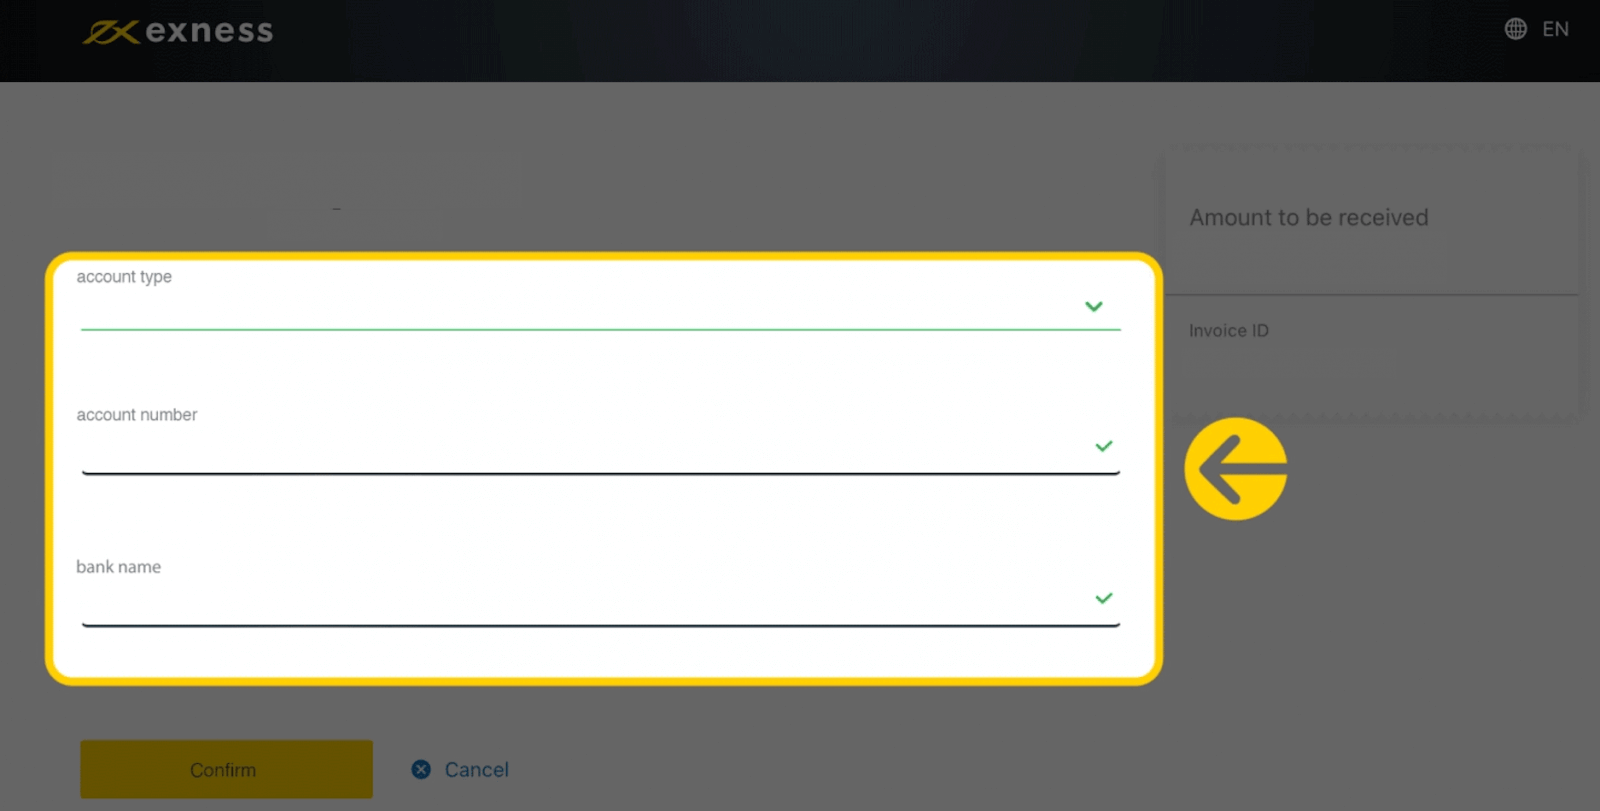
5. Click Confirm once the information is input.
6. A screen will confirm the withdrawal has been completed.
Wire Transfers
1. Select Wire Transfer (via ClearBank) in the Withdrawal section of your Personal Area.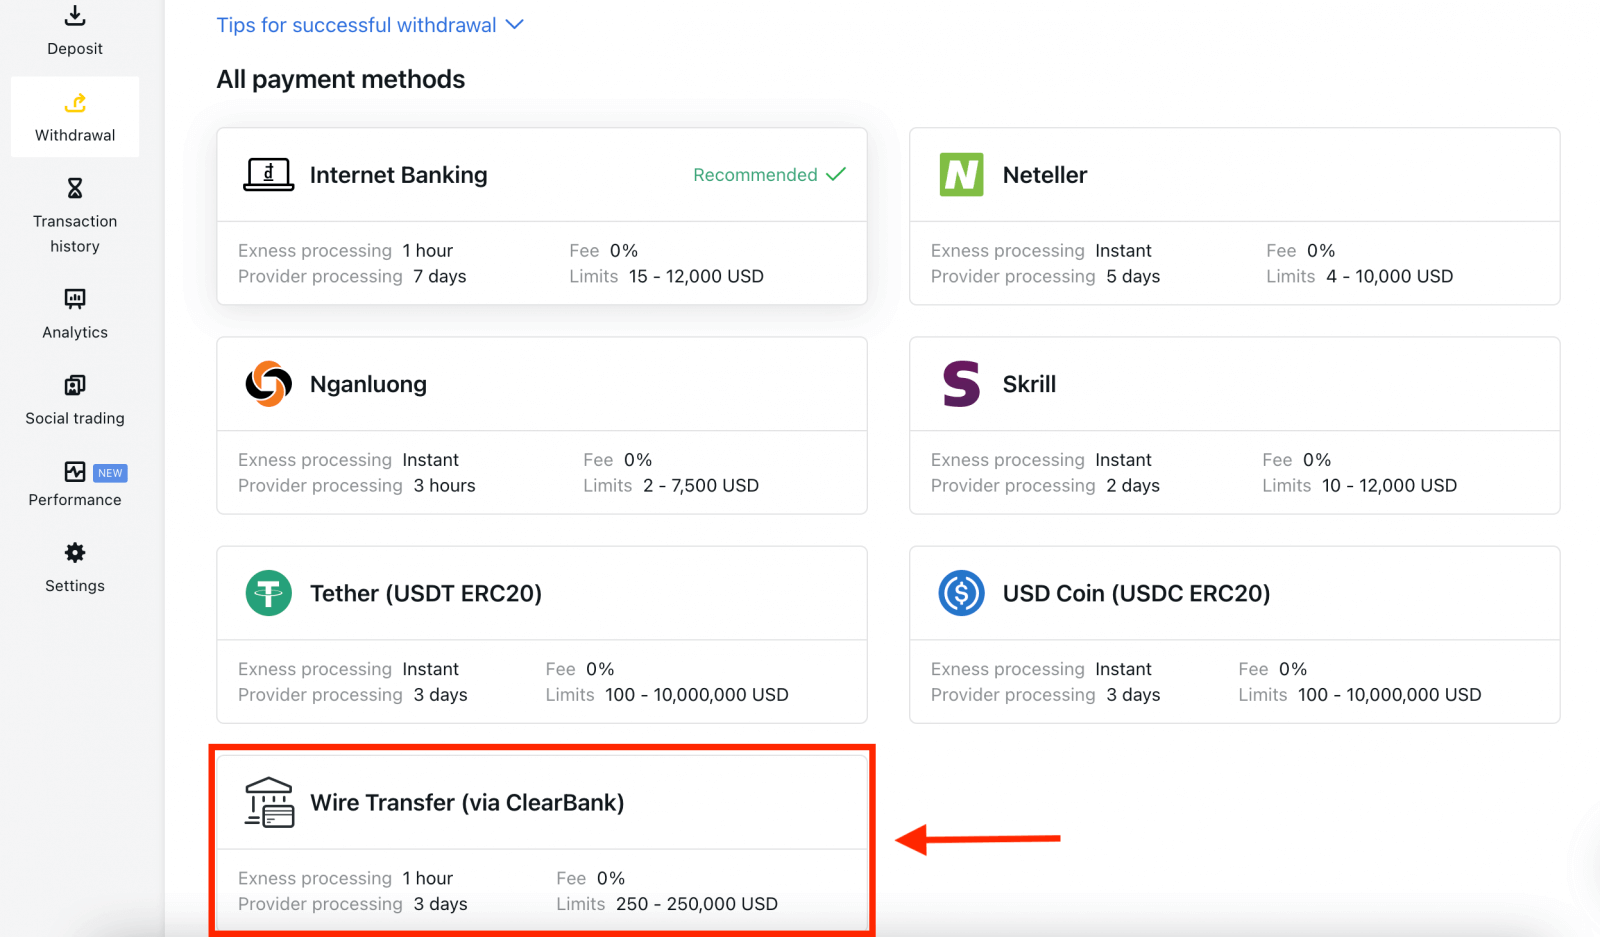
2. Choose the trading account you would like to withdraw funds from, choose your withdrawal currency and the withdrawal amount. Click Continue.
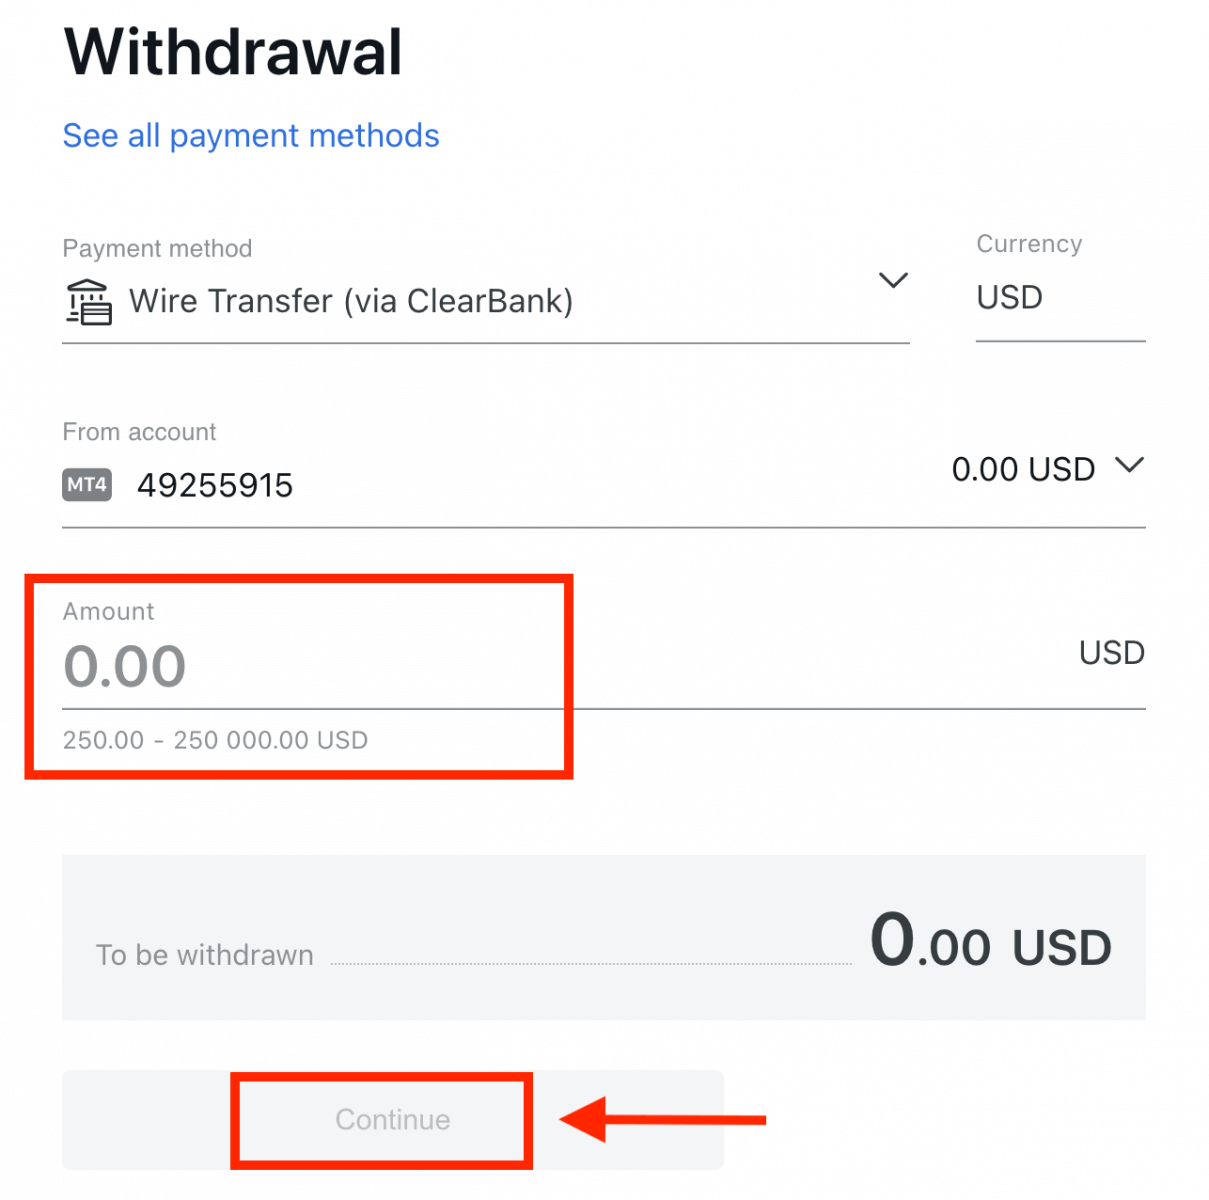
3. A summary of the transaction will be shown. Enter the verification code sent to you either by email or SMS depending on your Personal Area security type. Click Confirm.
4. Complete the presented form, including bank account details and the beneficiary’s personal details; please ensure every field is filled in, then click Confirm.
5. A final screen will confirm that withdrawal action is complete and the funds will reflect in your bank account once processed.
Frequently Asked Questions (FAQs)
Verification
Checking an account is fully verified
When you log in to your Personal Area, your verification status is displayed at the top of the Personal Area.

Your verification status is shown here.
Account verification time limit
From the time of your first deposit, you are given 30 days to complete account verification which includes verification of identity, residence and economic profile.
The number of days left for verification is shown as a notification in your Personal Area, to make it easier for you to keep track each time you log in.

How your verification time limit is shown.
About unverified Exness accounts
There are limitations placed upon any Exness account yet to complete the account verification process.
These limitations include:
- A maximum deposit of up to USD 2 000 (per Personal Area) after completion of Economic Profile, and verifying email address and/or phone number.
- A 30-day limit to complete account verification from the time of your first deposit.
- With proof of identity verified, your maximum deposit limit is USD 50 000 (per Personal Area), with the ability to trade.
- These limitations are lifted after complete account verification.
- If your account verification is not complete within 30 days, deposits, transfers, and trading functions will not be available until the Exness account is fully verified.
The 30-day time limit applies to partners from the moment of their first client registration, while withdrawal actions for both partner and client are disabled in addition to deposits and trading after the time limit.
Deposits with cryptocurrency and/or with bank cards require a fully verified Exness account, so cannot be used at all during the 30-day limited function period, or until your account is fully verified.
Verifying a second Exness account
If you decide to register a second Exness account, you may use the same documentation that was used to verify your primary Exness account. All usage rules for this second account still apply, so the account holder must also be the verified user.
How long does it take to verify an account?
You should receive feedback on your submitted Proof of Identity (POI) or Proof of Residence (POR) documents within minutes, however, it can take up to 24 hours per submission if the documents require advanced verification (a manual check).
Note: POI and POR documents can be submitted at the same time. If you wish, you can skip the POR upload and do it later.
Deposit
Deposit fees
Exness does not charge commission on deposit fees, though it is always best to double-check the conditions of your chosen Electronic Payment System (EPS) as some may have service fee charges from the EPS service provider.
Deposit processing time
Processing times can vary based on the payment method you used to deposit funds. All available methods will be shown to you in the Deposit section of your Personal Area.
For most payment systems offered by Exness, the deposit processing time is instant, understood to mean that the transaction is carried out within a few seconds without manual processing.
If the stated deposit time has been exceeded, please contact the Exness Support Team.
How can I be sure that my payments are safe?
Keeping your funds secure is very important, so safeguards are put in place to ensure this:1. Segregation of client funds: your stored funds are kept separate from company funds, so that anything that may affect the company will not affect your funds. We also make certain that funds stored by the company are always greater than the amount stored for clients.
2. Verification of transactions: withdrawals from a trading account require a one-time PIN to verify the account owner’s identity. This OTP is sent to the registered phone or email linked to the trading account (known as a security type), ensuring transactions can only be completed by the account owner.
Do I need to deposit real money when trading on a demo account?
The answer is No.When you register with Exness through the web, you will automatically be given a demo MT5 account with USD 10,000 virtual funds which you can use to practice your hand at trading. Furthermore, you can create additional demo accounts which have a preset balance of USD 500 which can be changed during account creation and even afterwards.
Registering your account on the Exness Trader app will also give you a demo account with a balance of USD 10,000 ready to use. You can add or deduct this balance using the Deposit or Withdrawal buttons respectively.
Trading
Currency Pair, Cross Pairs, Base Currency, and Quote Currency
Currency pairs can be defined as the currencies of two countries combined together for trading in the foreign exchange marketplace. Some examples of currency pairs can be EURUSD, GBPJPY, NZDCAD, etc.A currency pair that does not contain USD is known as a cross pair.
The first currency of a currency pair is called the "base currency", and the second currency is called the "quote currency".
Bid Price and Ask Price
Bid Price is the price at which a broker is willing to buy the first named (base) of a currency pair from the client. Subsequently, it is the price at which clients sell the first named (base) of a currency pair.Ask price is the price at which a broker is willing to sell the first named (base) of a currency pair to the client. Subsequently, it is the price at which clients buy the first named (base) of a currency pair.
Buy orders open at Ask Price and close at Bid Price.
Sell orders open at Bid Price and close at Ask Price.
Spread
Spread is the difference between the Bid and Ask prices of a particular trading instrument and also the main source of profit for market maker brokers. The value of spread is set in pips.Exness offers both dynamic and stable spreads on its accounts.
Lot and Contract Size
Lot is a standard unit size of a transaction. Typically, one standard lot is equal to 100 000 units of the base currency.Contract size is a fixed value, which denotes the amount of base currency in 1 lot. For most instruments in forex, it is fixed at 100 000.
Pip, Point, Pip Size, and Pip Value
A point is the value of price change in the 5th decimal, while pip is the price change in the 4th decimal.Derivatively, 1 pip = 10 points.
For example, if the price changes from 1.11115 to 1.11135, the price change is 2 pips or 20 points.
Pip size is a fixed number that denotes the position of the pip in the price of an instrument.
For example, for most currency pairs like EURUSD where the price looks like 1.11115, the pip is at the 4th decimal, thus the pip size is 0.0001.
Pip Value is how much money a person will earn or lose if the price were to move by one pip. It is calculated by the following formula:
Pip Value = Number of Lots x Contract size x Pip size.
Our trader’s calculator can be used to calculate all these values.
Balance, Equity, and Free Margin
Balance is the total financial result of all completed transactions and depositing/withdrawal operations on an account. It is either the amount of funds you have before you open any orders or after you close all open orders.The balance of an account does not change while orders are open.
Once you open an order, your balance combined with the profit/loss of the order makes for the Equity.
Equity = Balance +/- Profit/Loss
As you already know, once an order is opened, a part of the funds is held as Margin. The remaining funds are known as Free Margin.
Equity = Margin + Free Margin
Leverage and Margin
Leverage is the ratio of equity to loan capital. It has a direct impact on the margin held for the instrument traded on. Exness offers up to 1:Unlimited leverage on most trading instruments on both MT4 and MT5 accounts.Margin is the amount of funds in account currency that is withheld by a broker for keeping an order open.
The higher the leverage, the lesser the margin.\
Profit and Loss
Profit or Loss is calculated as the difference between the closing and opening prices of an order.Profit/Loss = Difference between closing and opening prices (calculated in pips) x Pip Value
Buy orders make a profit when the price moves up while Sell orders make a profit when the price moves down.
Buy orders make a loss when the price moves down while Sell orders make a loss when the price moves up.
Margin Level, Margin Call and Stop Out
Margin level is the ratio of equity to margin denoted in %.Margin level = (Equity / Margin) x 100%
Margin call is a notification sent in the trading terminal denoting that it is necessary to deposit or close a few positions to avoid Stop Out. This notification is sent once Margin Level hits the Margin Call level set for that particular account by the broker.
Stop out is the automatic closure of positions when the Margin Level hits the Stop Out level set for the account by the broker.
There are multiple ways to access your trading history. Let us take a look at them:
How to check your trading history
1. From your Personal Area (PA): You can find your entire trading history in your Personal Area. To access this, follow these steps:
b. Go to the Monitoring tab.
c. Select the account of your choice and click All transactions to view your trading history.
2. From your trading terminal:
b. If using MetaTrader mobile applications, you can check the history of the trades performed on the mobile device by clicking on the Journal tab.
3. From your monthly/daily statements: Exness sends account statements to your mail both daily and monthly (unless unsubscribed). These statements contain the trading history of your accounts.
4. By contacting Support: You can contact our Support Team via email or chat, with your account number and secret word to request account history statements of your real accounts.
Withdrawal
Withdrawal fees
No fees are charged when withdrawing, but some payment systems may impose a transaction fee. It’s best to be aware of any fees for your payment system before deciding to use it for deposits.
Withdrawal processing time
The vast majority of withdrawals by Electronic Payment Systems (EPS) are performed instantly, understood to mean that the transaction is reviewed within a few seconds (up to a maximum of 24 hours) without manual processing. Processing times can vary based on the method used, with the average processing typically the length of time to expect, but it is possible to take the maximum length shown below this (Up to x hours/days, for example).If the stated withdrawal time is exceeded, please contact the Exness Support Team so we can help you troubleshoot.
Payment System Priority
To ensure your transactions reflect in a timely manner, do note the payment system priority put in place to provide efficient service and comply with financial regulations. This means that withdrawals through the listed payment methods should be done in this priority:
- Bank card refund
- Bitcoin refund
- Profit withdrawals, adhering to the deposit and withdrawal ratios explained previously.
Grace period and withdrawals
Within the grace period, there is no limitation on how much funds can be withdrawn or transferred. However withdrawals cannot be made using these payment methods:- Bank Cards
- Crypto Wallets
- Perfect Money
What should I do if the payment system used for the deposit is not available during the withdrawal?
If the payment system used for deposit is not available during withdrawal, please contact our Support Team via chat, email, or call, for an alternative. We will be happy to help you out.Note that while this is not an ideal situation, at times we may need to switch off certain payment systems due to maintenance issues on the provider’s end. We regret any inconvenience caused and are always ready to support you.
Why do I get an “insufficient funds” error when I withdraw my money?
There may not be enough available funds in the trading account to complete the withdrawal request.Please confirm the following:
- There are no open positions on the trading account.
- The trading account selected for the withdrawal is the correct one.
- There are enough funds for withdrawal in the chosen trading account.
- The conversion rate of the currency selected is causing an insufficient amount of funds to be requested.
For further assistance
If you have confirmed these and still get an “insufficient funds” error, please contact our Exness Support Team with these details to be assisted:
- The trading account number.
- The name of the payment system you are using.
- A screenshot or photo of the error message you are receiving (if any).

